Are you looking for ways to increase your WordPress website’s maximum file upload size?
The maximum file upload size on WordPress websites is determined by your hosting server’s PHP configuration, which can range from just a few megabytes to several hundred.
However, if you frequently upload large images, videos, themes, or plugins, you might find this limit restrictive.
While WordPress doesn’t set these limits, unfortunately, it doesn’t offer a built-in way to change them.
To increase the limit, you need to use a third-party plugin or manually edit server configuration files such as php.ini or .htaccess.
In this guide, we’ll walk you through the different methods you can use to check your current file upload size and safely increase it to fit your needs.
Let’s get started.
Table of Contents
What is the Max File Upload Size in WordPress?
When uploading files to WordPress, you may encounter a limit on the maximum file size due to native restrictions applied to various file types, including images (JPEG, PNG, GIF), documents (PDF, DOCX), videos (MP4, MOV), and even themes and plugins.
These limits exist for two key reasons: security and efficiency. If users were allowed to upload large files without restrictions, it could slow down the server, causing performance issues or even crashing the site. From a security standpoint, restricting file upload sizes helps prevent attackers from attempting denial-of-service (DoS) attacks or uploading malicious files that are usually large and could compromise the website.
So, the upload size limit is in place to prevent excessive resource consumption and ensure that the hosting server remains stable and continues to operate efficiently.
Depending on your hosting provider, WordPress’ maximum upload size can range from 2 MB to 500 MB. For example, Kinsta sets the limit at 128 MB, while WP Engine allows 50 MB for standard sites and just 1 MB for multisite networks.
That said, the upload size limitation can be overridden by server-level settings. Later in the article, we will show you how to increase WordPress’ maximum file upload size limits by overriding your hosting server settings.
Read more: How to Fix the WordPress Updating Failed & Publishing Failed Error
Why Increase Max File Upload Size? (+ Pros & Cons)
Several reasons prompt admins like yourself to increase your WordPress website’s maximum file upload size.
If you frequently upload high-resolution images, videos, or other large media files, you might quickly run into the default limit set by your hosting provider. Similarly, installing larger themes or plugins directly through the WordPress admin dashboard may not be possible without increasing the upload size.
If you sell digital products such as eBooks, stock photos, online courses, or software on eCommerce sites, these files can often exceed the standard upload limit. Even for physical product retailers, high-quality images and detailed product descriptions improve user experience and conversion rates, making an increased upload size beneficial.
Additionally, if you run a content-heavy website that requires frequent updates—such as blogs, news sites, or membership portals—having a larger file upload limit allows you to refresh content more easily and engage your audience effectively.
Pros of Increasing Maximum Upload Size
- High-quality media: Upload high-resolution images, videos, and other media files without resizing or compressing them, enhancing the overall user experience.
- Expanded functionalities: Accommodate larger themes, plugins, and custom elements, boosting your site’s capabilities and features.
- Improved engagement: Add more detailed product images, background videos, and downloadable content to increase engagement and conversions.
Cons of Increasing Maximum Upload Size
- Increased server load & costs: Hosting large media files can consume more server space and bandwidth, potentially slowing down your website and increasing storage costs.
- Backup & recovery challenges: Larger files can make backups and recovery processes more time-consuming and complicated, potentially leading to data loss or corruption.
- Page load times: Huge files can slow page load times, negatively impacting user experience and search engine rankings.
- Security risks: Allowing large file uploads makes your site more vulnerable to attacks, such as denial-of-service (DoS) attempts, malicious file injections, and virus or malware uploads.
IMPORTANT: Given these risks, consider optimizing media files, using external storage solutions, or upgrading your hosting plan to accommodate the demands instead of increasing the file upload limit. But if you still want to increase your WordPress website’s maximum file upload size, proceed to the following sections.
How to Check Maximum File Upload Size on Your Website
Before increasing your WordPress site’s maximum file upload size, you should check the current limit set by your hosting provider. There are multiple ways to do this!
Check via Media Library
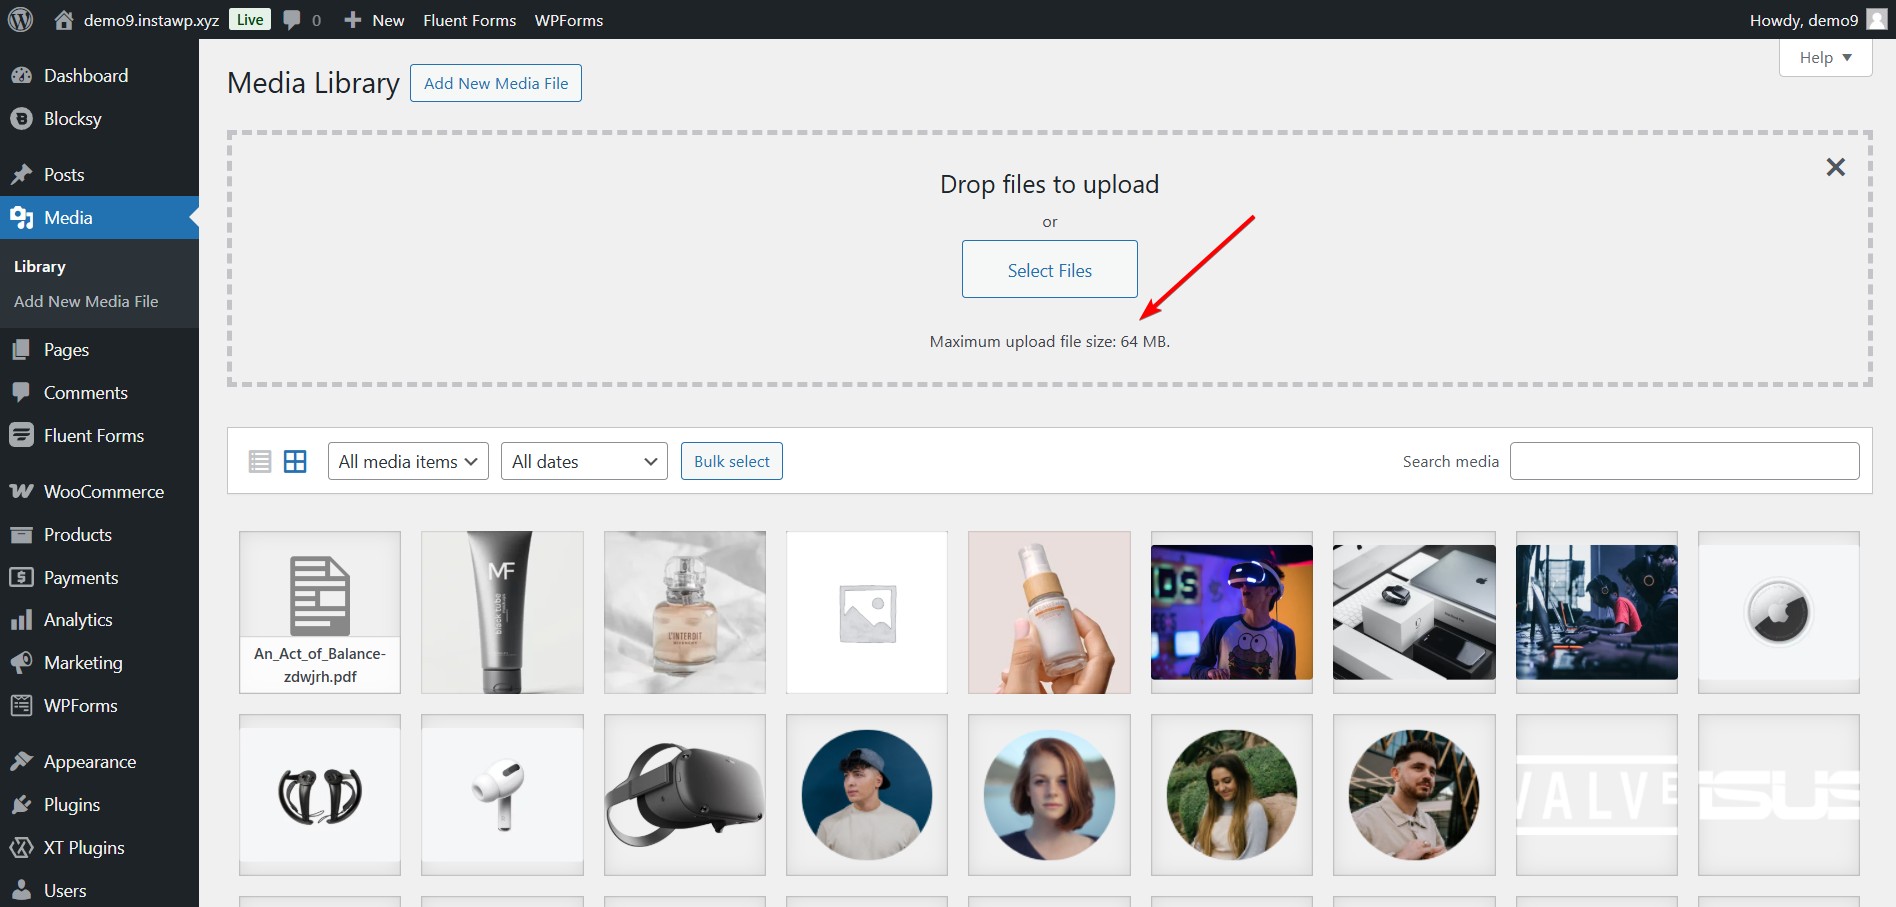
Go to your WordPress dashboard, navigate Media → Library, and click the Add New Media File button. This will open the media uploader, where you’ll see the maximum file upload size displayed below the “Select Files” button.
Alternatively, you can go directly to Media → Add New, where the maximum upload file size will also be displayed at the bottom of the page. Your web hosting provider determines this limit, so different hosting services may display different values.
Check via Site Health Info
Go to Tools → Site Health → Info and expand the Media Handling section. Here, you’ll find the “Max size of an uploaded file” value, representing your site’s current upload limit.

You can also check under the Server section, where you’ll find the Upload max file size setting.
Check via Hosting Provider Support
If you are unsure about your maximum upload size or need confirmation, check your hosting provider’s documentation or contact their support team.
How to Increase Maximum File Upload Size
Let’s say your current file upload limit is 2MB. If you need to upload larger files, such as high-resolution images, videos, or backups, you may need to increase this limit to 50MB or more. Here are the steps you need to take:
Take a Backup Before Proceeding (MUST DO)
In the following tutorial, you will be modifying your website’s core files like php.ini, .htaccess, or wp-config.php. One misstep can cause unexpected issues on your site.
So, before making any changes to your website’s files, taking a complete backup is crucial. Having a backup ensures you can restore your site if anything goes wrong. You can use a plugin like WPVivid, UpdraftPlus or BackupBuddy, or take a manual backup via your hosting control panel.
Once you have the backup, proceed with the steps below.
Read another great guide about WooCommerce Page Speed Optimization.
1. Contact Your Hosting Provider
One of the easiest and safest ways to increase the maximum file upload size in WordPress is to reach out to your hosting provider. Most hosting companies can quickly adjust this setting for you.
Log in to your hosting provider’s website (e.g., Bluehost, SiteGround, or Hostinger). Locate the Live Chat or Support option and request an increase in the maximum file upload size.
This method is the simplest for beginners, as it avoids manual code changes.
2. Use a WordPress Plugin
If you’re uncomfortable editing server files, you can use a plugin to increase the upload limit.
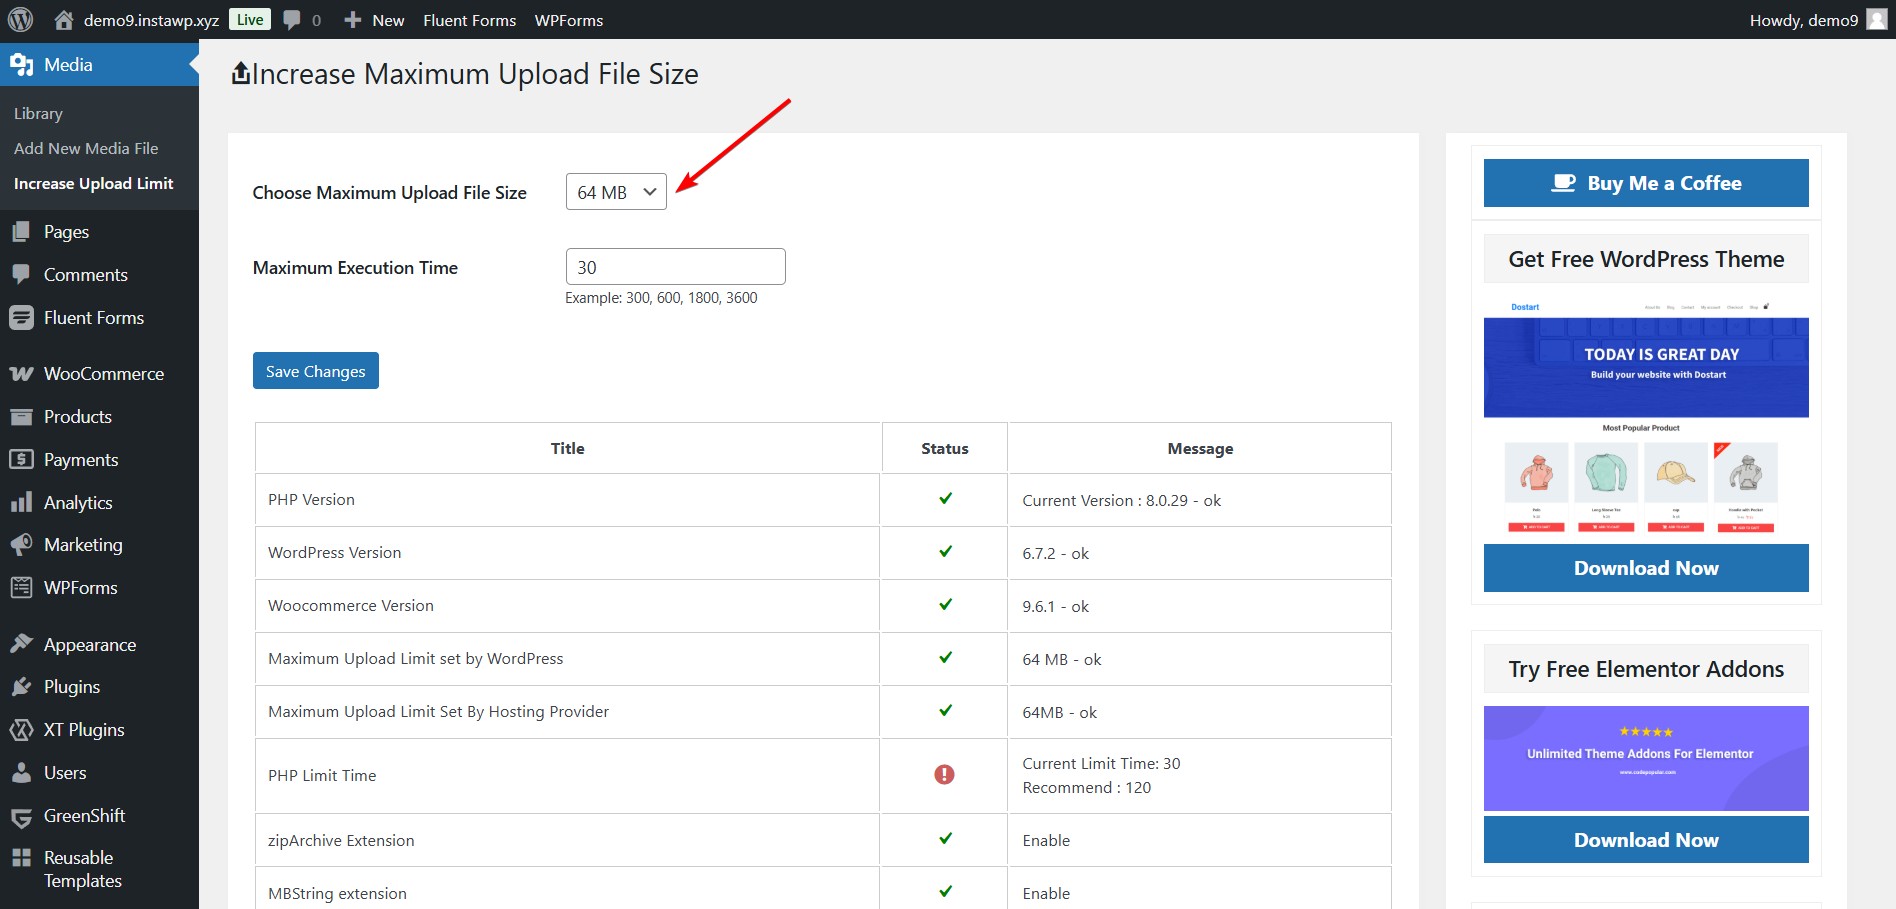
Install and activate the “MaxUploader – Increase Media Upload File Size” plugin. Then, navigate to Media → Increase Upload Limit, select a new file size from the dropdown, and click Save Changes.
You can also use alternative plugins like “Big File Uploads” and “WP Upload Size” to achieve the same result.
3. Create or Edit the php.ini File
Another way to increase the upload size is by modifying the php.ini file, which controls your server’s PHP settings.
Editing Using Hosting cPanel:
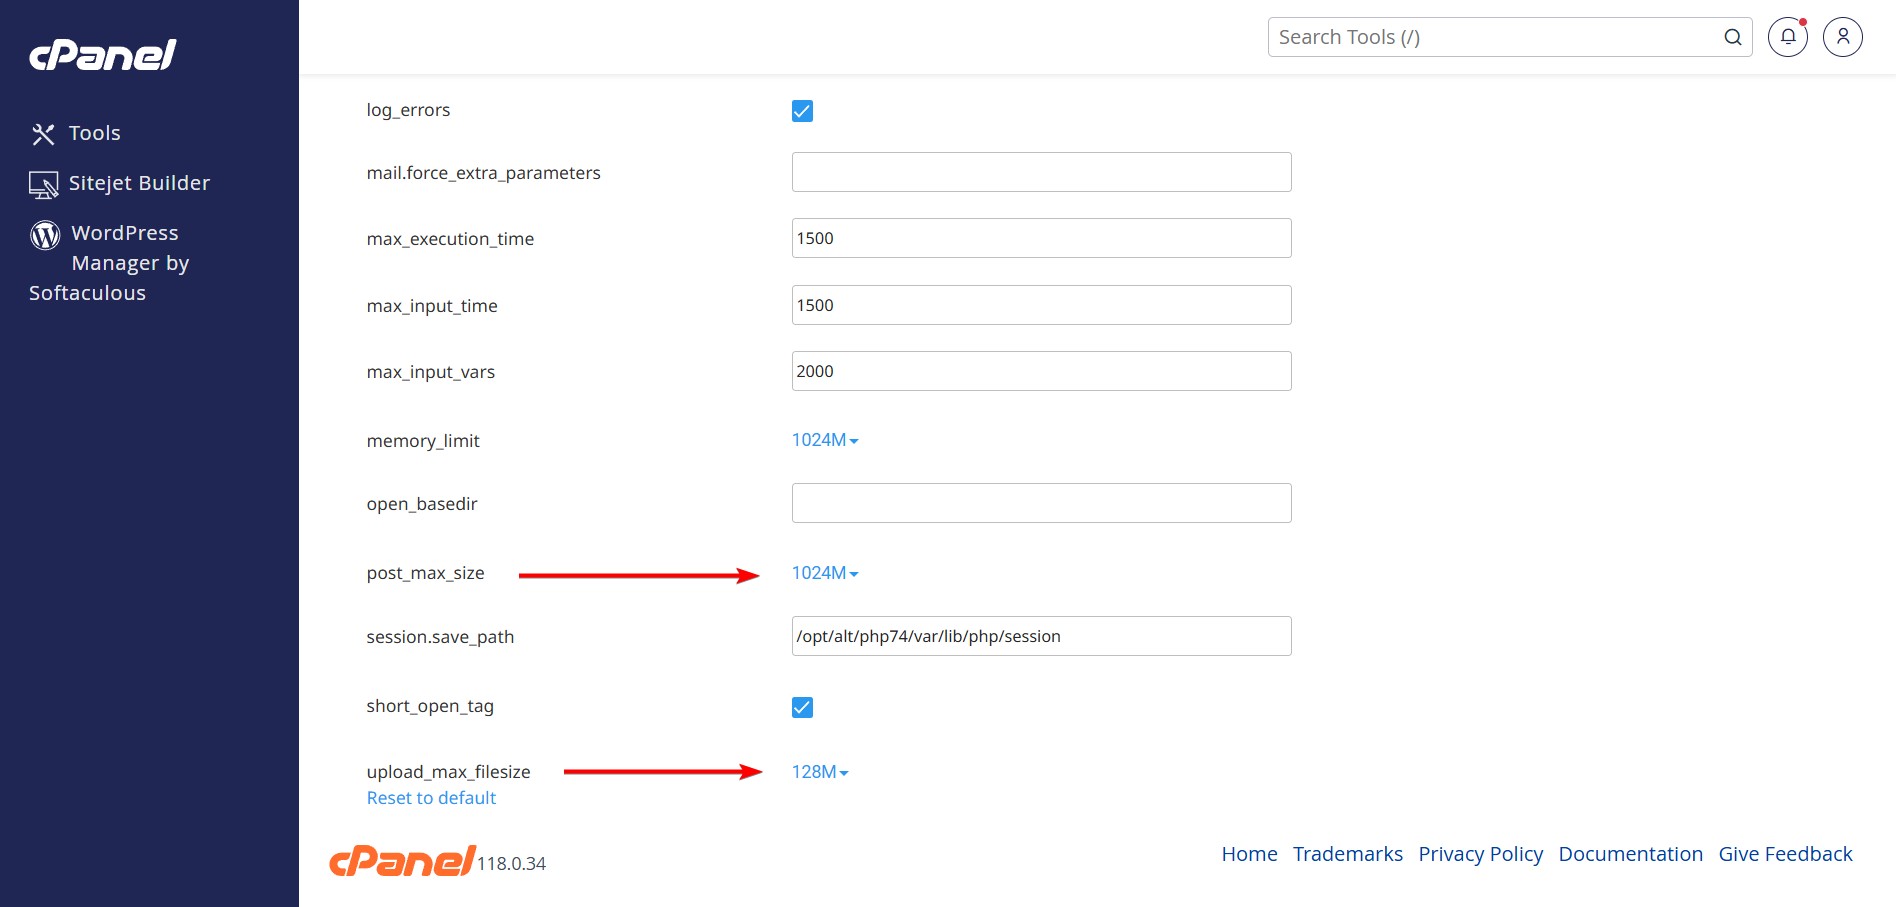
Log in to your hosting control panel (cPanel), navigate to MultiPHP INI Editor under the Software section, find “upload_max_filesize” and “post_max_size” and enter the desired values (e.g., 256M). Click Apply to save the changes.
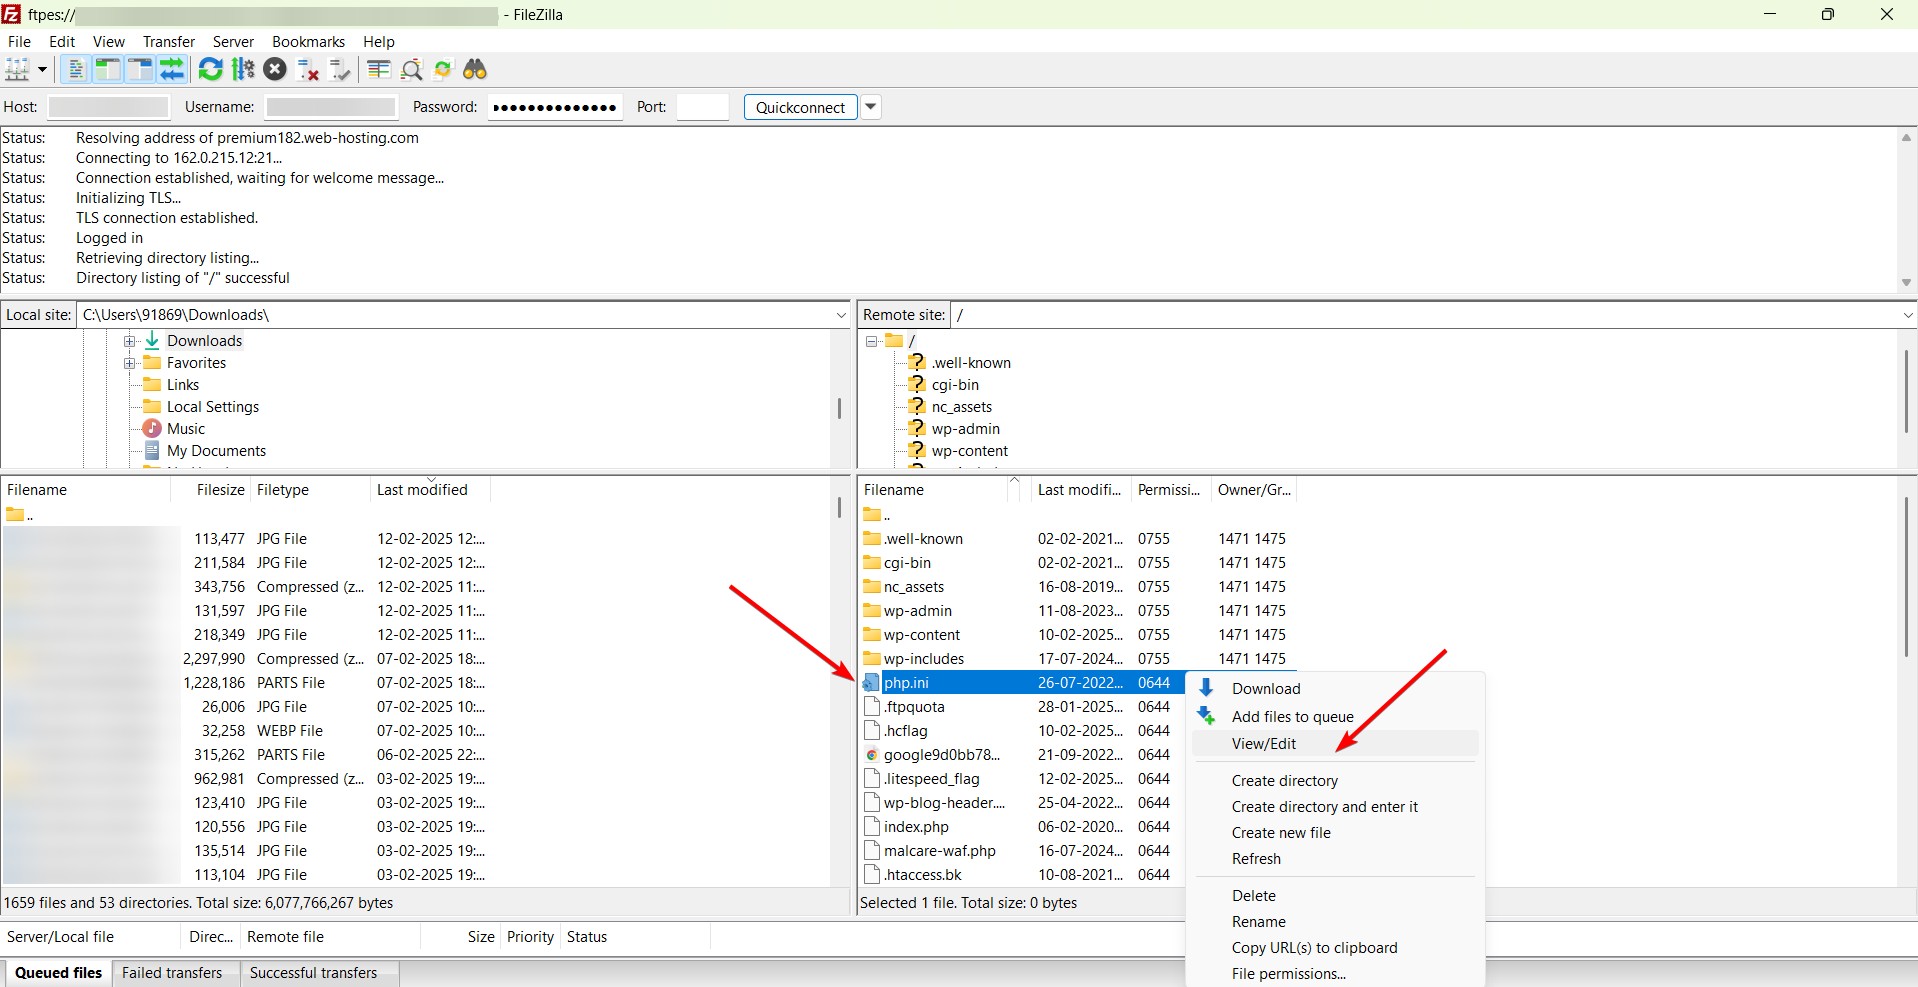
Manually Editing:
If your host does not provide a cPanel editor, you can manually edit the php.ini file. Connect to your website via an FTP client or File Manager in your hosting control panel. Locate or create a php.ini file in your site’s root directory.
Add or modify the following lines:
upload_max_filesize = 256M
post_max_size = 256M
max_execution_time = 300
memory_limit = 256M
Save the file, and that’s it.
4. Modify the .htaccess File
The .htaccess file controls your server configurations, and adding a few lines of code can increase the upload limit. This method only works on Apache servers, not on Nginx.

Connect to your website using an FTP client or File Manager. Locate the .htaccess file in the root directory, open it, and add the following lines at the end:
php_value upload_max_filesize 256M
php_value post_max_size 256M
php_value max_execution_time 300
php_value max_input_time 300
php_value memory_limit 256M
Save the file and check if the changes take effect.
Note: We are not covering Nginx because modifying upload limits on Nginx requires server-level configuration changes, which can be complex and vary depending on the hosting provider.
If you’re using Nginx, it’s best to follow one of the other methods listed in this article, such as contacting your hosting provider or using a plugin.
Increase Maximum Upload File Size in a Multisite (Optional)
If you’re running a WordPress Multisite network, you can modify the maximum upload file size for your network. Here’s how:
Head to your Network Admin dashboard and navigate to Settings → Network Settings. Scroll down to the Upload Settings section, locate the Max upload file size field, and enter a higher value. Then, click Save Changes.

Note: You cannot exceed the server-level max upload size limit from here. If the limit you set exceeds the server’s maximum upload size, the server will ignore it. You may need to use one of the other methods above to modify your server settings.
WordPress Multisite default sets the max upload file size to 1500 KB (~1.5 MB). You can increase this limit if it does not exceed your server’s limit.
Conclusion
While WordPress sets default limits to maintain security and server performance, you can increase these limits when necessary by contacting your hosting provider, modifying server files, or using a plugin.
However, before making changes, it’s essential to weigh the pros and cons, considering factors like server load, page speed, and security risks. If increasing the upload size is unavoidable, optimizing files and using external storage solutions (such as Amazon S3, Google Drive, or a content delivery network) can help manage large files without overloading your server.
That’s it for this one, folks. If you have any questions about how to increase the maximum file upload size in WordPress, leave us a comment below.