WordPress is pretty awesome as it is, but when combined with some little-known secrets, it turns into a powerhouse for your website. You’ll be able to save time, navigate your site faster, and streamline everyday tasks. To start off right, here’s a list of WordPress shortcuts and tricks.
Key Takeaways:
- Keyboard shortcuts save time: Use built-in WordPress editor shortcuts to duplicate blocks, navigate sections, and switch views quickly without using your mouse.
- Markdown speeds up formatting: Typing syntax like
##or*directly in the Gutenberg editor instantly formats headings and lists without reaching for the toolbar. - Screen Options offer hidden control: This overlooked dashboard feature lets you show/hide elements, change pagination, and customize your admin layout with ease.
- Fix lockouts without plugins: Regain access to your site by editing
functions.phpor activating fallback themes through specific URLs—even when WP Admin is broken. - Native tools reduce plugin bloat: You can add custom CSS, change your login URL, and reuse layouts—all without installing extra plugins.
Table of Contents
WordPress Keyboard Shortcuts
Most of you already know the Cmd or Ctrl + A/Z/S/P… shortcuts that are used to select, save, undo/redo, etc.
But the WordPress editor also features a selection of other WP shortcut, some of which cover general functions, while others control block actions.
For example, you can toggle Fullscreen mode by pressing Cmd + Shift + Option + F (Ctrl + Shift + Alt + F) – useful if you want to quickly jump to your WP dashboard. Pressing Cmd + Shift + Option + M (Ctrl + Shift + Alt + M) switches between the visual and code editor, letting you take a quick look or grab a part of your layout and paste it elsewhere. Real case: you’re a blogger who frequently needs to tweak HTML within posts. Instead of manually clicking to switch between the visual and code editor, use this shortcut to toggle back and forth instantly. This saves valuable time when working with complex formatting or custom HTML.
Ctrl + Option + O on a Mac or Alt + Shift + O on Windows will open the Block List View and Cmd + Option + Y (Ctrl + Alt + Y) will insert a new block after the selected one. If you want to insert a new block after the selected block, you can use Cmd + Option + T (Ctrl + Alt + T).
Cmd + Shift + D or Ctrl + Shift + D will duplicate your selected block so you can quickly try variations or add new content. Real case: you’re building a page layout with reusable content sections (e.g., testimonials or pricing tables). Instead of recreating each section manually, you can quickly duplicate the selected block and adjust the content, cutting down on repetitive actions.
Ctrl + Option + N navigates to the next part of the editor, while Ctrl + Option + P will take you to the previous part (Alt + Shift + N or Alt + Shift + P for Windows users). Real case: when working on a long post or page with multiple blocks, this shortcut WordPress allows you to navigate through each block without needing to scroll and click. It’s especially helpful for designers who need to review content section by section.
The Settings bar can be toggled on or off with Cmd + Shift + , on a Mac while Ctrl + Shift + , does the same in Windows.
All these shortcuts are useful to know but you don’t have to memorise them, because it turns out there’s also a shortcut to all shortcuts? While in the WP editor, if you press Option + Control + H on a Mac or Alt + Shift + H in Windows you can bring up a pop-up containing all the available keyboard shortcuts. Pretty neat!
And if your WordPress website gets a lot of comments, you can even speed up the moderation process with the help of some handy keyboard shortcuts. You first need to enable them in the Users -> Profile section of your dashboard.
Use A to approve, U to unapprove, D to delete, R to reply, Q for quick edit, J for next comment, K for previous comment and Z to undo the deletion of a comment.
Using Markdown in WordPress
Markdown is a plain-text markup language created by John Gruber and Aaron Swartz and intended as a “true structured text format.” Today, Markdown is widely used on many platforms thanks to its visual appeal and ease of use. It helps bloggers (and not only) with streamlining the creation process — simple additions to the syntax can create block elements and format text into anything you can think of.
And you can definitely use Markdown in WordPress. The next time you’re using the Gutenberg Editor, type a few # signs before your text to turn it into a heading! That’s because anything you write using Markdown gets parsed and outputted as HTML based on the syntax you use.
Real case: you’re drafting a blog post or documentation and need to insert multiple headings throughout. Instead of clicking the heading button each time, simply type ## before your text to create an H2 heading instantly. This is particularly useful for writers or bloggers who want to maintain their writing flow without interruptions.
The official documentation is a great place to become familiar with this language.
Screen Options
There is a pretty discrete menu in the WordPress dashboard that can prove helpful and it has certainly been the location of Evrika! moments for many WP beginners. We’re referring to the Screen Options menu and it can be accessed in the top right corner of several sections of your WordPress dashboard.
If you click on this menu, you’ll be able to configure the view of that particular admin area page. With the help of checkboxes, you can add or hide new sections and elements to your menus, adjust pagination or show advanced properties. Whenever you’re looking to add something custom to your menus, pull down the Screen Options menu, you might just find what you are looking for!
Real case: if you manage a high-traffic blog, you may receive hundreds of comments each day. You can use the Screen Options to increase the number of comments displayed on the dashboard, reducing the need to click through multiple pages and streamlining the moderation process.
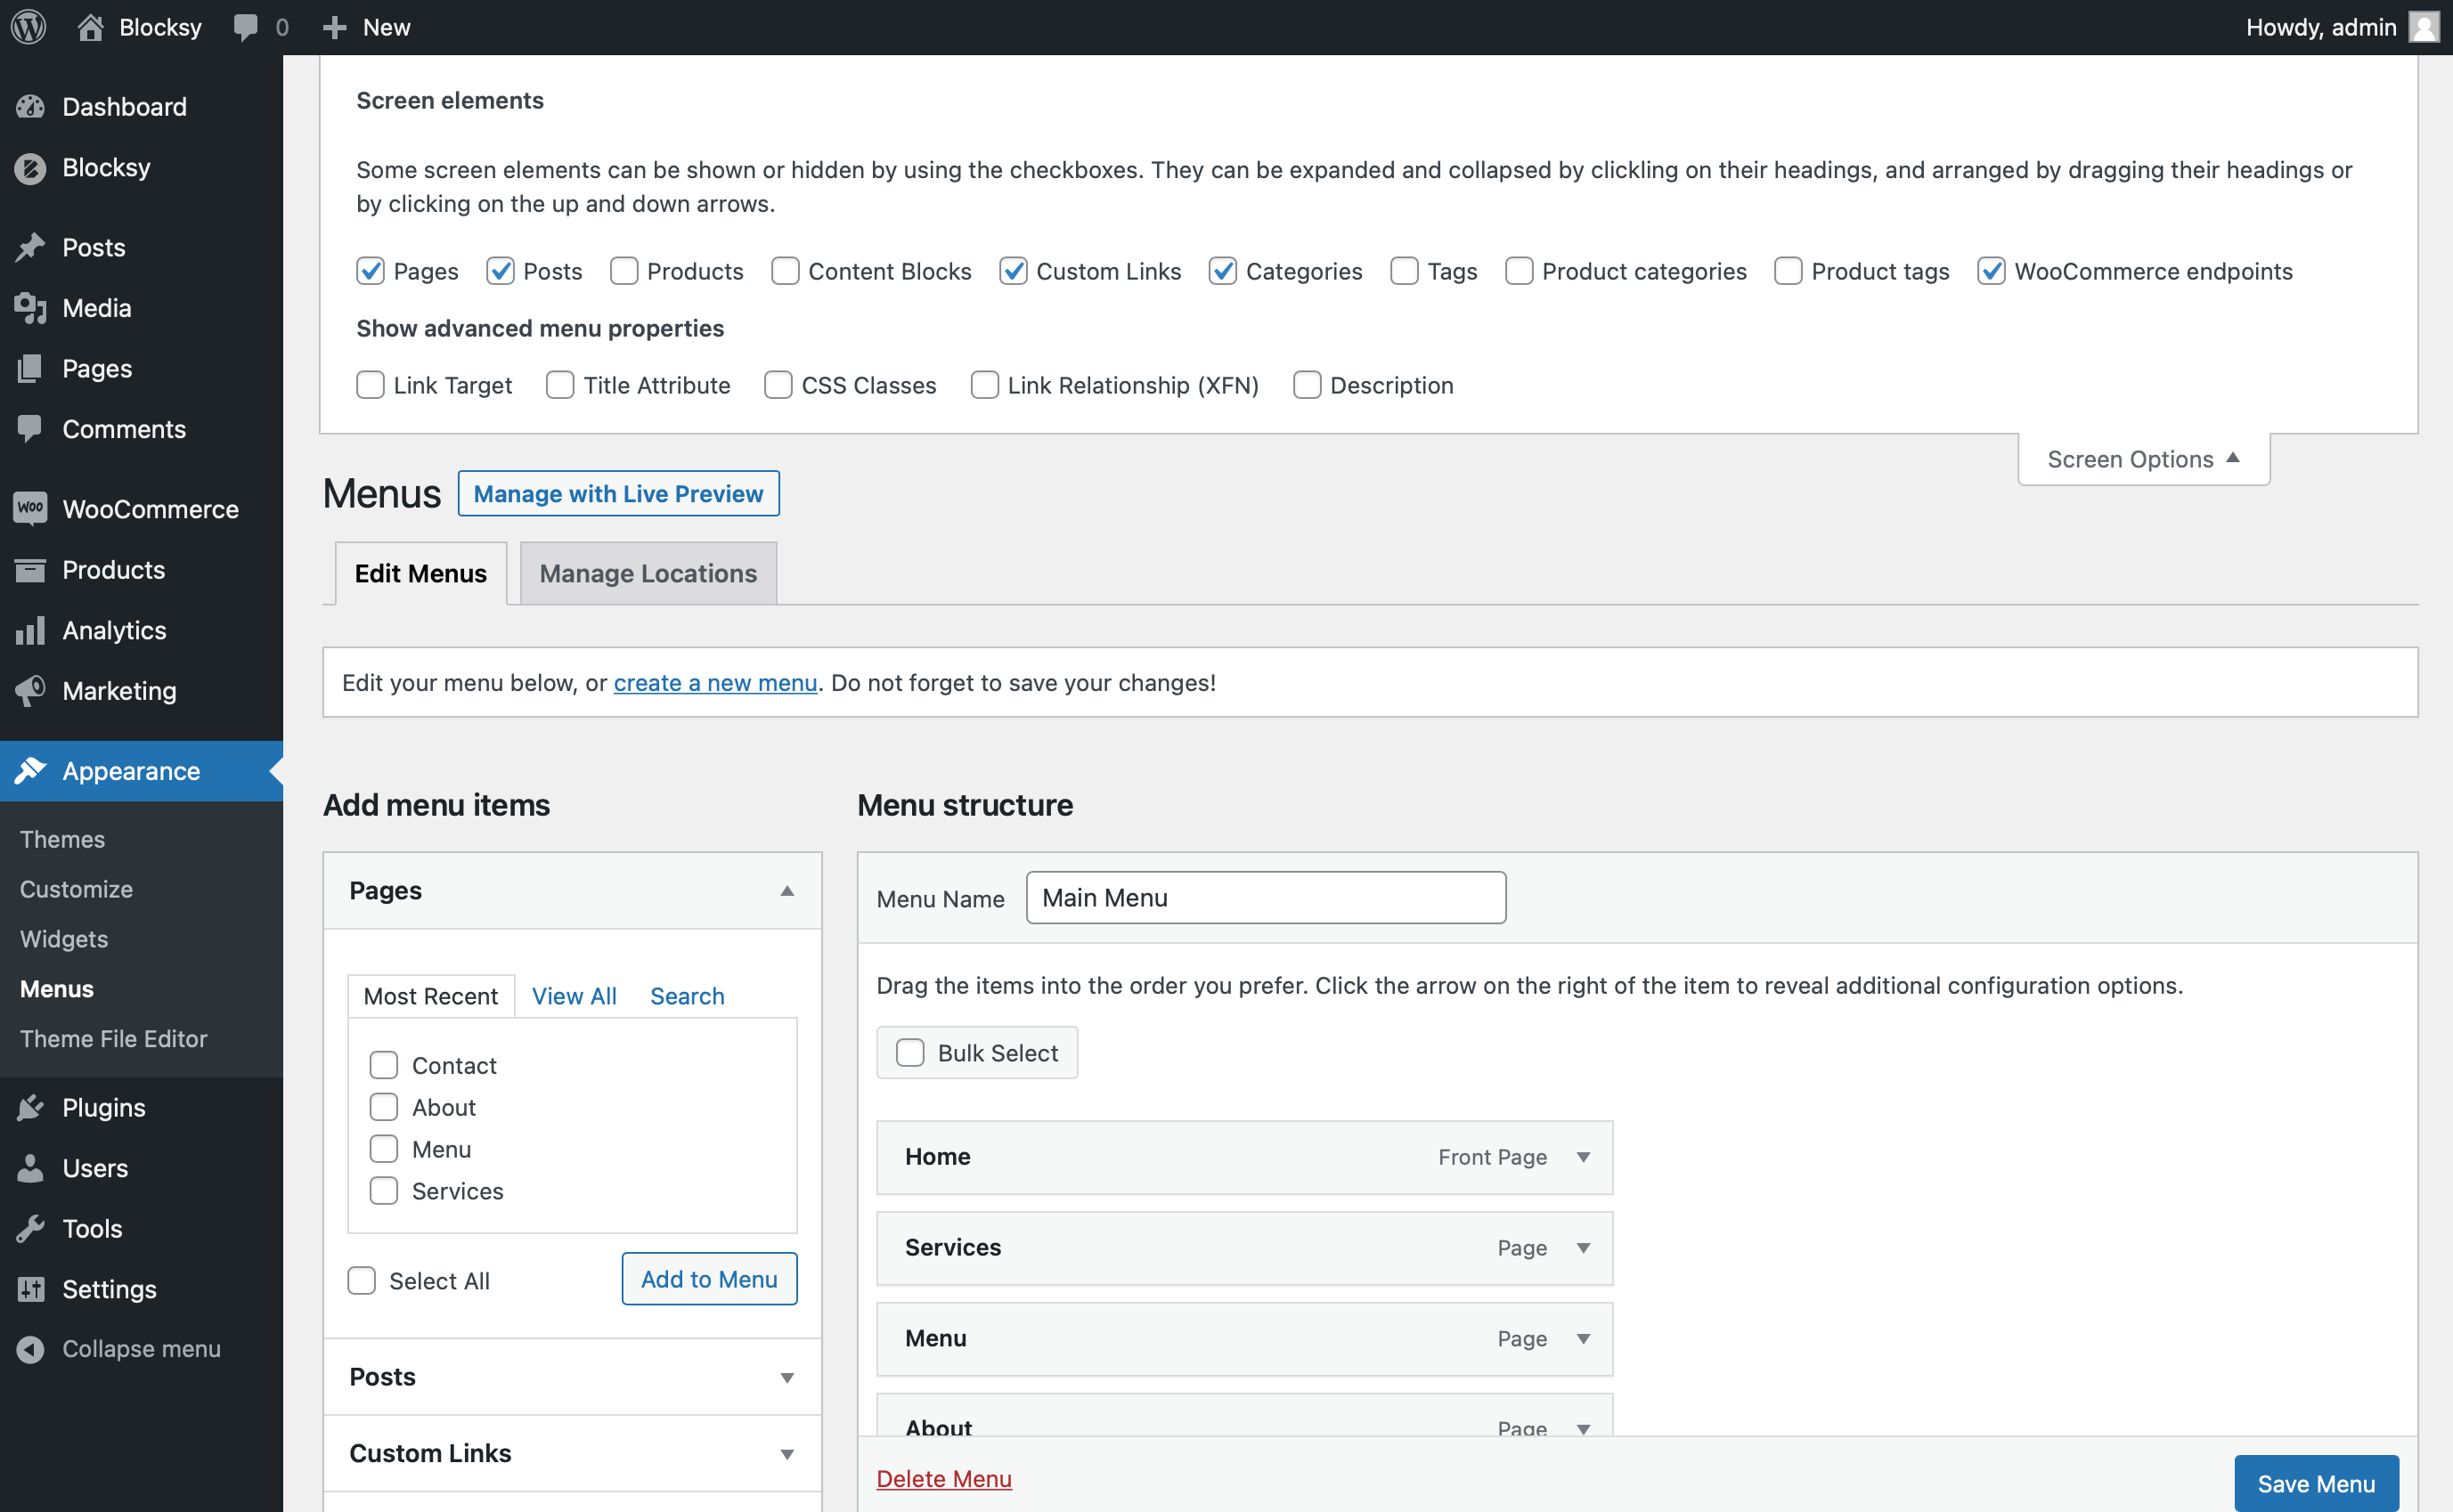
An important note here is that Screen Options are saved in cookies & database and are stored per user. So this basically means that your own specific layout will be accessible from different devices, which is pretty cool if you ask us!
Update WordPress URLs While Locked Out of WP-Admin
Maybe you were trying to move your website and something went terribly wrong or perhaps you just messed up some configuration when updating your WP URLs. Regardless of the cause, the effect is that you cannot access your admin area or just get sent back to your old website.
The good news is this: if you have FTP access to your website, there’s a secret way back in. 🕵️
If you can access your functions.php file you can paste two lines of code and recover your access:
update_option( 'siteurl', 'http://yoursite.com' );
update_option( 'home', 'http://yoursite.com' );
After doing that, you’ll be able to log in and your first order of business should be to go to Settings -> General in your dashboard and updating the URLs to their correct form. Then delete the added code and you should be good to go.
Bypass PHP Fatal Errors
Similarly to the topic above, let’s assume your theme has suffered a fatal error and you aren’t able to access your website. No frontend access, no WP Admin access and not even FTP. Is it time to say goodbye?
No, it’s not, but you do need to have the Twenty Twenty-One theme installed on your website. Not active, just installed.
If you do, you’ll need to type yoursite.com/wp-admin/customize.php?theme=twentytwentyone in the address bar and click Activate & Publish. In the preview mode, files from the current active theme are not loaded and this means you can bypass the PHP error, fix it and then re-activate your main theme.
Paste a Link, Create a Link
Real case: you’re writing a post with several external references. Instead of manually inserting links via the editor toolbar, highlight the text and paste the URL to automatically turn it into a hyperlink. This is especially useful for long-form content with multiple links.
As obvious as this one sounds, it turns out many WordPress users didn’t know about it and it’s quite handy in case you have a lot of links to insert. In the editor, if you select some text you can turn it into link by simply pasting the link onto the selection. Unexpectedly pleasant outcome!
Allow User Registration on Your Website
If WordPress has the option to manage users, it makes sense to take full advantage of it. In the Settings -> General section of your WP dashboard you can enable the membership option by ticking the Anyone can register checkbox.
You also get the option to select what role is to be attributed to new users. Better stick with Subscriber at first, since you can always change roles later on.
Turn Off The Gutenberg Fullscreen Mode
Do you find yourself in a constant back-and-forth between your editor and the WP dashboard? We know we do sometimes!
There’s an easy option to eliminate this inconvenience and it’s hidden behind the three dots in the top right corner of your editor page. Turning off the Fullscreen mode will open up the familiar WordPress menu on the left and you can access everything from one page.
How to Save And Reuse Your Layouts
Sometimes you’ll need to reuse certain layouts and there’s a few ways you can do this in WordPress:
- Use the Copy All Content option in the editor (it’s under the three dots in the top right corner) and then paste it in your other post or page;
- Save your block or group as reusable blocks, then insert them from the Reusable tab in the Block Inserter
Blocksy Pro’s Content Blocks
If you’re a Blocksy Pro user, saving and reusing your layouts is as easy as pie, with the help of our Content Blocks functionality.
Simply go into your Blocksy dashboard and create a new Content block. Add your design and save it. Using its ID and the conditional display module, you can have this block be displayed dynamically throughout your website!
Convert Categories to Tags And Vice Versa
WordPress users sometimes confuse tags with categories but even if a mistake was made and one or the either got created, there’s a quick fix for it. In the dashboard, under Tools -> Import you’ll find the option to install the Categories and Tags Converter. Doing so will allow you to selectively convert tags into categories or categories into tags.
The satisfaction you feel when your flow is fluent and your hands are skilful — now that’s something else, isn’t it? Knowing a few WordPress tricks is incredibly useful if you need to move fast and be effective in your work.
Remove The Pre-Publish Checklist
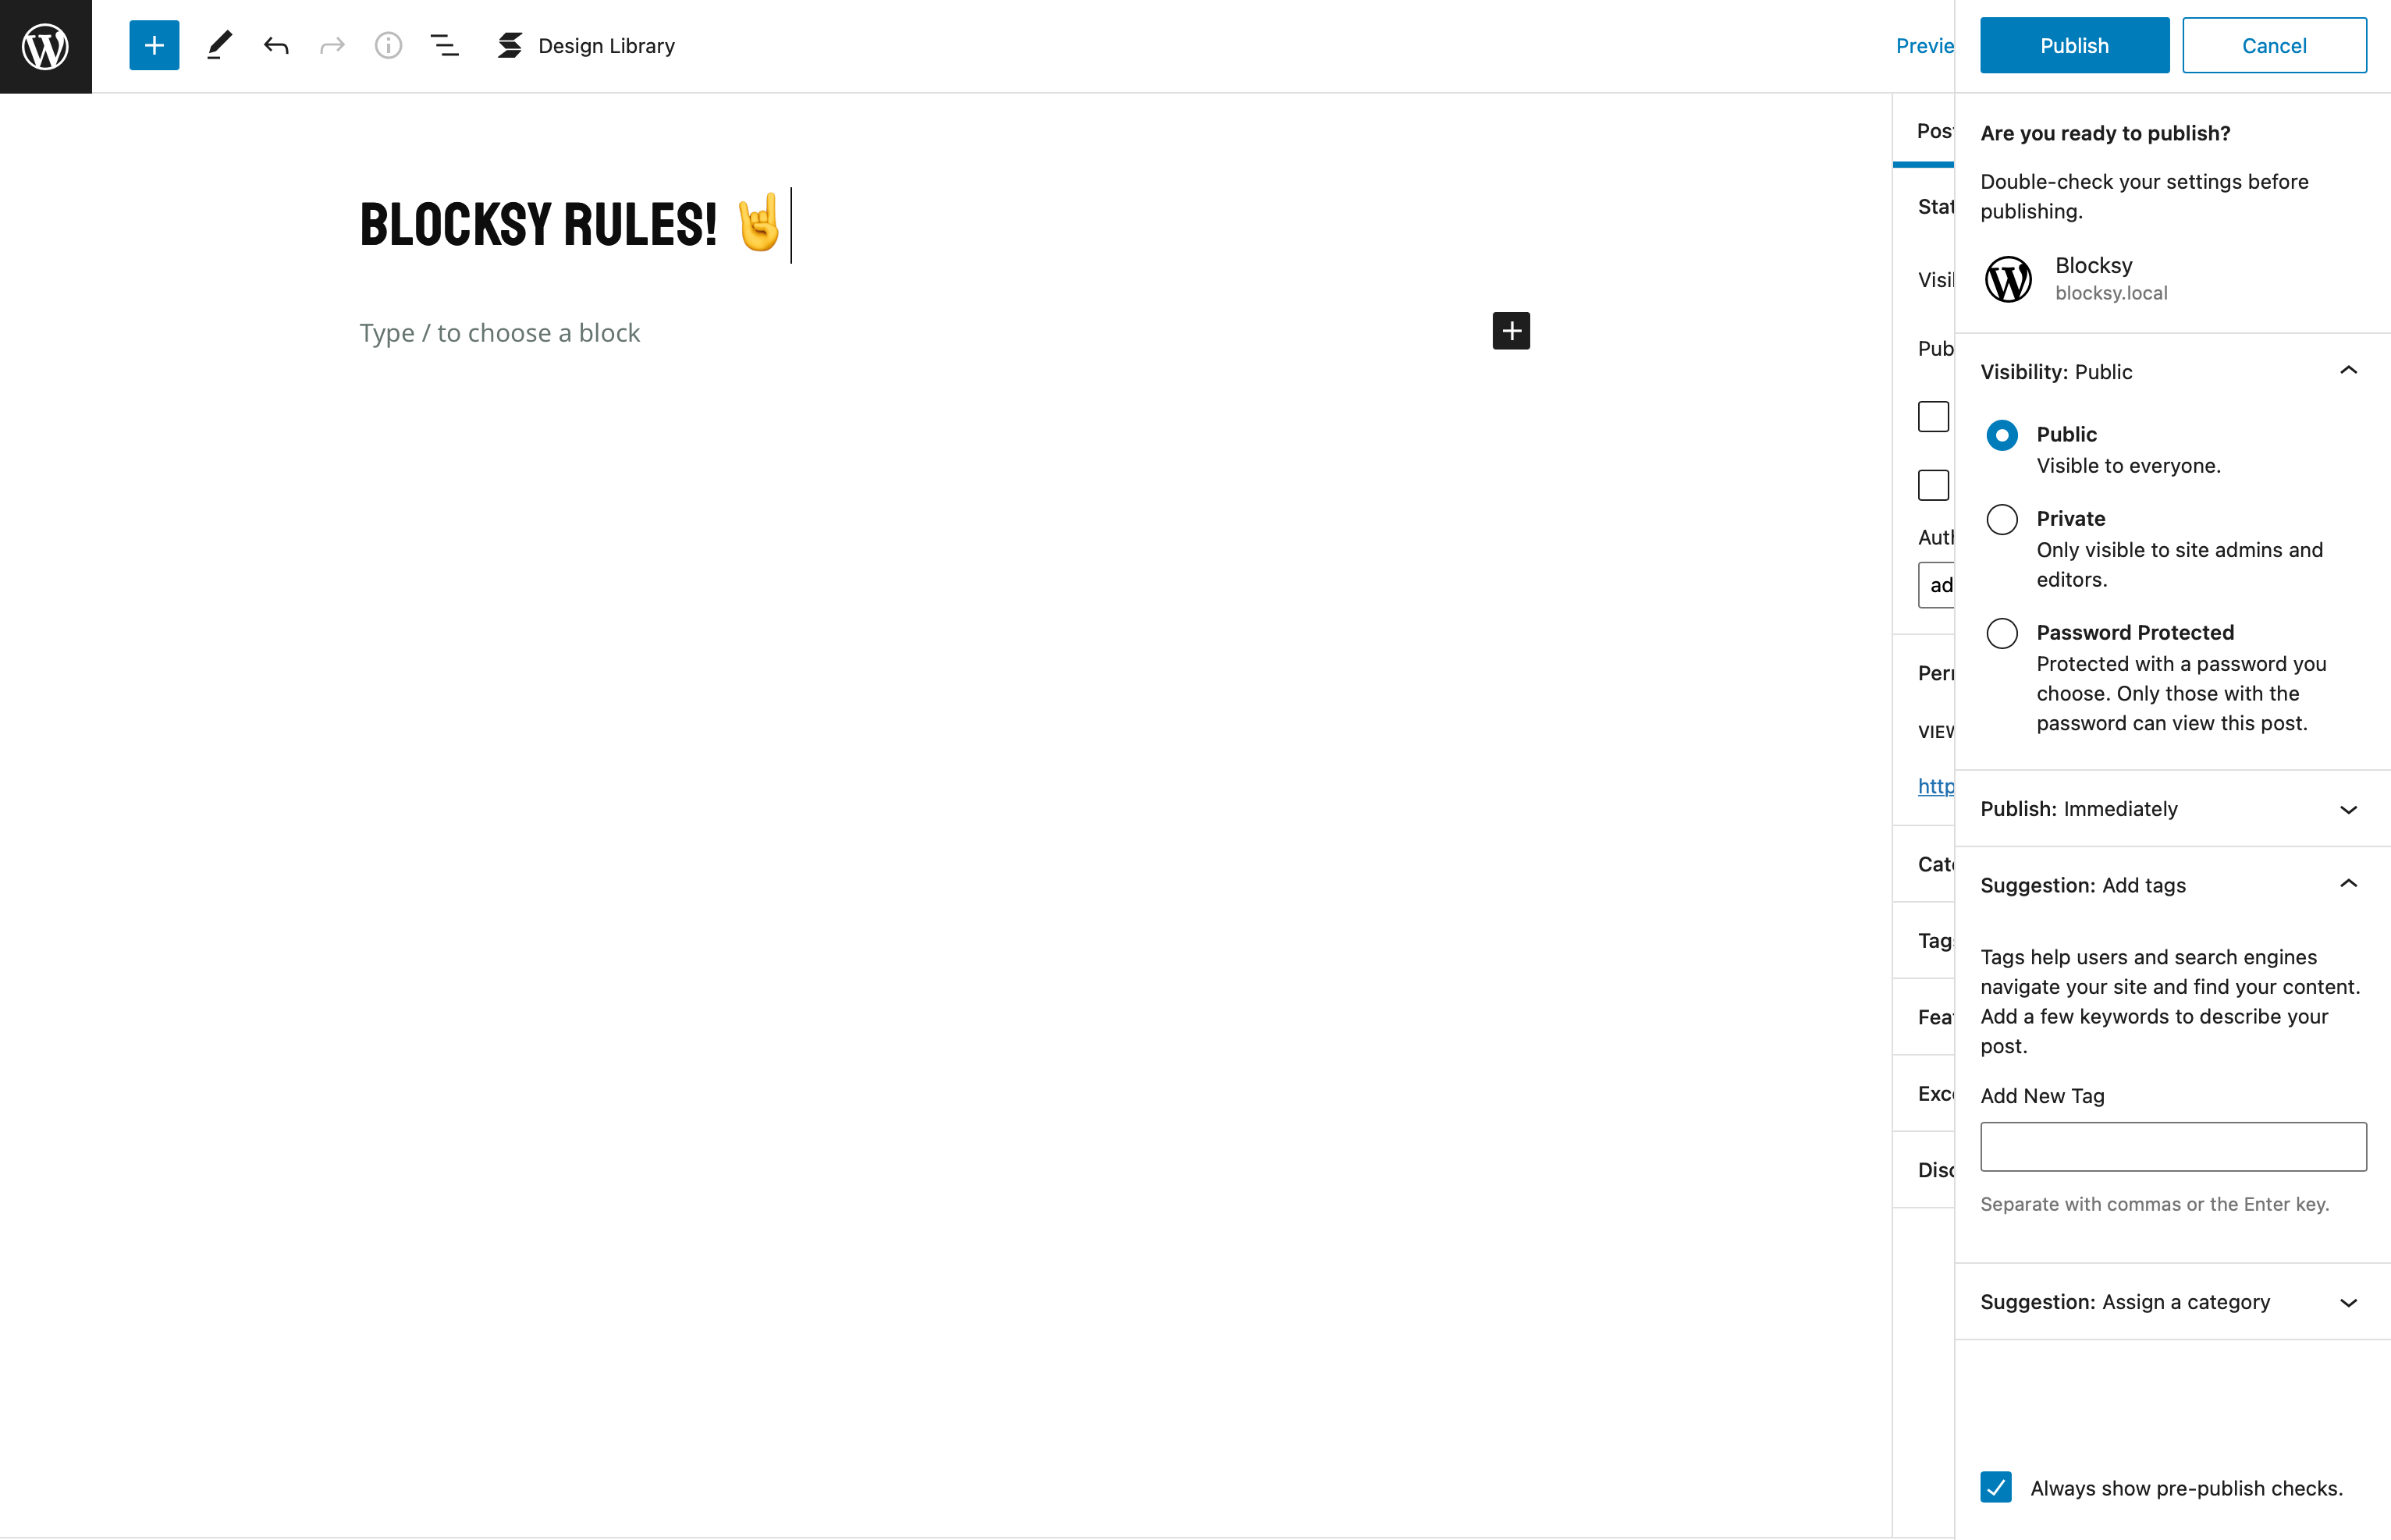
There are moments when you feel uncertain about a decision, but at some point, publishing an article stops being one of them. Luckily, for those who prefer to hit Publish and move on there is the option to remove the pre-publish checklist that is standard for WordPress posts. In the editor preferences, accessible by clicking the three dots in the top right corner of your screen, you can turn off this publishing option. When your time is precious, every little bit counts.
Quicker Access to WP-Admin
Here’s another tip that will shave some time off your daily actions.
If you don’t want to type yoursite.com/wp-admin you can just type yoursite.com/admin and you will be redirected to your login page.
Even if you’re not going for the 100-metre dashboard race, it is still a cool trick and pretty useful when you have to do it 20 times per day!
Schedule Posts With One Click
WordPress allows you to schedule posts to go live at a specific time in the future, but you can speed up this process by using the calendar dropdown in the Publish section.
Real case: if you manage a blog or content-heavy site, this can be a game-changer for content planning. Instead of manually publishing posts or remembering to come back later, simply set the date and time, and WordPress will do the rest. Perfect for bloggers who want to maintain a consistent publishing schedule.
Use Custom CSS Without a Plugin
WordPress allows you to add custom CSS without installing a plugin. Go to Appearance > Customize > Additional CSS, and you can insert site-specific CSS tweaks directly into your theme.
Real case: for developers or site owners who need to make small design adjustments (e.g., changing button colors or spacing) without wanting the bloat of additional plugins. Perfect for users who want greater control over their website’s design without diving into full theme development.
Change the Login URL for Added Security
By default, the WordPress login URL is yoursite.com/wp-admin, which is common knowledge and a target for hackers. Using a plugin like WPS Hide Login, you can change this URL to something custom.
Real case: Perfect for website administrators who want to add an extra layer of security to prevent brute force attacks. Changing the login URL makes it harder for attackers to guess and protects your site from unwanted access.
FAQ
How Do I View All Available Keyboard Shortcuts in the WordPress Editor?
You can press Alt + Shift + H on Windows or Option + Control + H on Mac to open a pop-up showing all the keyboard shortcuts available in the WordPress block editor.
Can I Use Markdown Formatting Inside the WordPress Block Editor?
Yes, the Gutenberg editor supports basic Markdown. For example, typing ## before a line will automatically format it as a heading, helping you write faster without interrupting your workflow.
What Should I Do If I Get Locked Out of My WordPress Dashboard After a URL Change?
If you have FTP access, you can temporarily add two lines to your functions.php file to reset the WordPress and Site URLs, allowing you to regain access to your admin dashboard.
How Can I Duplicate a Block or Section in WordPress Without Rebuilding It Manually?
Use the shortcut Ctrl + Shift + D (or Cmd + Shift + D on Mac) to instantly duplicate the selected block. It’s useful for reusing layouts like pricing tables or testimonial sections.
Is It Possible to Add Custom CSS Without Installing a Plugin?
Yes, go to Appearance → Customize → Additional CSS. This lets you add styling rules directly into your theme without needing an extra plugin.
Access Secret Options Screen
Proceed at your own peril 🙂
This is a really obscure WordPress trick! It works, but it only works as intended only if you know your way around it. Included on this page are options for your entire website so you definitely shouldn’t edit anything unless you really know what each option does and what modifying its value will do.
To access this hidden page you need to type yourwebsite.com/wp-admin/options.php in your address bar. You can use it for simple options, but you’ll need other methods to edit more complex options, like serialised arrays, for example.
Nevertheless, it is an interesting method to get information about your website, plugins and setup and might come in handy in some specific cases.
That’s all we have for now and this list is in no way complete so we might be back with updates. In the meantime, what are your favourite WordPress tips and tricks? Want to share them with the rest of us?


Awesome article with plenty of insights, thank you