Ever updated your WordPress site, but the changes won’t show up?
You tweak the design, publish a post, or adjust a plugin setting, but nothing seems to happen on the front end. Don’t panic! The problem usually isn’t your browser or your theme. It’s caching!
Caching works like a waiter who remembers your usual coffee order — it speeds things up, but if they get the order wrong, it’s frustrating. That’s what happens when your website shows outdated content. Clearing cache fixes that.
Websites work the same way, and caching helps them load faster by remembering previously loaded content. But when that “remembered” version gets outdated, it can cause display glitches or hide your latest updates.
That’s why learning how to clear your cache is essential. Whether you’re making small content changes or overhauling your site design, clearing the cache ensures your visitors see the most recent version of your site.
In this guide, you’ll learn exactly how to clear WordPress cache, with or without plugins. We’ll walk you through popular caching tools, explain manual methods like browser and hosting cache clearing, and help you troubleshoot if things still don’t look right.
Let’s get started.
Key Takeaways:
- Caching speeds up WordPress but can hide updates — Clearing cache ensures your visitors see the latest version of your site.
- You can clear cache using plugins like W3 Total Cache, WP Super Cache, or WP Fastest Cache with one click.
- Browser, hosting, and CDN caches also need to be cleared when plugin cache isn’t enough.
- Performance themes like Blocksy improve caching behavior by supporting file-based CSS, lazy loading, and other optimizations.
- Troubleshooting tips include hard refreshes, flushing DNS, disabling CDN, and checking for plugin conflicts.
Table of Contents
How to Clear Cache WITH Plugins
If your site uses a caching plugin, start here. Most caching plugins let you clear your site’s cache with a single click.
We will show you how to clear the cache using the free versions of three popular plugins (W3 Total Cache, WP Super Cache, and WP Fastest Cache) to give you an idea of where cache-clearing options typically reside and how the process works, regardless of which plugin you use.
W3 Total Cache
If you have W3 Total Cache installed, go to Performance → Dashboard and hit the Empty all Caches button.
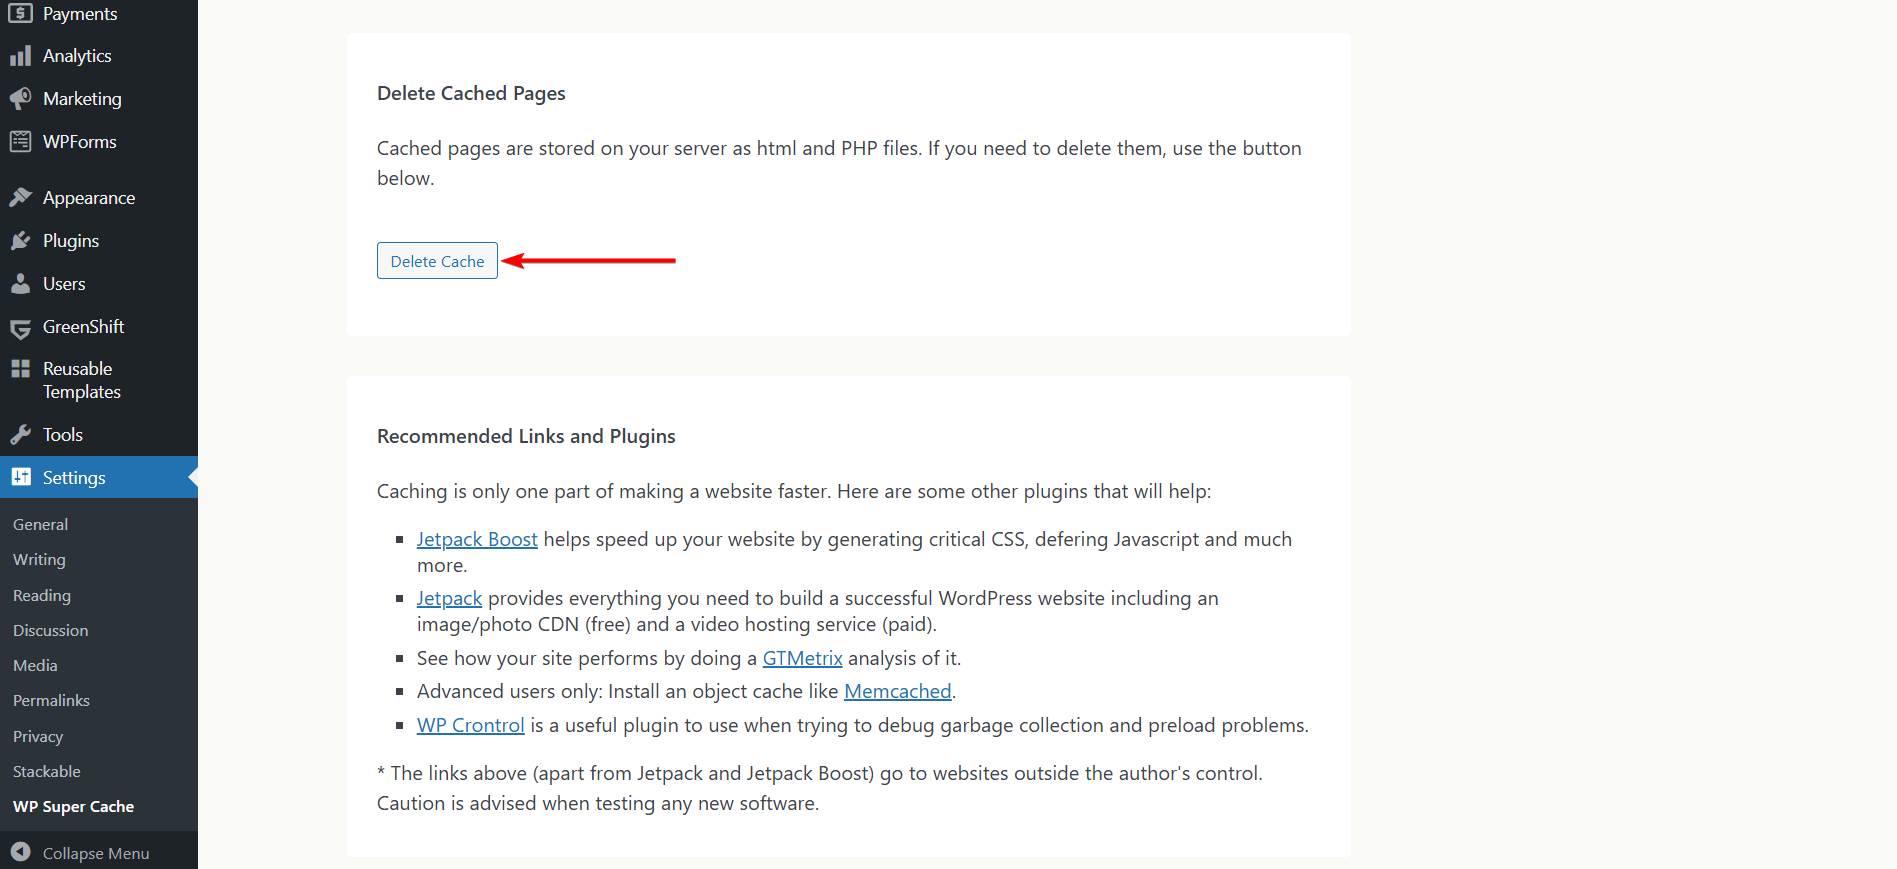
WP Super Cache
Go to Settings → WP Super Cache → Delete Cache Pages and hit the Delete Cache button.
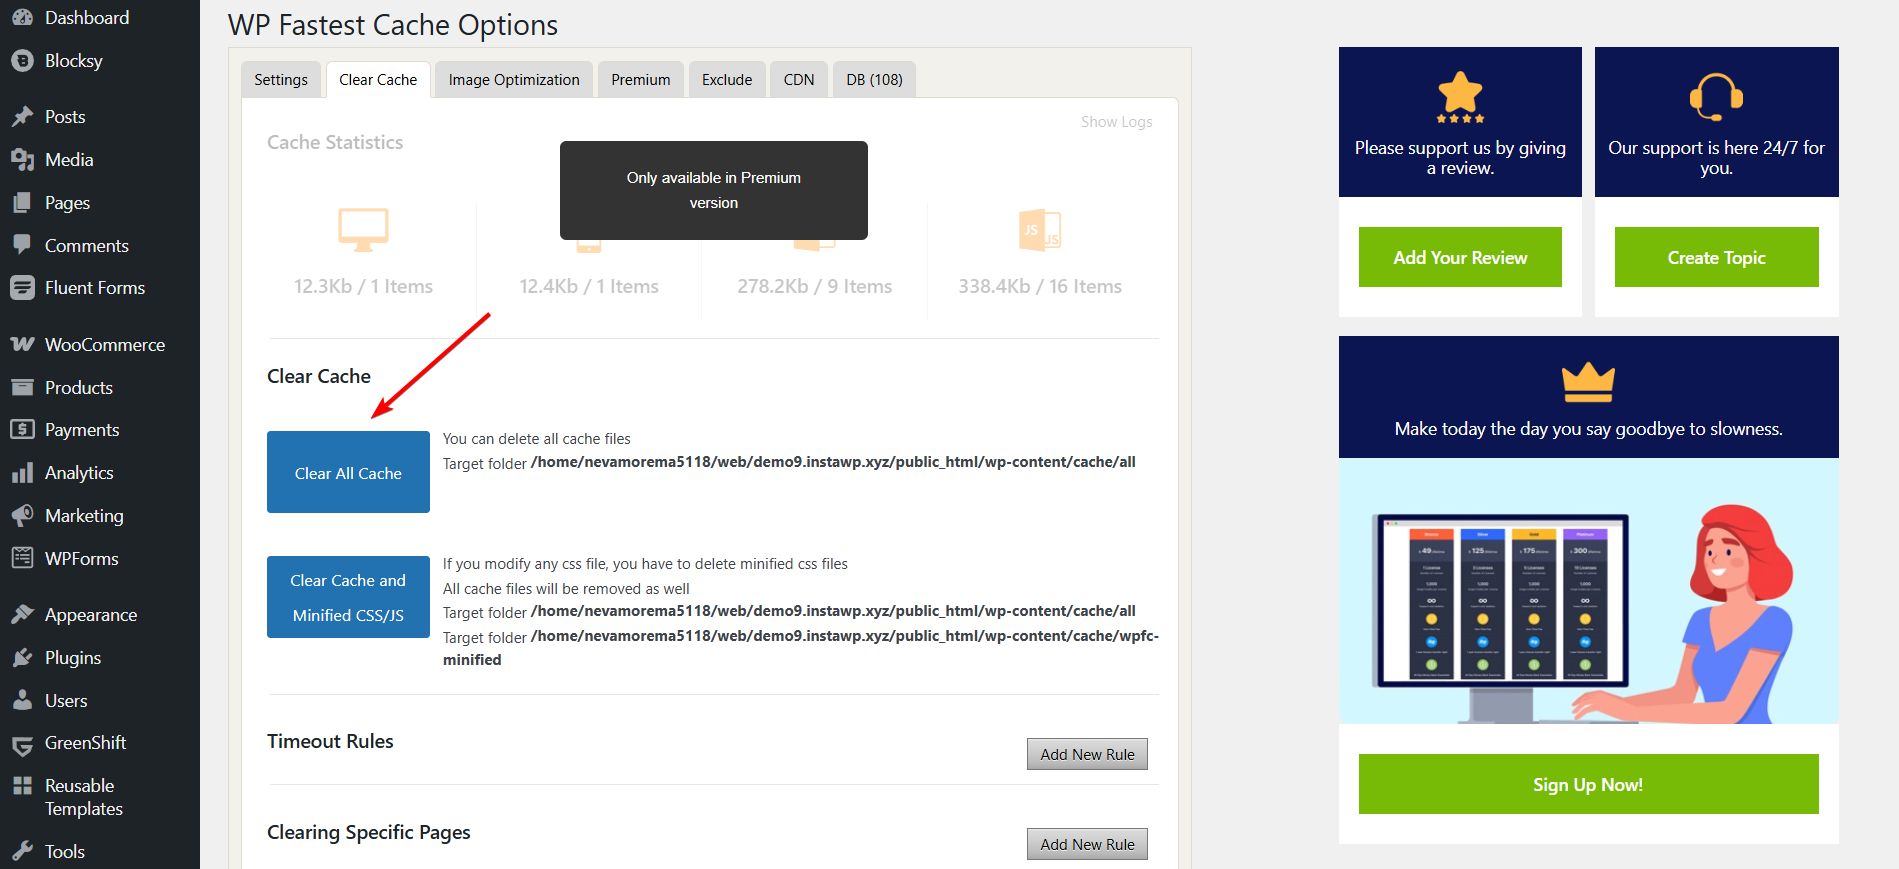
WP Fastest Cache
Go to WP Fastest Cache → Clear Cache, and hit the Clear All Cache button.
Tip: If you’re using a different caching plugin, look for a “Clear Cache” or “Purge Cache” option. It’s usually located in the WordPress toolbar or the plugin’s settings area. Most caching tools make this option easy to find.
WordPress Clear Cache Without Plugin
If you don’t have a caching plugin installed or prefer not to use one, you can still clear your WordPress cache through other methods.
Even with a plugin, other layers like your browser, host, or CDN may still serve outdated content.
Your site may also be cached at other levels, such as your browser, web host, or CDN (Content Delivery Network), and those layers can continue serving outdated content even after you’ve cleared your plugin cache.
In this section, we’ll walk you through how to manually clear the cache from each of these sources to ensure your visitors always see the latest version of your site.
1. Clear Browser Cache
Your browser stores static versions of websites to speed up loading times. But this can sometimes cause you to see an outdated version of your site, even after changes go live. Here’s how to clear your browser cache:
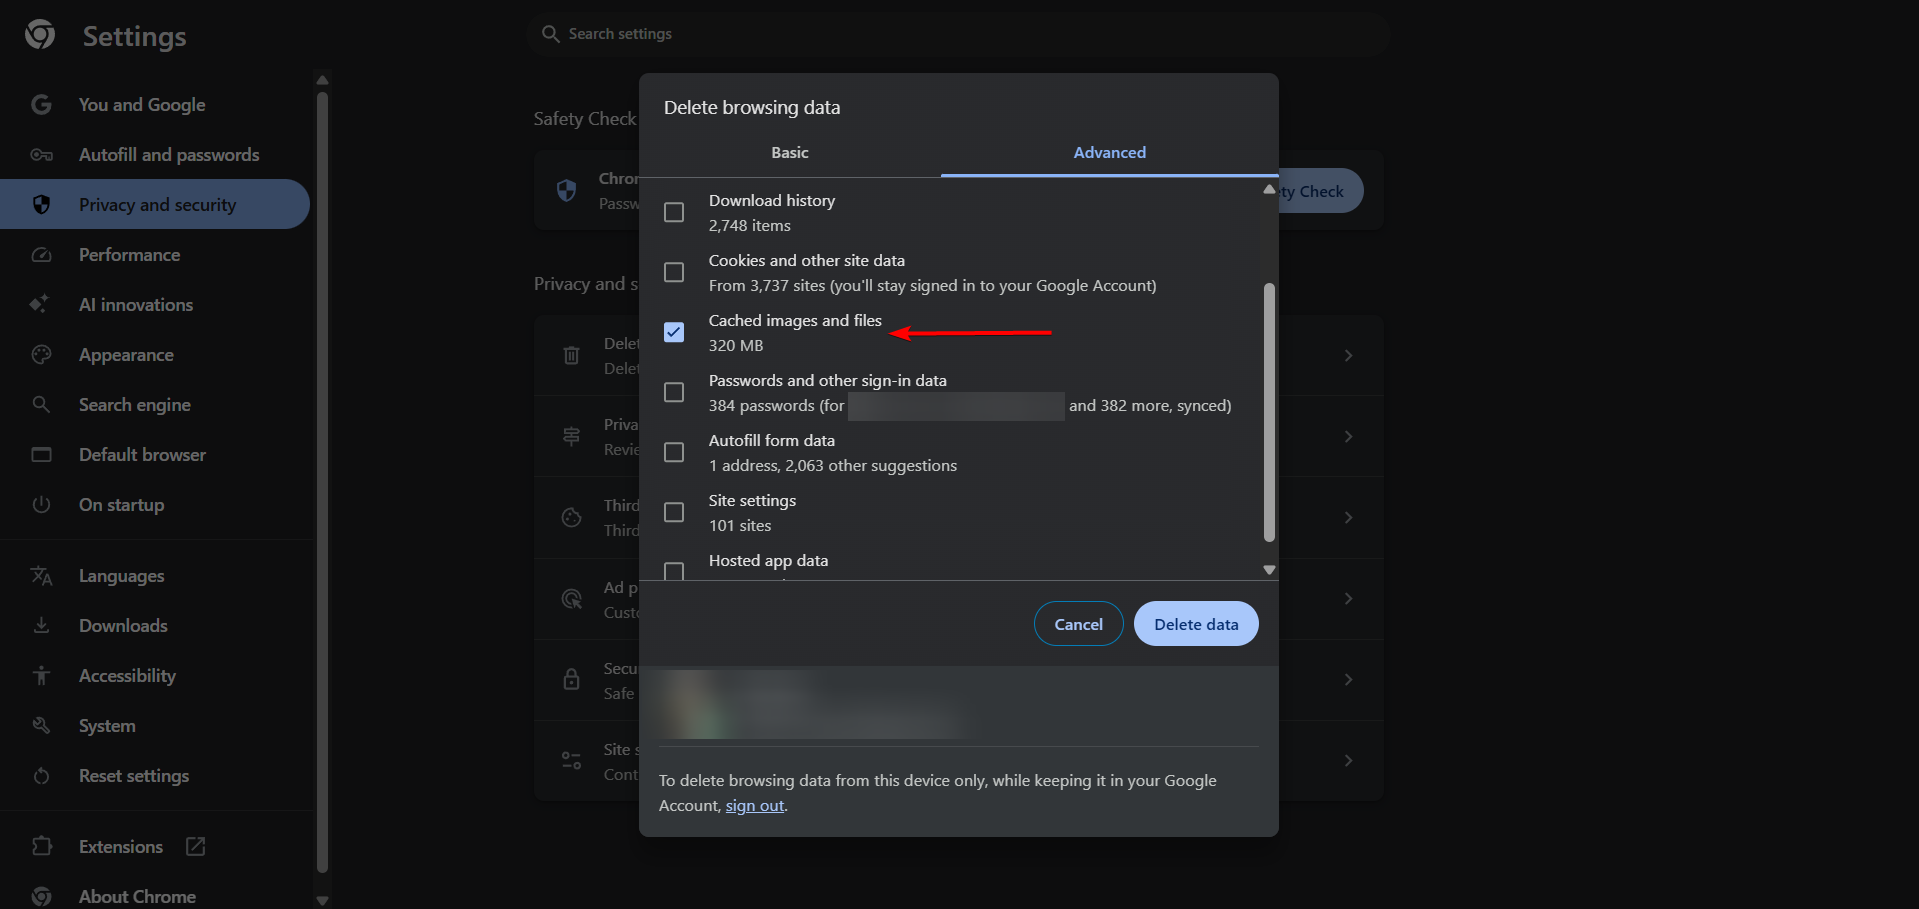
On Google Chrome
- Click the three-dot menu in the top-right corner
- Go to Settings → Privacy and Security → Clear browsing data
- Select Cached images and files
- Click Clear Data
On Safari (Mac)
- Click Safari → Preferences → Advanced
- Enable “Show Develop menu in menu bar”
- Go to Develop → Empty Caches

2. Clear Hosting-Level Cache
Many WordPress hosts include their own caching systems at the server level. This means even if you clear your plugin cache or browser cache, your host might still be serving an outdated version.
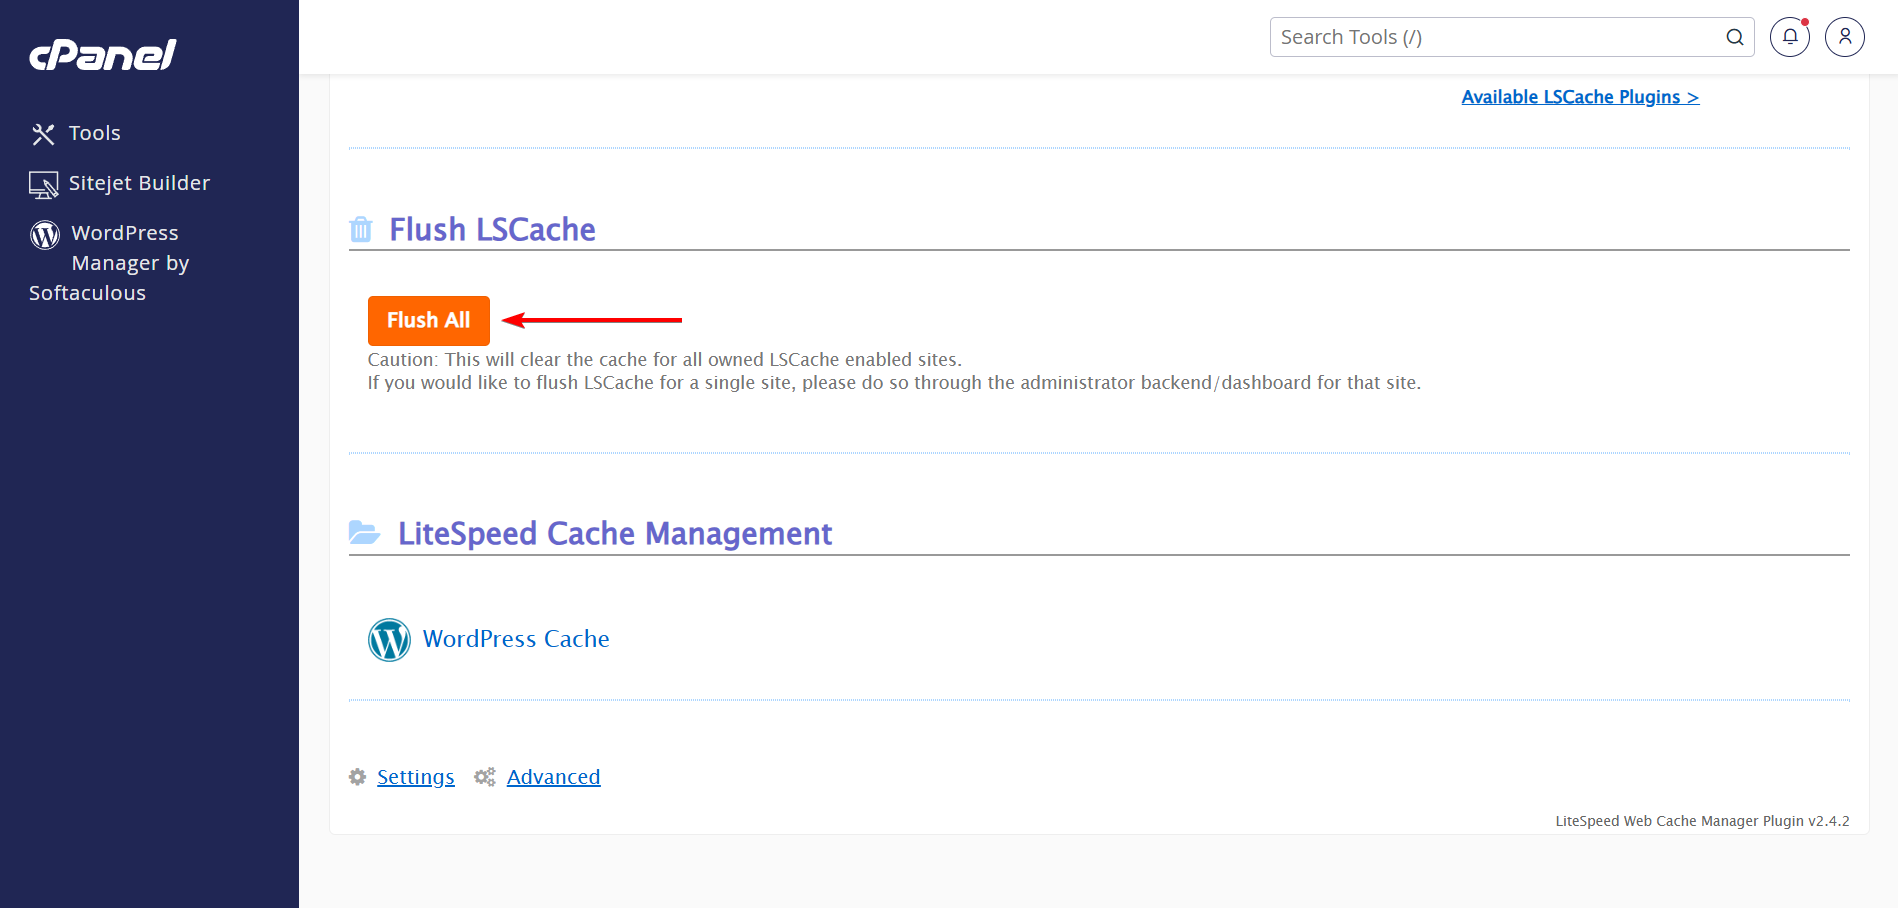
The steps you need to take to clear your hosting cache will vary from web host to web host, but we’ll show you how we cleared our hosting cache in Namecheap, where we host a couple of our websites. This will give you a general idea of how hosting-level cache clearing works.
On Namecheap, go to cPanel → LiteSpeed Web Cache Manager and hit the Flush All button to clear your site cache immediately.
If you’re using another host (like SiteGround, Bluehost, or WP Engine), they typically have dedicated options in their control panels or WordPress toolbars to clear server cache.
3. Clear CDN Cache
The CDN (Content Delivery Network) is usually the final layer your website passes through before reaching the browser. So, even if you’ve cleared your plugin, browser, or hosting cache, stale content can still appear if the CDN cache hasn’t been purged.
That’s why it’s important to clear the CDN cache separately, especially when troubleshooting display issues or checking for recent updates.
Most CDNs provide an option in their dashboard to purge or delete cached files, either across your entire site or for specific URLs. While we won’t cover the step-by-step instructions for each one, here are help docs for some of the most popular providers:
“With Plugins” vs “Without Plugins” – Which Method is Better?
At a glance –
| Method | Pros | Cons | Best for |
| Plugin | ✔️ Quick and easy for testing Doesn’t affect server or visitor cache | ❌ May conflict with other plugins ❌ Adds plugin overhead | ⭐️ Beginners, frequent content/design updates |
| Browser | ✔️ Quick and easy for testing ✔️ Doesn’t affect server or visitor cache | ❌ Only clears local device cache ❌ Doesn’t resolve server/CDN issues | ⭐️ Designers and developers testing visual changes |
| Hosting | ✔️ Clears cache across global edge servers Essential for global speed | ❌ Steps vary by host ❌ May need access to control panel | ⭐️ Users with managed hosting, developers |
| CDN | ✔️ Clears cache across global edge servers ✔️ Essential for global speed | ❌ Steps vary by CDN ❌ May require technical knowledge or a login | ⭐️ Sites with CDN integrations, global audiences |
A caching plugin is the easiest and fastest method for most WordPress users.
But if you want to be sure that every layer of cache is cleared, especially after major updates or migrations, don’t skip browser, hosting, and CDN-level cache clearing.
They all work together to make your site load faster and reflect changes accurately.
How to Optimize Caching With Your Theme
Caching plugins and browsers do most of the work when it comes to storing and serving cached content, but your WordPress theme can also affect how efficiently your site is cached.
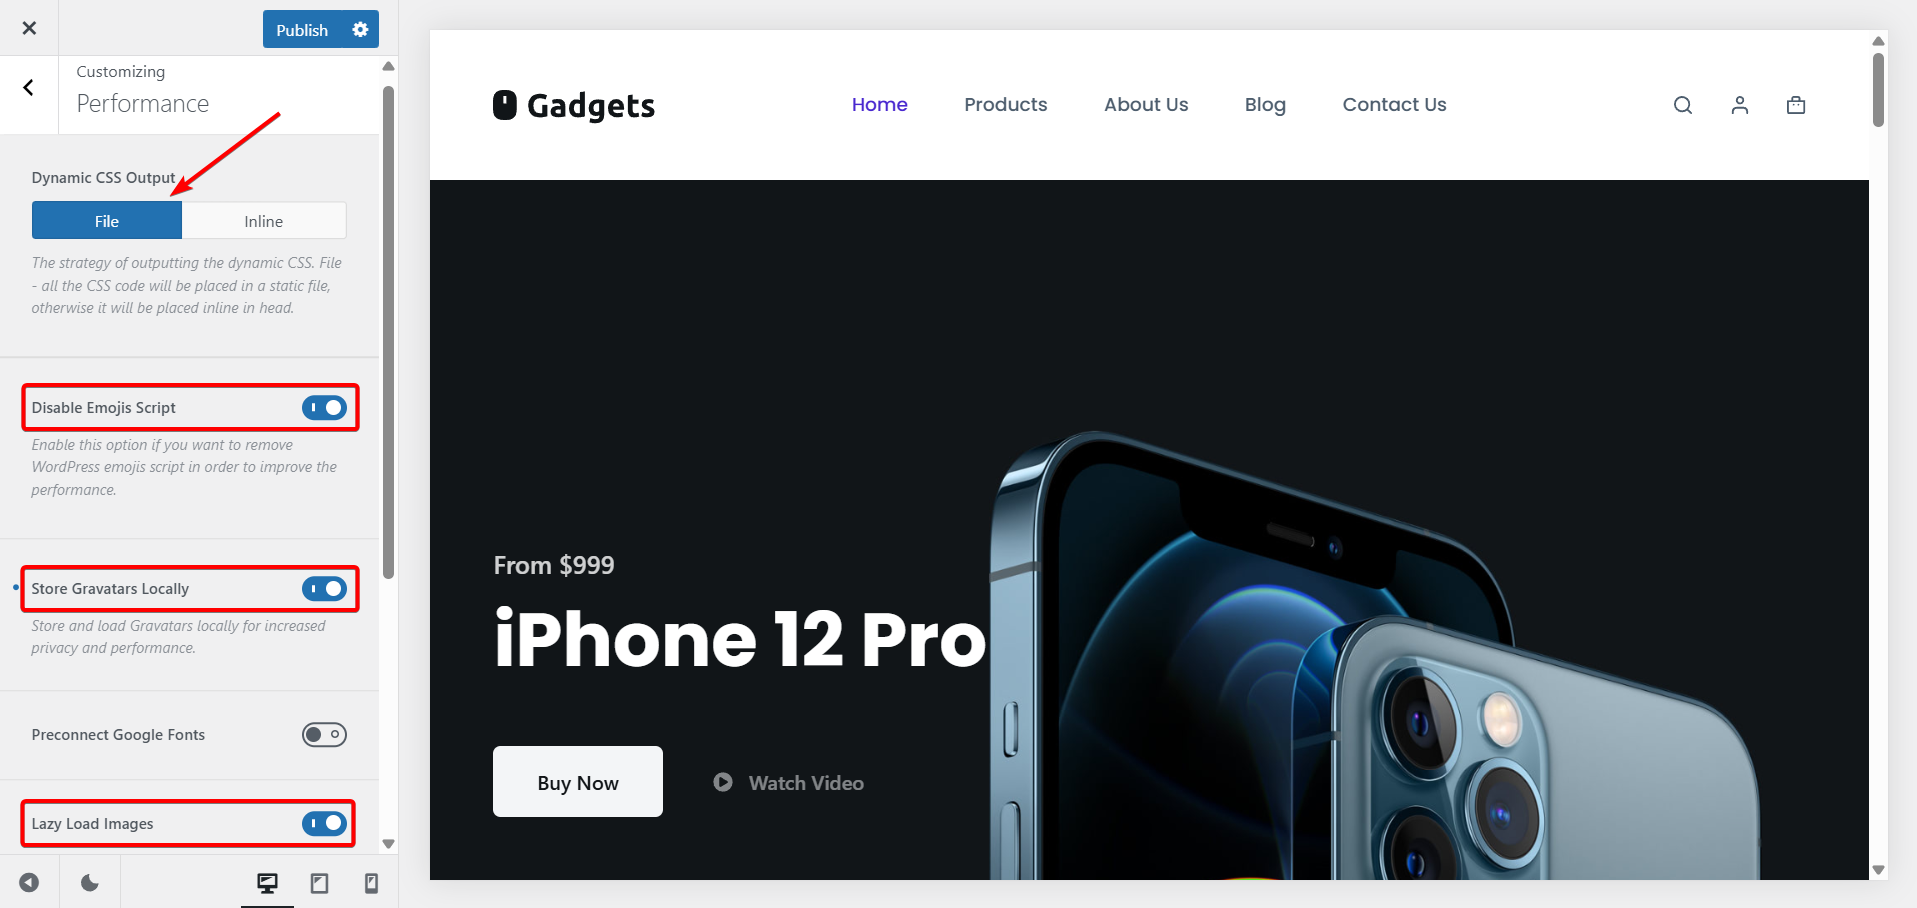
If you’re using a performance-optimized theme like Blocksy, there are a few built-in features that can help improve caching and site speed:
Dynamic CSS Output: Blocksy lets you choose how CSS is delivered. For better caching and performance, we recommend using the “File” mode instead of “Inline.” This allows browsers and CDNs to store and cache your CSS more efficiently.
Performance Pane Options: Blocksy includes a dedicated performance settings panel. A few quick wins here:
- Disable emoji scripts to prevent unnecessary scripts from loading.
- And enable local Gravatar caching to speed up comment sections and reduce third-party requests.
Lazy Loading: Native image lazy loading is built in, reducing the number of images loaded simultaneously. This minimizes cache size and improves perceived load times.
While these features are great for speed, be cautious of over-optimization. Aggressive settings might conflict with certain plugins or caching layers. If you’d like to learn more, check out our guide on over-optimization.
If you’re not already using a performance-oriented theme, these are the features to look for.
Still Facing Issues? Try These Steps
Cleared all the caches, and your site still looks broken or outdated? Don’t worry, this happens more often than you’d think. Here are a few simple troubleshooting steps to get things back on track:
1. Do a Hard Refresh
Sometimes your browser stubbornly holds onto cached files. A hard refresh forces it to reload everything from scratch.
- On Windows: Press
Ctrl + F5 - On Mac: Press
Cmd + Shift + R
Try this on both the frontend and the WordPress admin panel to see if it fixes the issue.
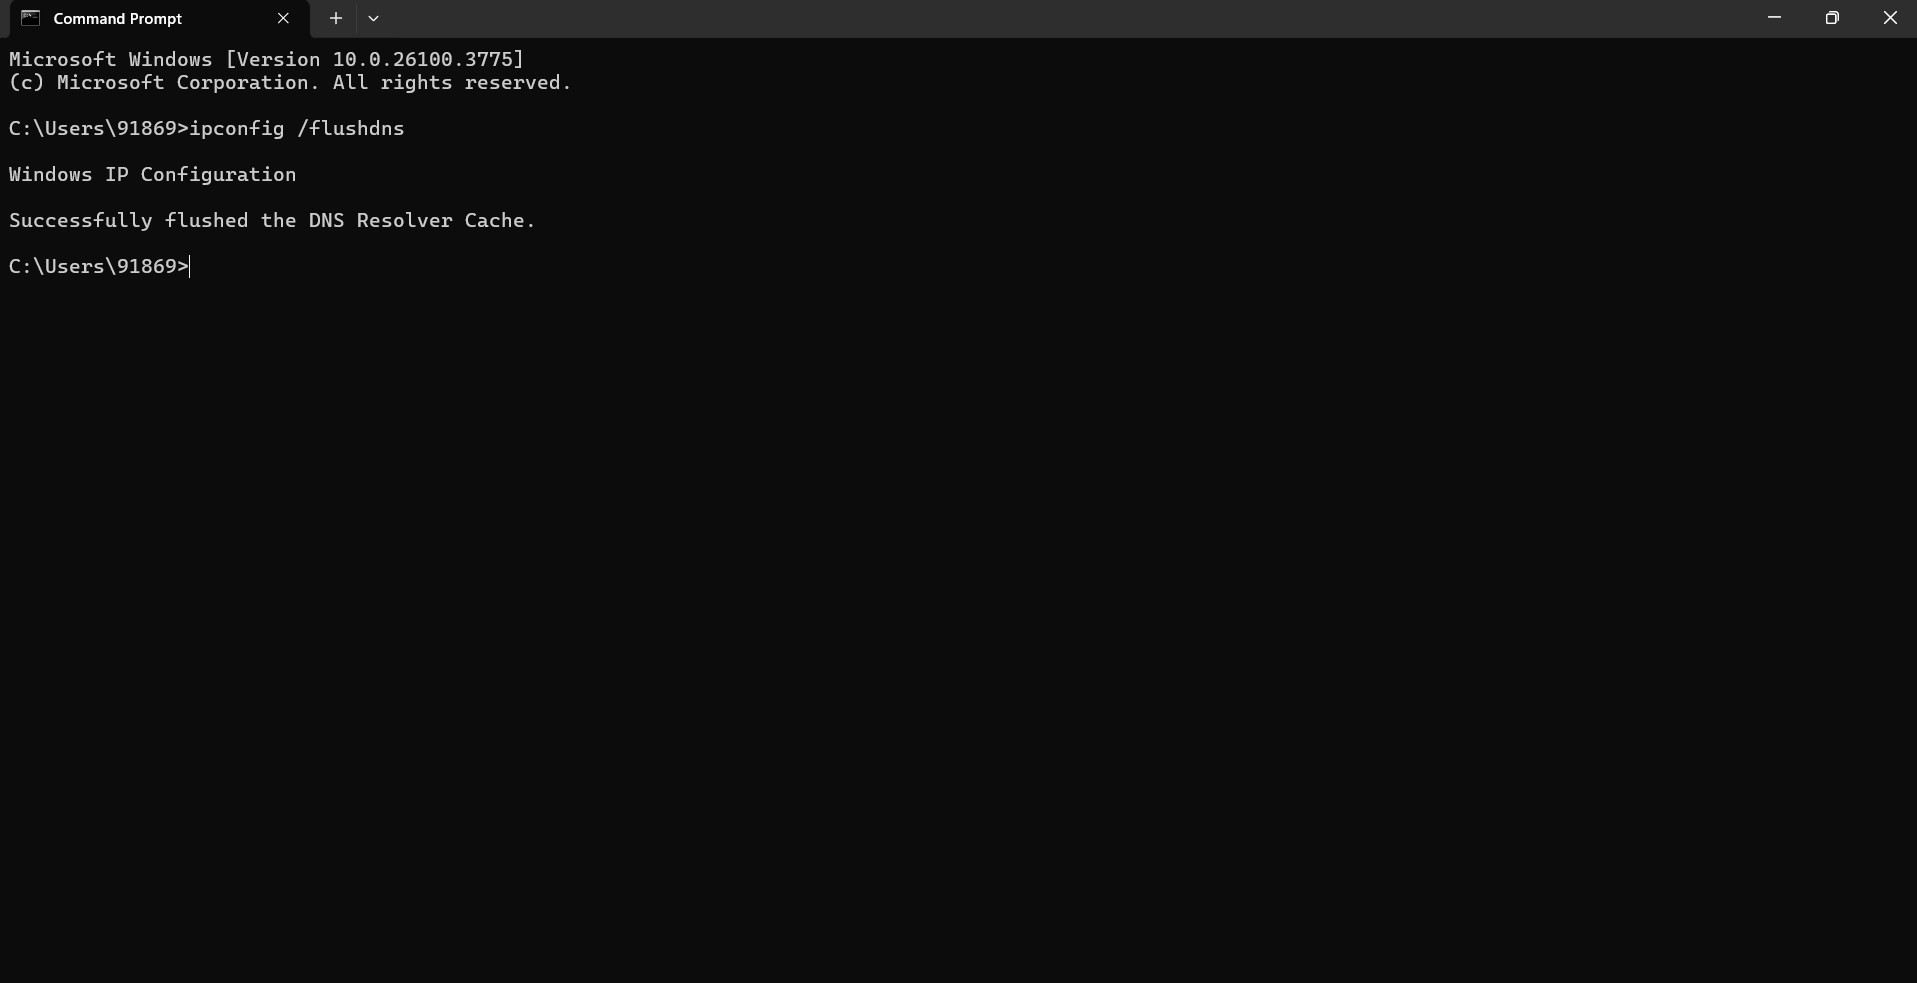
2. Clear Your DNS Cache
If you recently updated your domain, switched hosts, or changed site URLs, the problem might be with your computer’s DNS cache. You can flush it by running a simple command:
- On Windows, open Command Prompt and type:
ipconfig /flushdns - On Mac, open Terminal and type:
sudo dscacheutil -flushcache; sudo killall -HUP mDNSResponder
This is especially useful when testing changes on a local setup or after site migrations.
3. Temporarily Disable Your CDN
If you’re using a CDN (like Cloudflare or RocketCDN), it might be serving an outdated cached version of your site even after you’ve cleared your plugin or hosting cache. Temporarily pause or bypass the CDN and reload your site to test.
4. Check for Plugin Conflicts
Some plugins (especially optimization and security plugins) can interfere with caching behavior. To rule out conflicts:
- Deactivate all plugins except your caching plugin.
- Check if the issue gets resolved.
- Reactivate plugins one by one while keeping an eye out for the issues to re-emerge.
- Once you identify the problematic plugin, consider replacing it or adjusting its settings to prevent future conflicts.
If you’ve tried all the steps above and still can’t see changes, there’s likely a deeper issue at play, like server misconfiguration or a theme-related bug. In that case, it’s best to contact your hosting provider or a WordPress developer for further help.
FAQs
How Often Should I Clear My WordPress Cache?
There’s no fixed rule, but generally, you don’t need to clear your cache unless you’ve made changes to your site like updating content, switching themes, or installing new plugins. That said, if you run a dynamic site (like a blog or store), clearing cache weekly or setting up automatic cache expiry is a good practice.
Will Clearing Cache Break My Site?
No, clearing your cache won’t break your site. It simply removes saved versions of your pages so visitors can see the latest updates. Nothing on your site gets deleted or changed. It just forces a fresh reload. At most, you might notice a slight delay the first time a page loads, but that’s temporary and part of the cache rebuilding process.
Why Can’t I See Changes After Clearing Cache?
If changes still don’t show after clearing the plugin cache, your browser, hosting server, or CDN may still serve an outdated version. Try clearing all layers of cache (browser, hosting, CDN), and if the problem persists, follow the troubleshooting steps like doing a hard refresh, disabling the CDN, and checking for plugin conflicts (see the “Still Facing Issues? Try These Steps” section).
Conclusion
Caching is one of the best ways to speed up your WordPress site, but when left unchecked, it can also become the reason your changes don’t show up. Fortunately, clearing your cache is easy once you know where to look.
Start with your caching plugin. It’s usually the quickest fix. If that doesn’t do the trick, clear your browser cache for testing, and use your hosting or CDN tools as needed to ensure every layer is refreshed. And don’t forget to check if your theme (like Blocksy) offers performance settings that support a smoother caching setup.
Got questions or stuck with a caching issue? Drop a comment below — or explore our full performance optimization series for more speed tips.