Have you ever locked yourself out of your WordPress dashboard? Or maybe you’ve faced the dreaded white screen of death and couldn’t figure out how to fix it? In those frustrating moments, you need a way to access your site that doesn’t rely on the WordPress admin panel.
That’s where FTP (File Transfer Protocol) comes in.
FTP is a behind-the-scenes tool that lets you connect directly to your website’s files without needing to access a dashboard. You can use it to upload files, edit configuration settings, or disable a plugin that broke your site.
In this guide, we’ll cover:
- What FTP and SFTP are
- Why you might need FTP for WordPress
- How to connect to your site using an FTP client (FileZilla)
- Best practices to keep your site safe when using FTP
What is FTP?
FTP (File Transfer Protocol) is a standard network protocol used to transfer files between a client and a server over the internet.
In simple terms, it allows you to connect your computer to your website’s server so you can view, upload, download, edit, or delete files. It’s just like managing files on your local machine, except the files you’re managing are your website’s files.
When it comes to WordPress, FTP is especially useful for accessing your site’s files directly. You can upload new themes or plugins, change configuration files, or troubleshoot issues even when the WordPress dashboard is unavailable.
There’s also SFTP (Secure File Transfer Protocol), which is a more secure version of FTP. While FTP transmits data in plain text (which can be intercepted), SFTP encrypts the connection. This additional layer of security makes it the preferred method for modern websites.
FTP vs SFTP at a glance:
- FTP: Basic file transfer, unencrypted
- SFTP: Secure file transfer with encryption
In web development and WordPress troubleshooting, FTP (and SFTP) is a go-to tool. Developers and site owners use it to make back-end changes without relying on the WordPress admin panel.
Now that you know what FTP is, let’s look at the specific reasons why you might need to use it on a WordPress site.
Why You Might Need FTP for WordPress
Most WordPress users rely on the dashboard to manage their sites.
But what happens when the dashboard breaks, or when it simply doesn’t offer the control you need? That’s when FTP becomes essential.
Here are some common scenarios where FTP can save the day:
- Manually uploading themes or plugins. Sometimes, a plugin or theme file is too large or causes issues during a normal upload from the back-end. With FTP, you can upload the files directly to the appropriate folder.
- Fixing errors. When your site crashes and you can’t access the admin area, FTP lets you troubleshoot by editing or replacing problem files. This is useful for fixing errors like the white screen of death.
- Disabling a broken plugin. If a plugin update causes your site to break, you can disable it via FTP by simply renaming or deleting its folder.
- Editing core files. FTP gives you access to critical configuration files like wp-config.php and .htaccess so you can do things like enable debugging and reset permalinks.
- Backing up files manually. Download your entire site structure for safekeeping on your device. This is particularly helpful before major updates or migrations.
- Uploading media in bulk. FTP lets you upload hundreds of images or videos to your site’s back-end and it’s much faster than doing it through the WordPress Media Library.
Put simply, FTP gives you granular control that the WordPress dashboard can’t match. And more importantly, it works even when your WordPress dashboard doesn’t.
How to Connect to Your WordPress Site via FTP
Connecting to your WordPress site via FTP is easier than you might think. Before you get started, make sure you have the following:
- An FTP client (like FileZilla)
- Your FTP login credentials (host, username, password, port)
- Access to your web hosting account
Let’s walk through the steps.
Step #1: Install an FTP Client
To get started, you’ll need an FTP client which is a software application that connects your computer to your website’s server. One of the most popular (and free) options is FileZilla.
Here’s how to install FileZilla:
- Go to the official FileZilla website.
- Download the FileZilla Client (not the Server).
- Choose the version for your operating system (Windows, macOS, Linux).
- Run the installer and follow the on-screen instructions.
- Once installed, open FileZilla to get started.

Step #2: Enter Your FTP Credentials
To connect to your WordPress site, you’ll need the following information which is typically provided by your web host:
- Host (usually your domain name or your server’s IP address)
- Username (assigned by your host)
- Password (assigned or created by you)
- Port (usually 21 for FTP or 22 for SFTP)
You can usually find this information in your hosting control panel (e.g. cPanel, SiteGround, Bluehost). If you’re unsure, contact your hosting provider.
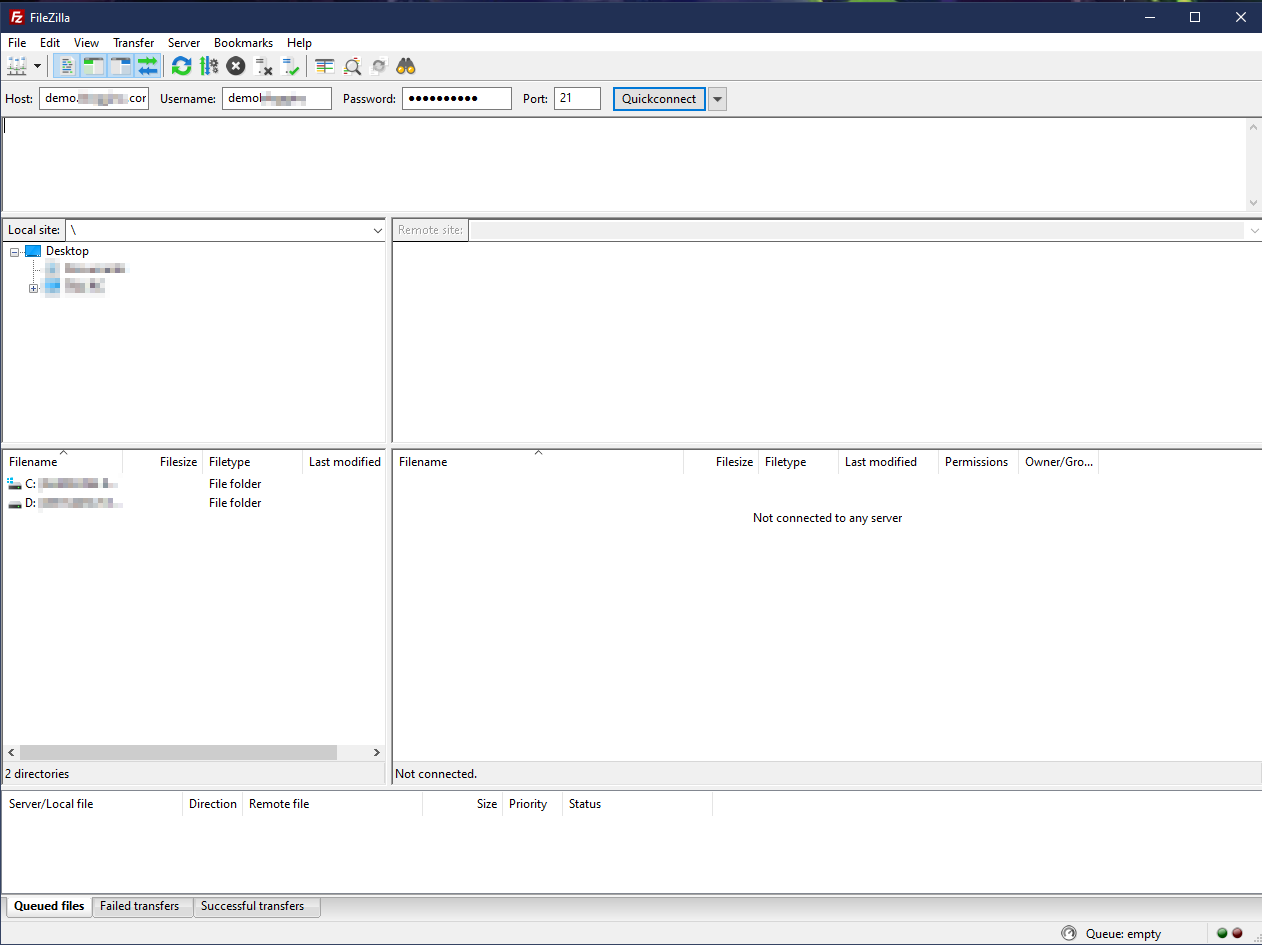
How to enter your credentials in FileZilla:
- Open FileZilla.
- At the top, enter:
- Host (e.g., ftp.yoursite.com)
- Username
- Password
- Port (leave blank for default or use 22 for SFTP)
- Click Quickconnect.
If your login details are correct, FileZilla will connect to your server and display your site’s file structure. It should look something like this:
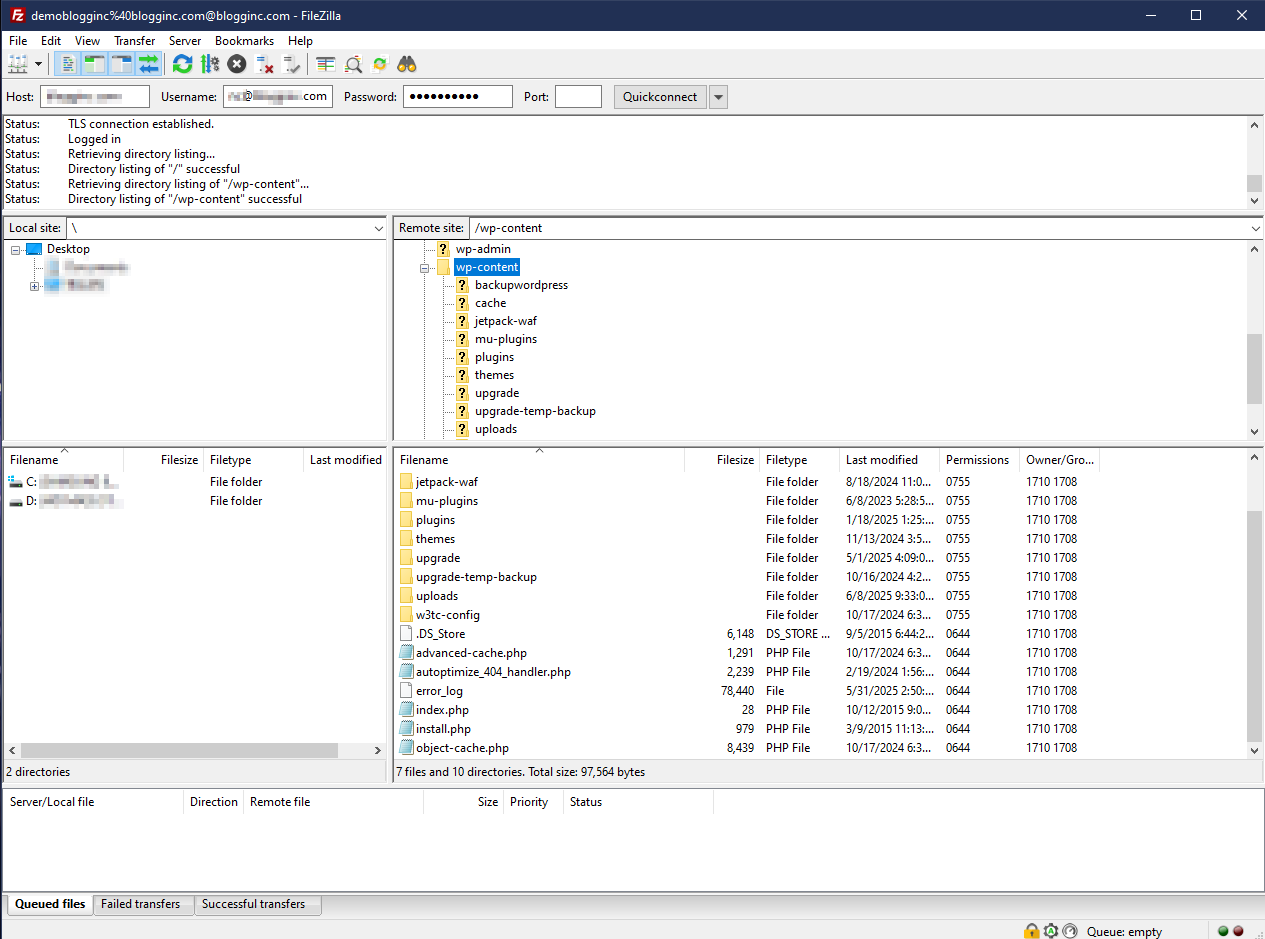
Step #3: Find the WordPress Root Folder
Once you’re connected, you’ll need to locate the root directory of your WordPress site. This is usually one of the following folders:
- /public_html/
- /www/
- /htdocs/
- A folder named after your domain (e.g. /yourdomain.com/)
Inside the root folder, you should see familiar WordPress files like:
- wp-config.php
- wp-content/
- wp-admin/
- wp-includes/
Pro tip: If you manage multiple websites under one hosting account, double-check that you’re in the correct directory before making changes.
Step #5: Upload, Download, or Edit Files
Now that you’re inside the WordPress root folder, you can begin managing your site’s files.
To Upload Files
- On the left pane (your local computer), navigate to the file or folder you want to upload.
- Right-click and select Upload.
- The file will transfer to the remote server (right pane).
To Download Files
- On the right pane (remote site), right-click the file or folder you want to download.
- Select Download to copy it to your local machine.
To Edit Files
- Right-click the file you want to edit (e.g. wp-config.php or .htaccess).
- Select View/Edit.
- The file will open in your default text editor.
- After editing, save the file. FileZilla will prompt you to re-upload the updated version.
Important: Be extremely careful when editing files, especially configuration or core files. A small typo could break your entire site!
Once you’ve made your changes or uploads, you can safely disconnect from the server by closing FileZilla or going to File → Disconnect.
Best Practices for Using FTP
FTP gives you powerful access to your WordPress site. But keep in mind that a single wrong move can break your site, so it’s important to follow some best practices when using FTP.
Tip #1. Always backup your site before making changes
Before you upload, edit, or delete any files, create a full backup of your site. This includes both the database and the file system. If something goes wrong, you’ll be able to restore your site quickly.
Tip #2. Use SFTP instead of plain FTP
Always opt for SFTP (Secure File Transfer Protocol) when possible. Unlike standard FTP, SFTP encrypts your data during transfer. This makes it much harder for attackers to intercept your credentials or site files.
3. Don’t delete or overwrite files unless you’re sure
Avoid deleting or replacing files unless you know exactly what they do. If you’re not sure, download a copy to your local machine first, or rename the original file instead of deleting it outright.
4. Avoid editing core WordPress files
Editing files like wp-settings.php or core update files can lead to unexpected behavior. Stick to editable files like wp-config.php, .htaccess, or theme/plugin files unless you’ve been instructed otherwise by a developer.
5. Use a staging site to test changes first
If you’re making major changes, use a staging environment to test them. This prevents downtime or breakage on your live site.
6. Keep your FTP credentials secure
Don’t share your FTP login details unnecessarily and store them securely using a password manager.
Conclusion
FTP might seem technical at first, but it’s one of the most useful tools you can have in your WordPress troubleshooting toolkit. Whether you’re uploading files, fixing errors, or editing configurations, FTP gives you direct access and control over your site’s inner workings.
In this guide, we covered what FTP and SFTP are, why you might need them, how to connect using an FTP client like FileZilla, and best practices to keep your site safe.
Do you have any questions about getting started with FTP in WordPress? Drop a comment below.