WooCommerce is the most popular eCommerce platform on the planet.
Unfortunately, it doesn’t have the built-in capacity to export or import customers.
Why is this important?
There are three main reasons why you might need to export your WooCommerce customers:
- to create a mailing list or for some other marketing initiative
- to update the customer list of a related website or service
- as part of a migration to a new store or a merger between stores
Likewise, you might need to import new customers from a marketing campaign or a store migration/merger.
In any of these cases, you’re going to need a third-party plugin.
This article demonstrates how to use the popular plugins WP All Export and WP All Import to perform these tasks. If you want to follow along, you can use their free online demo at https://www.wpallimport.com/try. Just choose the WooCommerce Store option and you’re ready to go!
Key Takeaways
- WooCommerce doesn’t support customer export/import by default, so third-party plugins like WP All Export and WP All Import are essential for managing customer data.
- WP All Export makes it easy to export customer data in CSV, Excel, or XML formats, and allows filtering specific segments such as frequent buyers or recently updated profiles.
- Customer passwords are securely exported as hashed values, ensuring they remain protected while still allowing users to log in after import.
- Importing customers from CSV, XML, or JSON is straightforward, thanks to WP All Import’s drag-and-drop interface, custom field mapping, and filter support.
- Advanced features like scheduled imports, custom field handling, and store migrations make WP All Export/Import powerful tools for syncing WooCommerce data or consolidating stores.
Table of Contents
Create a new WooCommerce Customer Export
Exporting WooCommerce customers is easy. First, go to All Export > New Export. This will bring you to the New Export screen:
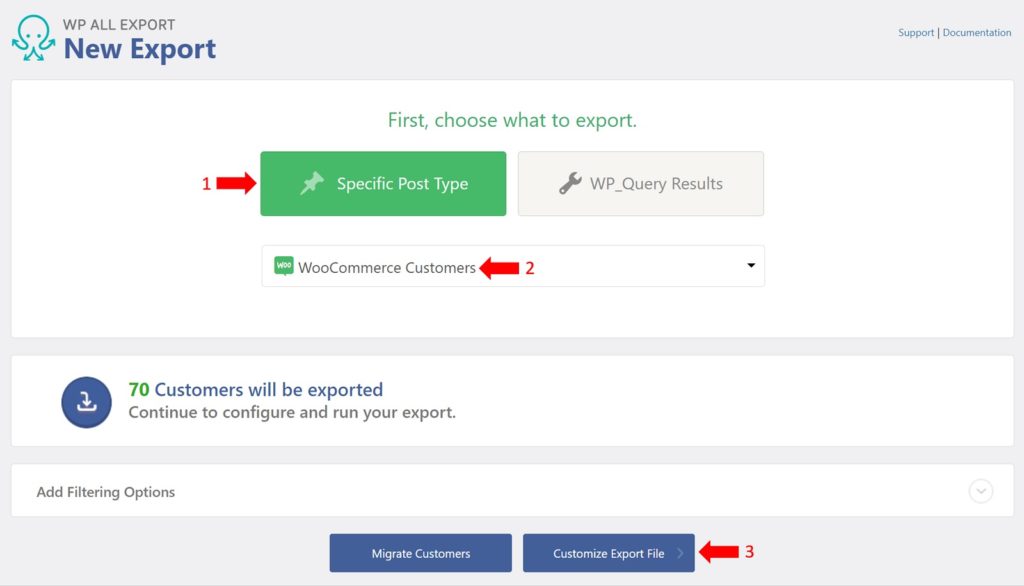
- Select Specific Post Type.
- Choose WooCommerce Customers.
- Click the blue Customize Export File button.
Step-by-Step Instructions for Export
The Drag & Drop interface lets you select, arrange, and modify your customer export columns:
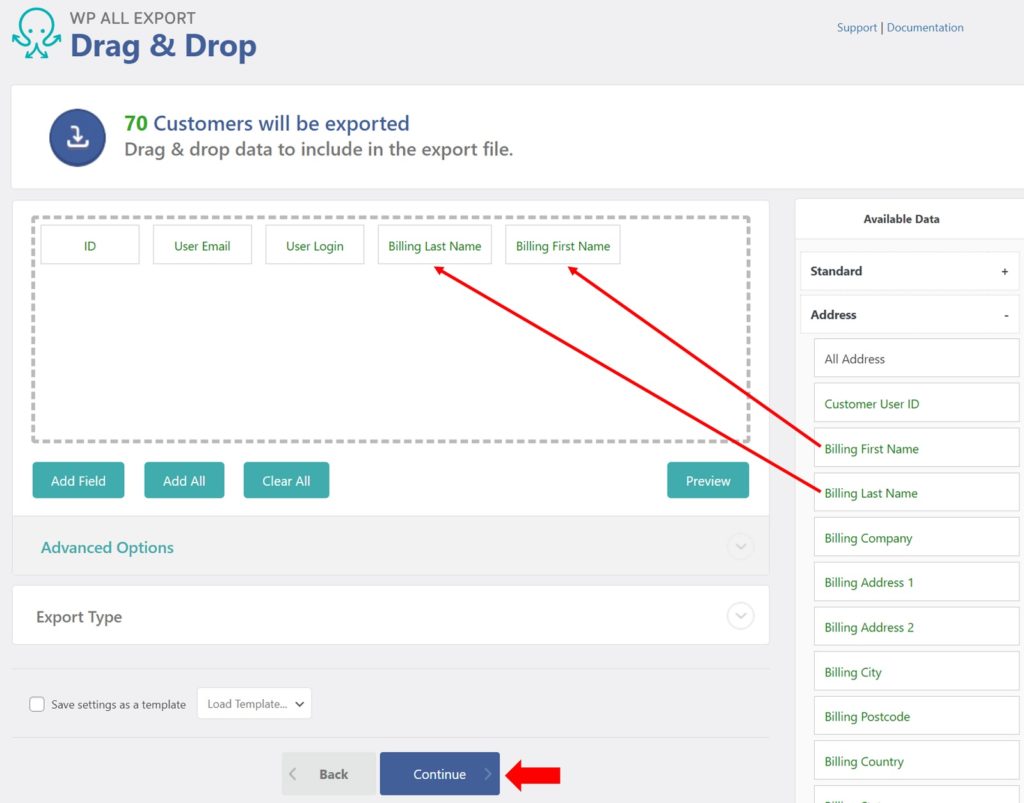
In this example, do the following:
- In the Available Data panel on the right, expand the Address data section.
- Drag the Billing Last Name and Billing First Name fields into the column selection area.
- Click the blue Continue button.
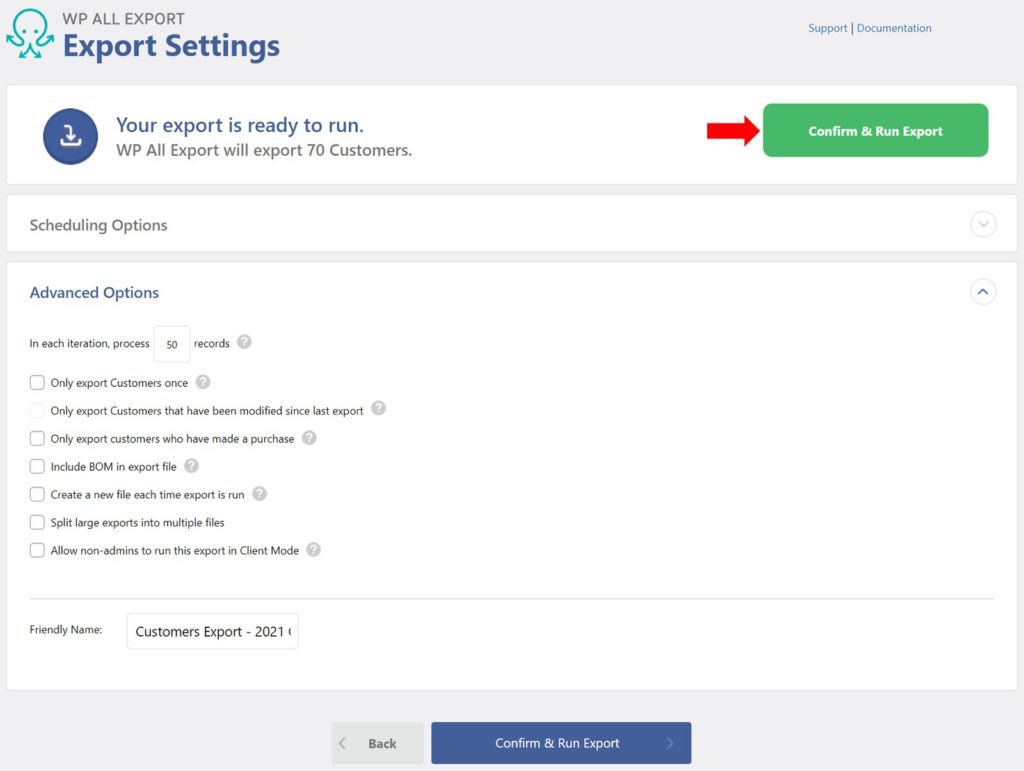
WooCommerce Customer Export Settings
The Export Settings screen lets you schedule your customer exports and also manage advanced export settings. Skip these options for now and click the green Confirm & Run Export button.
Complete the Customer Export
When your customer export is complete, WP All Export will present you with this screen:
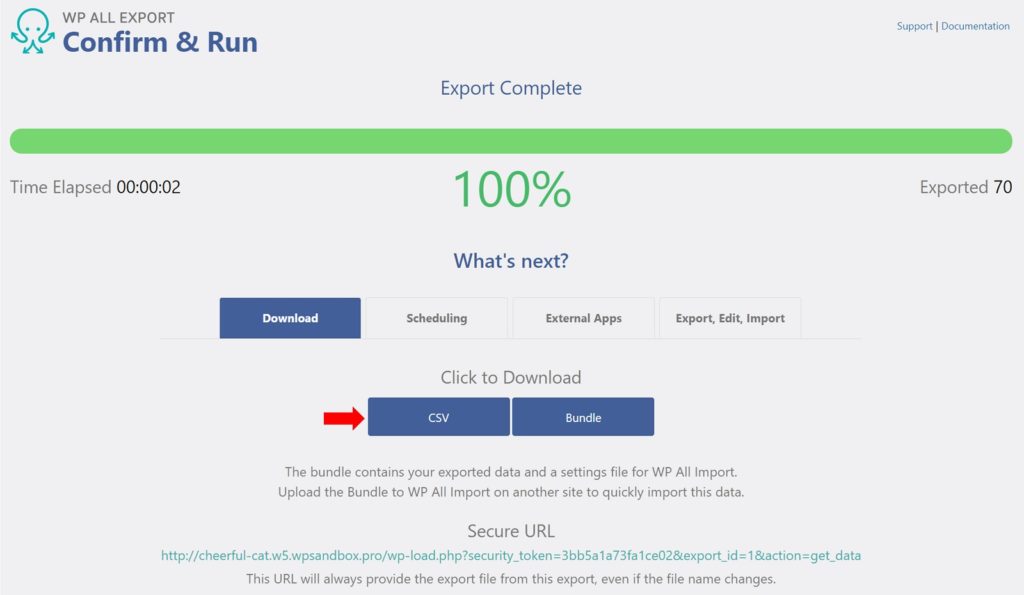
To download your customer export file to your local computer, click the CSV button in the Click to Download section.
That’s it! That’s how easy it is to export WooCommerce customers with WP All Export!
Exporting to Excel or XML Formats
To export WooCommerce customers in one of the Microsoft Excel file formats, do the following in the Drag & Drop Interface:
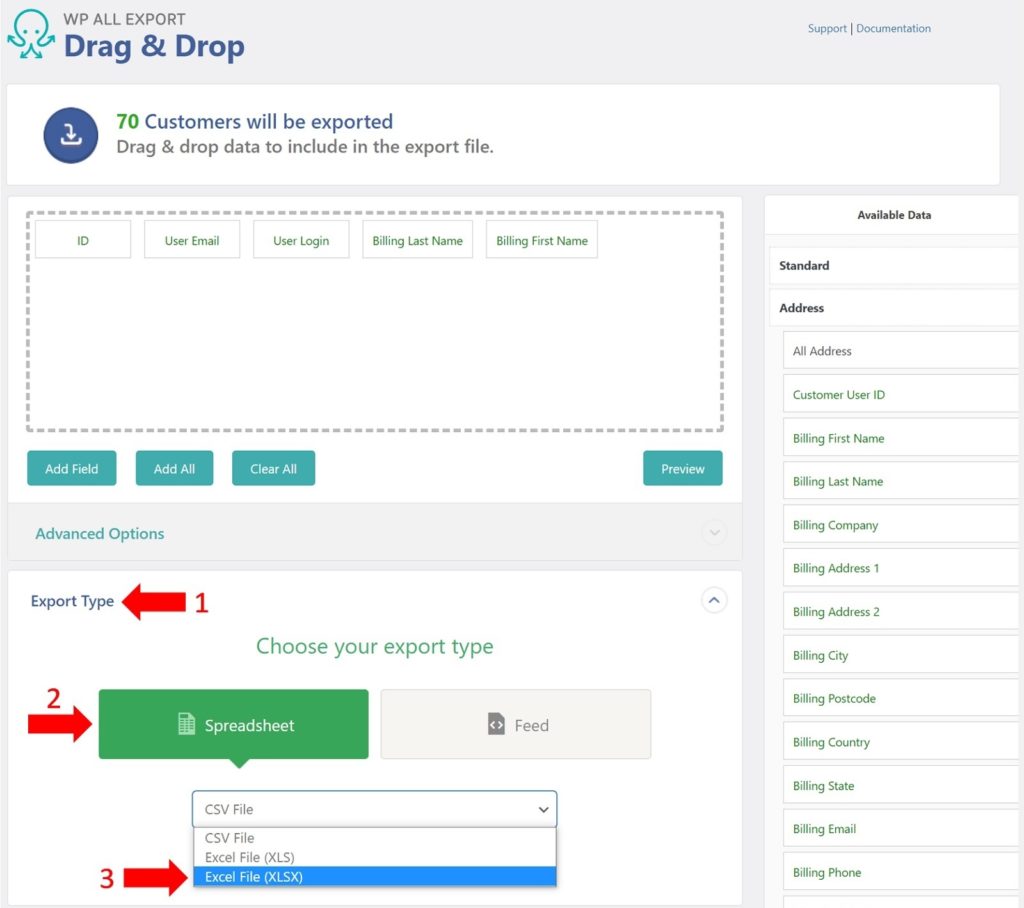
- Expand the Export Type section.
- Choose Spreadsheet.
- Select the desired Excel format.
To export customers in an XML format:
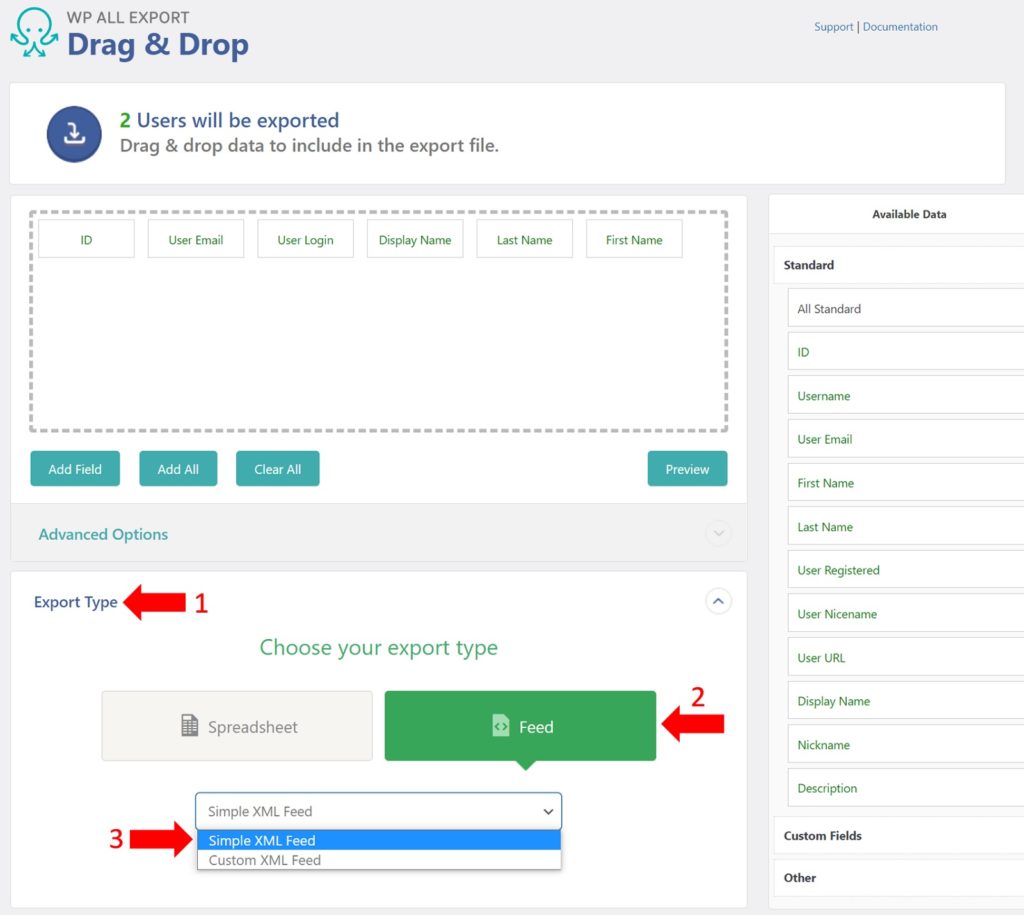
- Expand the Export Type section.
- Choose Feed.
- Select the desired XML format.
Applying Filters for Specific Exports
If you wish to export only a subset of your customers, you must add filters in the bottom section of the New Export screen:
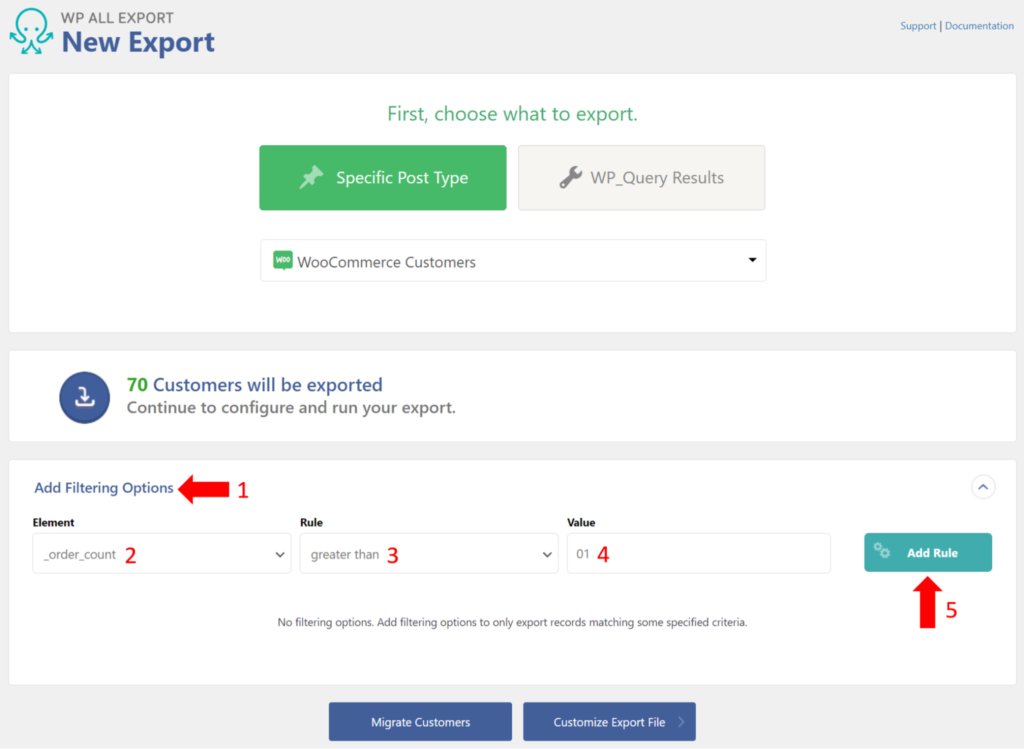
For example, to export only those customers who have ordered from you more than once, do the following:
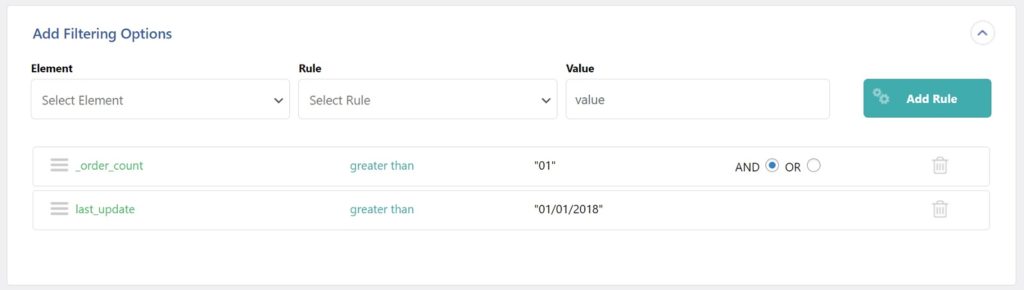
- Expand the Add Filtering Options section.
- In the Element box, select “_order_count”.
- In the Rule box, select “greater than”.
- In the Value box, enter “1”.
- Click the Add Rule button.
To apply multiple filters, simply add more filter rules. For example, to export customers who have ordered more than once and who have had their customer profiles updated since 01/01/2018, just add the required date rule:
Handling WooCommerce Customer Passwords
To export WooCommerce customer passwords, simply include the User Pass export field from the Available Data > Other section of the Drag & Drop interface:
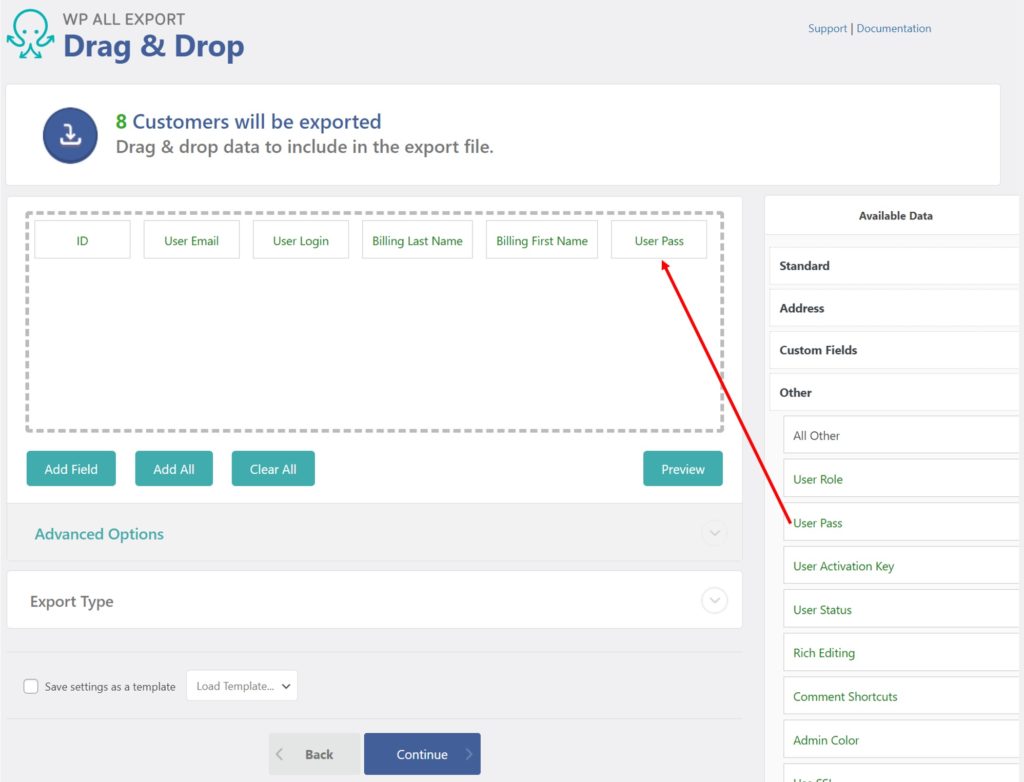
Note that hash values for the passwords are exported, not the text versions, to keep the passwords safe in case the export file falls into the wrong hands.
However, if you import these hashed values back into another WooCommerce store, customers will still be able to access their accounts using their old password.
When you export customer data, WooCommerce protects customer passwords by storing them as “hashed” values—a secure way to hide the actual password. Hashing scrambles the password so it can’t be read, which is essential for security if the export file is accidentally accessed by someone else.
Imagine you’re migrating customers from one WooCommerce store to another. When you import hashed passwords into the new store, customers can log in as usual with their old passwords. This makes the transition seamless for them without compromising password security.
How to Import WooCommerce Customers
The two most common reasons to import WooCommerce customers are:
- to add new customers acquired through a marketing campaign/activity
- to add customers from another site as part of a store merger or migration
One of the key differences when importing versus exporting customers is that you often don’t control the file format or layout for import data.
Fortunately, WP All Import has been designed specifically with this challenge in mind. Thanks to its Drag & Drop interface, you can woocommerce import customers from any CSV, XML, JSON file with virtually any data layout using these basic steps:
- Upload the customer import file.
- Optionally add a filter if you only want to import certain customers.
- Map the fields from your import file to WooCommerce customer fields using drag and drop functionality.
- Run the import to create and/or update the customers.
Create a new WooCommerce Customer Import
WP All Import offers several methods for uploading your customer import data. You can manually upload a file from your computer, download it from an external URL or FTP location, or use a file that’s already been uploaded to your server.
For this demonstration, we’ll use the following Google Docs spreadsheet as our source file: https://docs.google.com/spreadsheets/d/1S4RMJPXqaoBz3oB_UrWAwtN4CDgYQX3lW7aqf-LRWvg/edit?usp=sharing.
If you look inside this file, you will see that it contain 5 customer records consisting of 24 columns. We’re only showing the first 8 columns here:

To start the import, go to All Import > New Import. This will open the New Import screen:
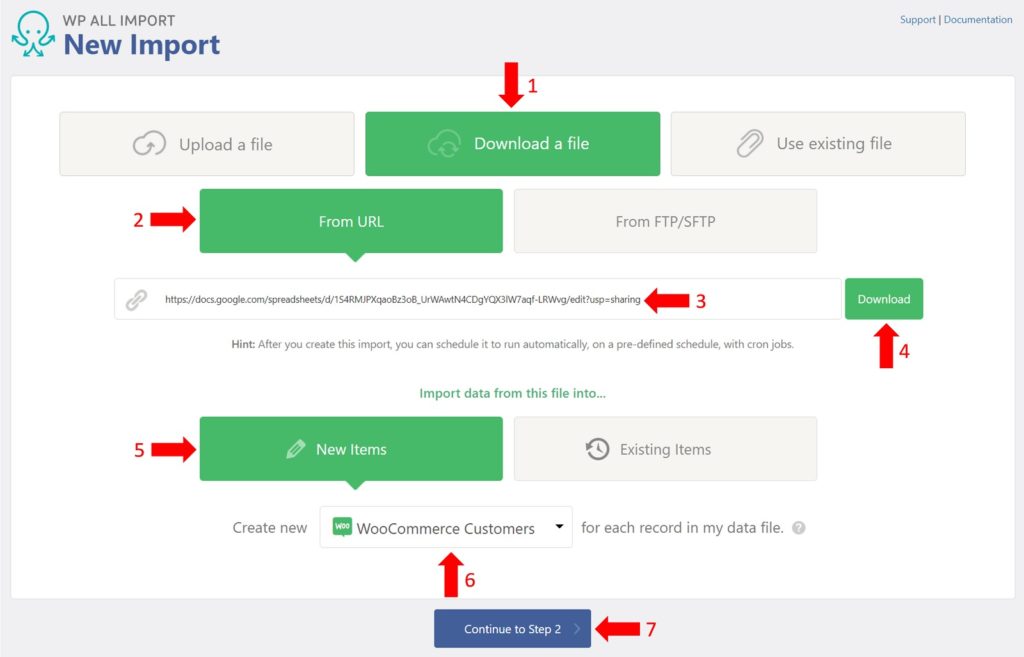
- Click Download a file.
- Select From URL.
- Enter the link for the sample Google Docs spreadsheet.
- Click the Download button.
- Click New Items.
- Select WooCommerce Customers in the Create new selection box.
- Click the blue Continue to Step 2 button at the bottom.
Review the Import File
The Review Import File screen lets you verify that WP All Import has parsed the import file correctly:

As you can see, WP All Import has detected 5 records, as expected, and if you browse the record contents, you will see that they match the contents of the import file.
Because everything looks as expected, click the Continue to Step 3 button.
Drag-and-drop Import Data into WooCommerce Customer Fields
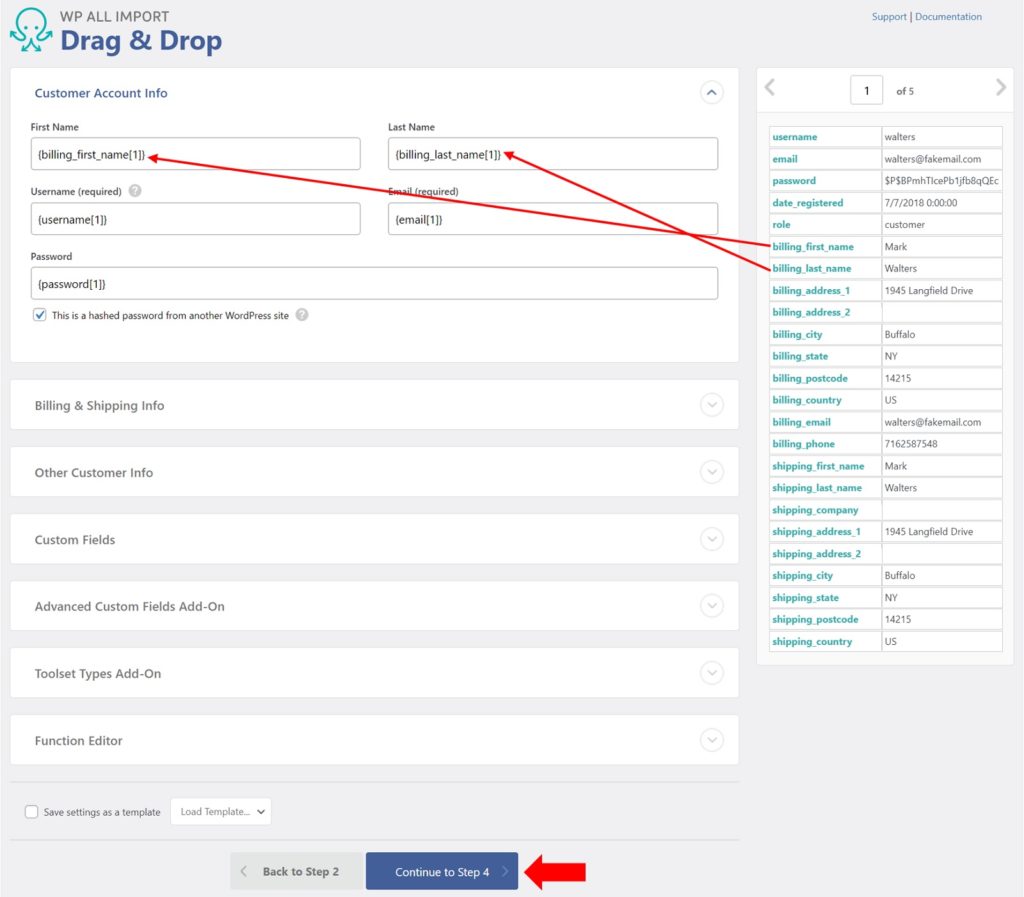
In this step, we’ll map the data from our import file to the WooCommerce fields in the import template. Thanks to the drag and drop system, you don’t have to manually edit your file so that every column has the correct name and order – instead, just drag the columns from the right into the appropriate fields on the left.
Here’s a look at the mapping process for just the Customer Account Info section. Note that we haven’t drawn all the red drag & drop paths because it would get too messy. But, as you can see, in addition to the First Name and Last Name mappings, the incoming email value gets mapped to the customer Email field, the incoming username value gets mapped to the Username field, and the incoming password value gets mapped to the Password field.
WP All Import’s drag-and-drop mapping makes it easy to import data from files with different layouts. If you’re importing data from an external source where the columns don’t match WooCommerce’s format, you can still map the fields to fit WooCommerce’s requirements.
Let’s say you have a CSV file with columns labeled “First_Name” and “Last_Name,” but WooCommerce uses “Billing First Name” and “Billing Last Name.” WP All Import allows you to drag “First_Name” to the Billing First Name field in WooCommerce, so your import goes smoothly without needing to modify the original file.
Note that the incoming password value is a hashed value, so we indicate this to WP All Import by checking the This is a hash password from another WordPress site option. We’ll explain more about hashed passwords shortly.
Just as we mapped the name, email, and password values to the fields in the Customer Account Info section, we will also map all the incoming billing and shipping address values to the fields in the Billing & Shipping Info section.
When this mapping is complete, click the blue Continue to Step 4 button.
WooCommerce Customer Import Settings
The Import Settings screen allows you to control exactly what WP All Import does with the data mapped in the Drag & Drop interface. Here are the relevant settings in the top two sections of this page:
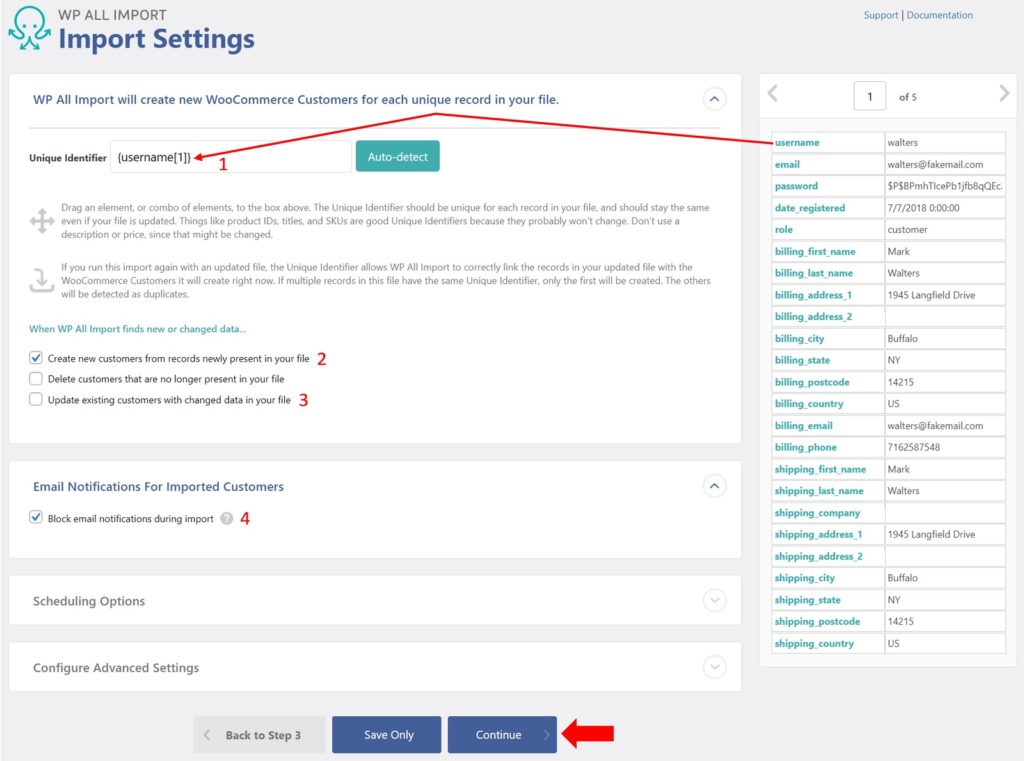
- Unique Identifier. This identifier must be unique for each customer, including all the customers already in your WooCommerce database. In the example image above, we’re using the incoming username value. However, this may not be sufficient. For example, what if an existing customer already has the same user name as one of the incoming customers? There are many ways to deal with this. In this simple scenario, we’ll just assume that there are no conflicts with existing customer user names.
- A unique identifier is a special field—such as username or email—that WooCommerce uses to tell customers apart. During imports, it’s essential to make sure there are no conflicts, especially with usernames, which need to be unique across the store.
- If you’re merging customer lists from two stores, use a unique identifier like the customer’s email address to prevent importing duplicate usernames. WP All Import can match based on this field, so existing customers aren’t duplicated, and each customer is identified correctly in the new system.
- Create new customers from records newly present in your file. If checked, WP All Import will create a new customer for every incoming customer whose unique identifier is not already present in the existing WooCommerce customer data.
- Note that the Update existing customers with changed data in your file option is NOT checked. This means that we will not try to deal with updating existing customers. If this option were checked, it would open up a large number of options that would allow us to deal with update issues on a field-by-field basis. But as we’re trying to keep this tutorial simple, we’ll skip this option for now.
- Block email notifications during import. Normally, if you update a WooCommerce customer, WordPress will email the customer by default. This setting allows you to avoid these updates when importing customer data.
Ignore the Scheduling Options and Configure Advanced Settings sections of this page for now. We’ll return to these subjects shortly.
Click the blue Continue button at the bottom of the screen.
Run the WooCommerce Customer Import
The next screen is the Confirm & Run page. On this page, click the green Confirm & Run Import button.
When the import is complete, you should see a confirmation screen that looks similar to this:
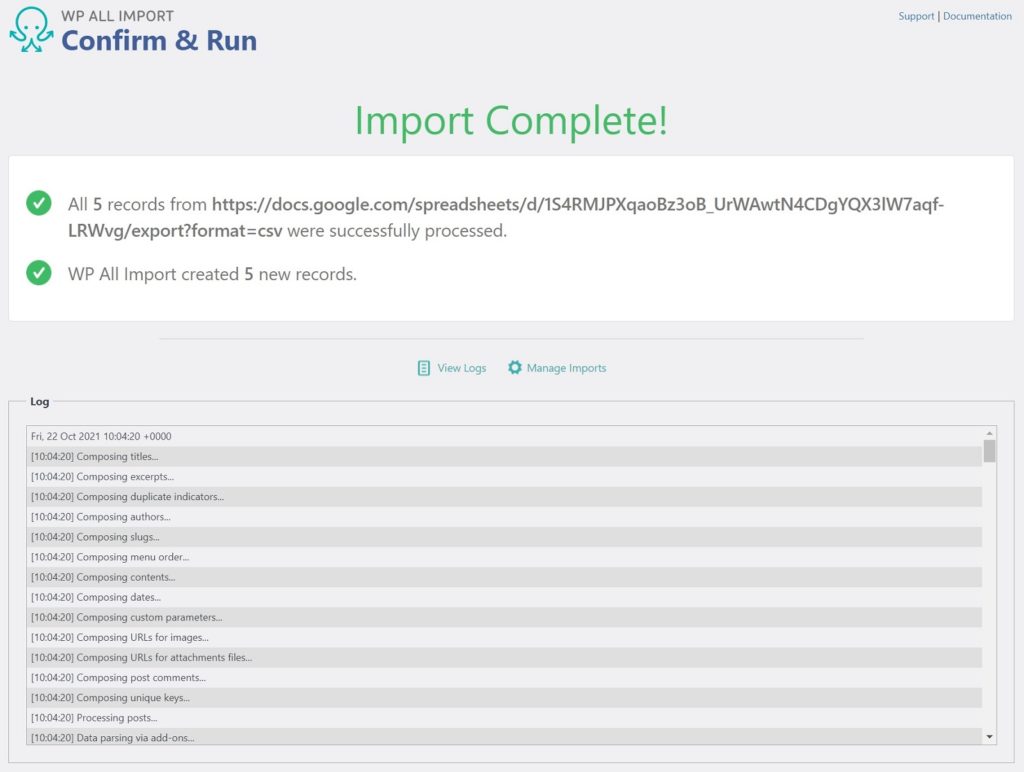
This screen should indicate that your five customers were imported. If you attempt to create an order in WooCommerce, you will find that you can now use these customers in the order entry process.
That’s it — you’ve just completed the basic process of how to import WooCommerce customers with WP All Import.
Advanced Features in WP All Import
In the preceding sections, we skipped over a few of the advanced features of WP All Import for importing customers. In this section, we briefly describe some of those features.
Filtering Import Data
Back in the Review Import File screen (Step 2), there was a section at the bottom of the screen called Add Filtering Options. This filter works in a similar manner to the filtering process shown earlier for WooCommerce customer exports. The main difference is that you are filtering incoming data instead of existing WooCommerce customer data.
Handling Hashed Passwords
As mentioned, incoming password information is often hashed.
Hashing is a one-way action that irreversibly scrambles a string of text. It is not possible to reverse the hashing process to identify the original password. However, if the hashed password values are coming from another WordPress website, then your WordPress site will understand them so that customers will be able to log into your store using their old passwords.
Mapping Custom Fields
If any incoming customer information belongs in a custom field on your website, you will be able to map them to your system in the Custom Fields section of the import’s Drag & Drop screen. This is one of the great benefits of using WP All Import, as it can identify and populate custom fields or fields from any plugin or add-on.
Function Editor
If you need to manipulate the incoming customer information in any way during the import process, you can create PHP functions to assist in this manipulation.
Scheduling Imports
If you need to run a customer import process on a schedule, you can do so through the Scheduling Options section of the Import Settings page. This is particularly useful if you need to keep your WooCommerce customer data synchronized with an external system. In this model, the external system can output a new customer import file on, say, a weekly basis. As long as the external system drops this file in an agreed-upon location, WP All Import can automatically import it by following a compatible schedule.
Scheduling is helpful for stores that frequently update customer data, allowing you to sync information automatically at regular intervals. This feature helps keep WooCommerce data aligned with external sources, like CRMs or mailing lists.
If you’re running a WooCommerce store that regularly updates customer lists from a mailing system, you can set WP All Import to check for new customer files every day. This daily sync ensures your customer records are always up to date without needing to import manually each time.
Advanced Settings
Importing an especially large customer file? No problem. WP All Import provides a Configure Advanced Settings section on the Import Settings page. These settings allow you to break imports up into more manageable processing chunks, and also to increase import processing speed by disabling certain functions, importing only specified records, or using a StreamReaders instead of an XMLReader to parse the import data.
WooCommerce Store Migrations
WooCommerce is one of the most widely used e‑commerce platforms in the world, powering over 5.3 million active online stores and holding a 28.19% market share of all online stores.
Just as we’ve described using WP All Export and WP All Import for exporting/importing WooCommerce customer data, you can also use these plugins to handle complete store migrations.
Why choose WP All Export/Import over a dedicated migration plugin? Because these two plugins not only handle all the typical store data (customers, products, orders, etc.), but also the data for all add-ons/extensions, too, including all settings and SEO information. And if you need to intervene in any portion of the migration process, you can do so using the convenient drag & drop functionality.
FAQ
Can I Export Woocommerce Customers Without a Plugin?
WooCommerce doesn’t have a built-in feature to export customers directly.
Are Customer Passwords Transferred Securely?
Yes, customer passwords are transferred as secure, hashed values. This means that while the passwords themselves can’t be read, customers can still log in with their existing credentials if you import the hashed passwords into another WooCommerce site. This approach ensures security while maintaining a smooth experience for your customers.
Is Wp All Import Compatible With Custom Fields?
Absolutely! WP All Import’s drag-and-drop interface allows you to map custom fields easily. This means you can import data into any custom fields you’ve created or that exist through WooCommerce extensions. This flexibility is especially useful if you need to transfer unique customer data or information tied to plugins.
Can I Schedule Automated Imports and Exports?
Yes, both WP All Import and WP All Export allow you to set up scheduled imports and exports.
Conclusion
As you can see, WP All Export and WP All Import make it easy to export and import WordCommerce Customers. Give it a try with the steps outlined in this article.