
The World Wide Web is evolving and WordPress is no different. WordPress, despite starting out as a blogging platform, it has grown into a flexible and powerful management system that powers nearly one-third of all websites on the internet. This means at least 1 in every 3 websites you run across the web are powered by WordPress. It has definitely grown into a valuable solution for everything from e-commerce to membership sites, magazines, and custom web applications. Almost anything you think you can do with your website can be accomplished with WordPress. In this article we’ll talk about WordPress stauts pages.
To some beginners, some aspects of WordPress can seem a little bit intimidating but after you take a closer look and learn it, you begin to realize how intuitive, easy, and extensible it is. WordPress has the ability not only to power web applications, but it can also drastically reduce the development time too.
While WordPress can cover almost everything from managing and maintaining your website through the use of plugins, themes, and using the intuitive WordPress Dashboard to manage your content, unexpected things will start happening beyond the capabilities of the WordPress functionalities.
There are plenty of possible issues that can come up with your WordPress deployments across the world and with the unfolding of cloud-based solutions, uptime reporting has shifted from manual to service providers themselves which sometimes are complicated to control especially if you are managing a lot of WordPress websites. Having a dedicated service or at least a platform that will notify you about your WordPress website downtime and website’s health status has been a favorable option for website owners.
While it’s good to understand the benefits of having good monitoring methods, website monitoring itself is just a part of the puzzle. This is where a status page comes into place which can deliver several benefits to your website’s monitoring and maintenance needs.
Table of Contents
Understanding Status Pages
A status page is simply a webpage that provides a detailed summary of your system’s status, server uptime and downtime information, APIs and dashboard monitoring which dynamically notifies you and your team about such information via emails, text messages, or embedded widgets.
A common problem that a status page provides a solution with is that when your website is down. Aside from notifying you with the current live status of your website it can also give you a clear report of downtime and other relevant metrics about your website. This enables you to properly communicate such occurrences, scheduled maintenance and downtimes with your customer or website visitors in a dynamic and timely manner.
Some benefits of using a status page includes:
- Prevent several customer support complaints through proper communication of outages.
- Showcases the reliability and credibility of your business for free.
- Solve server and codebase issues faster.
- Understand your website’s performance through detailed metrics and system reporting.
Now that we’ve learned about what a status page is and how it can benefit your business and website’s performance, let’s take a closer look at how we can create our own status page for a WordPress website through an external platform called Pulsetic.
Before we proceed on setting up our Pulsetic account let’s first install a fresh copy of the latest version of WordPress. Please keep in mind that setting up a WordPress website may depend on your hosting provider’s available tools and how you might want to set it up. If you’re using the Pingdom service, we found a good alternative to Pingdom as it is Pulsetic.
In this tutorial, I am going to use Cpanel’s WordPress Softaculous to quickly install a copy of the latest WordPress website. If you are following along, simply click on the “Install” button on the upper left corner of the Softaculous dashboard as seen in the image below.
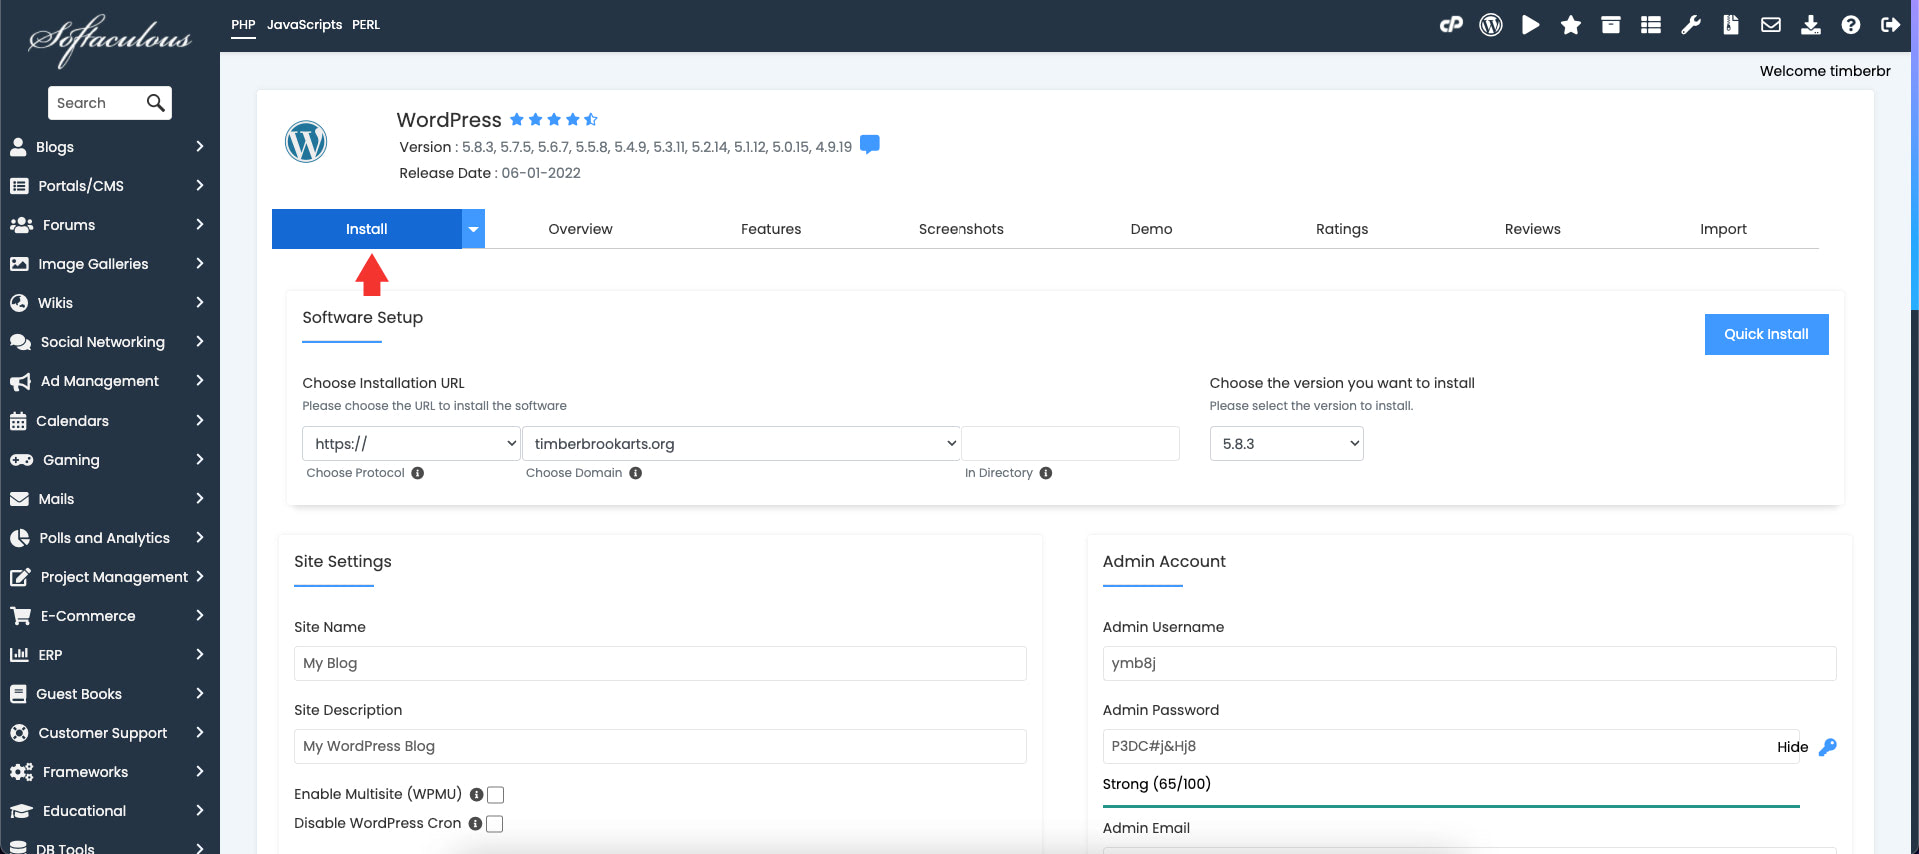
From here, you need to select your preference on following details about your WordPress installation:
- Installation URL
- WordPress version
- Site name
- Site tagline
- Admin username
- Admin password
- Language
- Starting theme
- And some more advanced options
Since most of these settings depend on user preference and are completely straightforward, I won’t go into details about the settings we’ve set up.
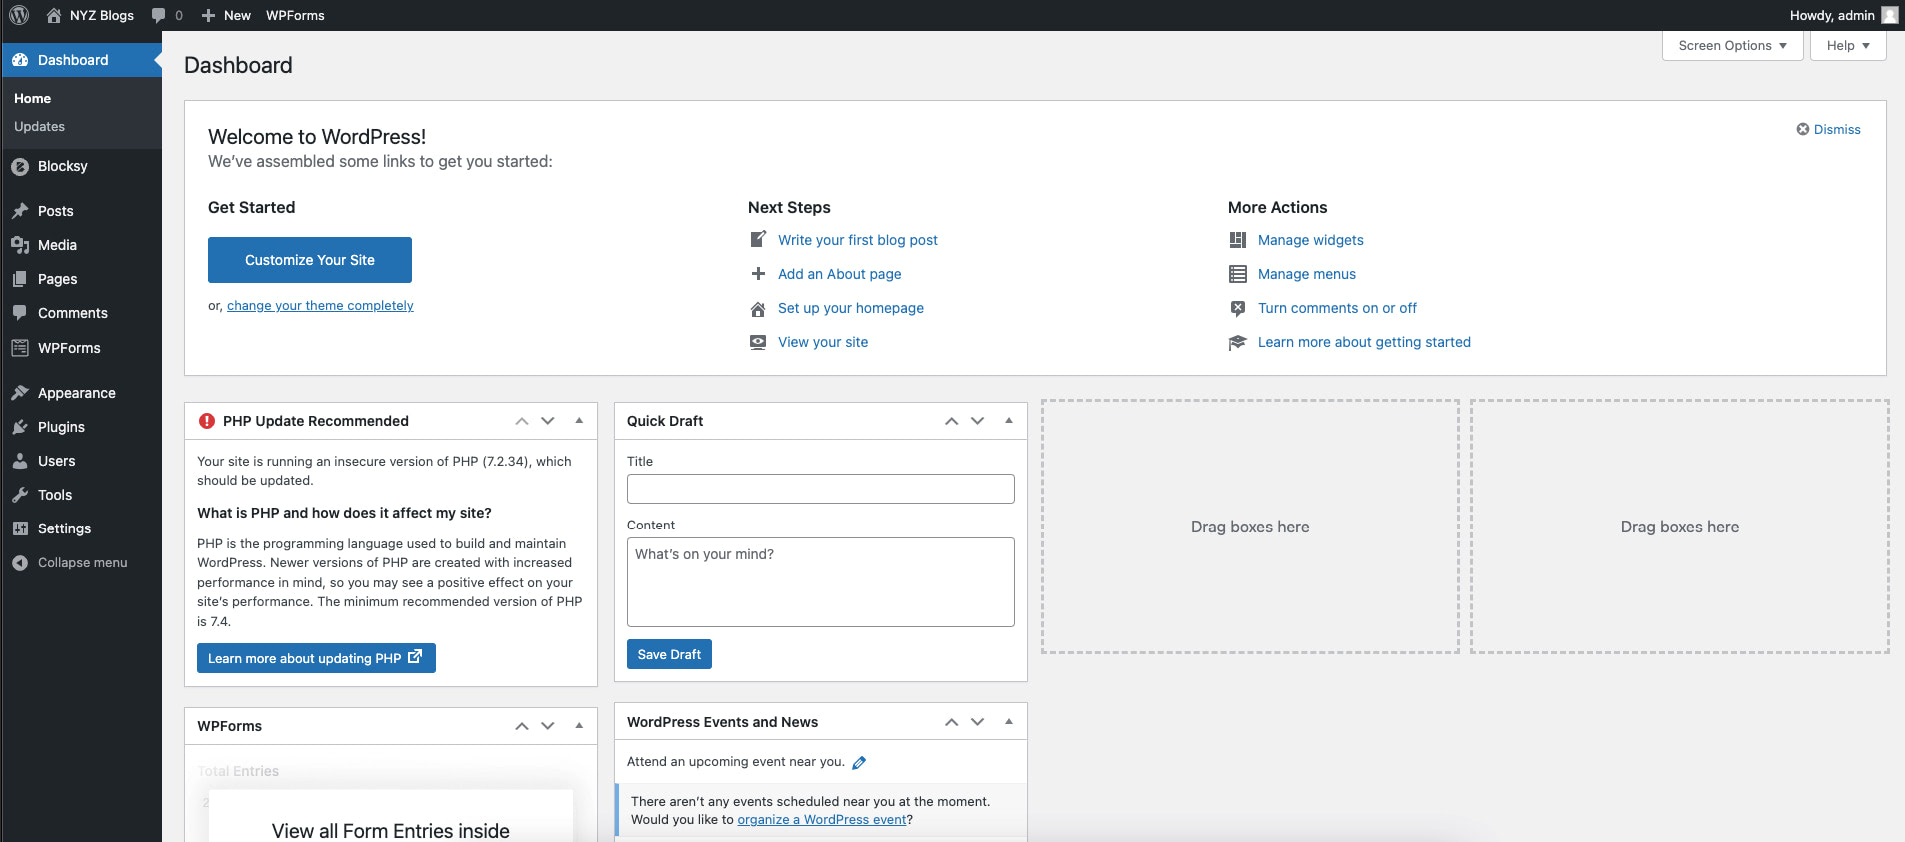
Once the installation is complete, simply login to your WordPress Dashboard using your admin user account details when you set it up on the Cpanel’s WordPress Softaculous installation. At this point, it’s presumed that you are login to WordPress Dashboard similar to the image below.
Setting Up Your WordPress Website
A WordPress theme is a collection of WordPress templates made up of WordPress template tags. There are thousands of WordPress themes out there. Choosing the right theme is very important as it will be the base design of your content, keeping it responsive across all devices, while loading it fast.
WordPress has recently added support to block-based content editors named Gutenberg. It is a major improvement for content customization, and will become even more efficient as more blocks are being built in core and in plugins. When it comes to choosing the right theme, it’s important to choose a theme that supports Gutenberg as it’s the modern trend these days.
In this tutorial, we’re going to use Blocksy WordPress Theme for our demo. This WordPress theme is an innovative, lightning fast free WordPress Theme that is Gutenberg ready along with some of its helpful features such as translation and responsive web design ready which was written with clean code in mind.
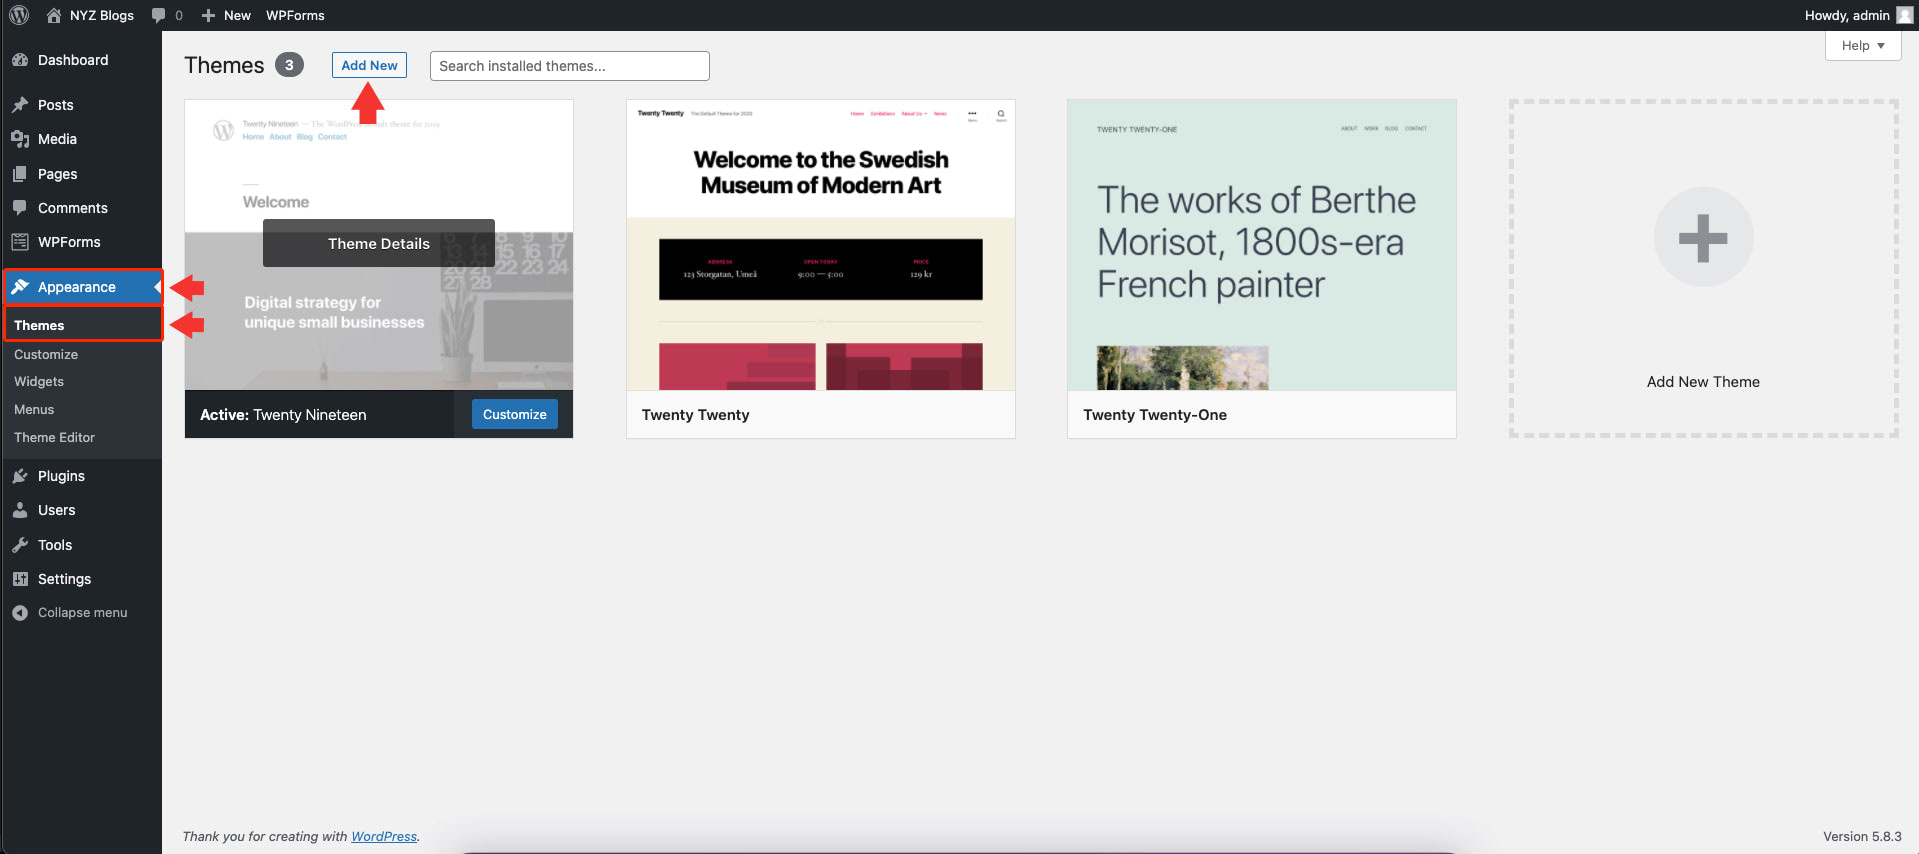
To install Blocksy WordPress Theme, head on to “Appearance” -> “Themes” and click on the “Add New” button as seen in the image below.
On the upper right corner of the screen, search for “Blocksy” on the search bar as seen in the image below.
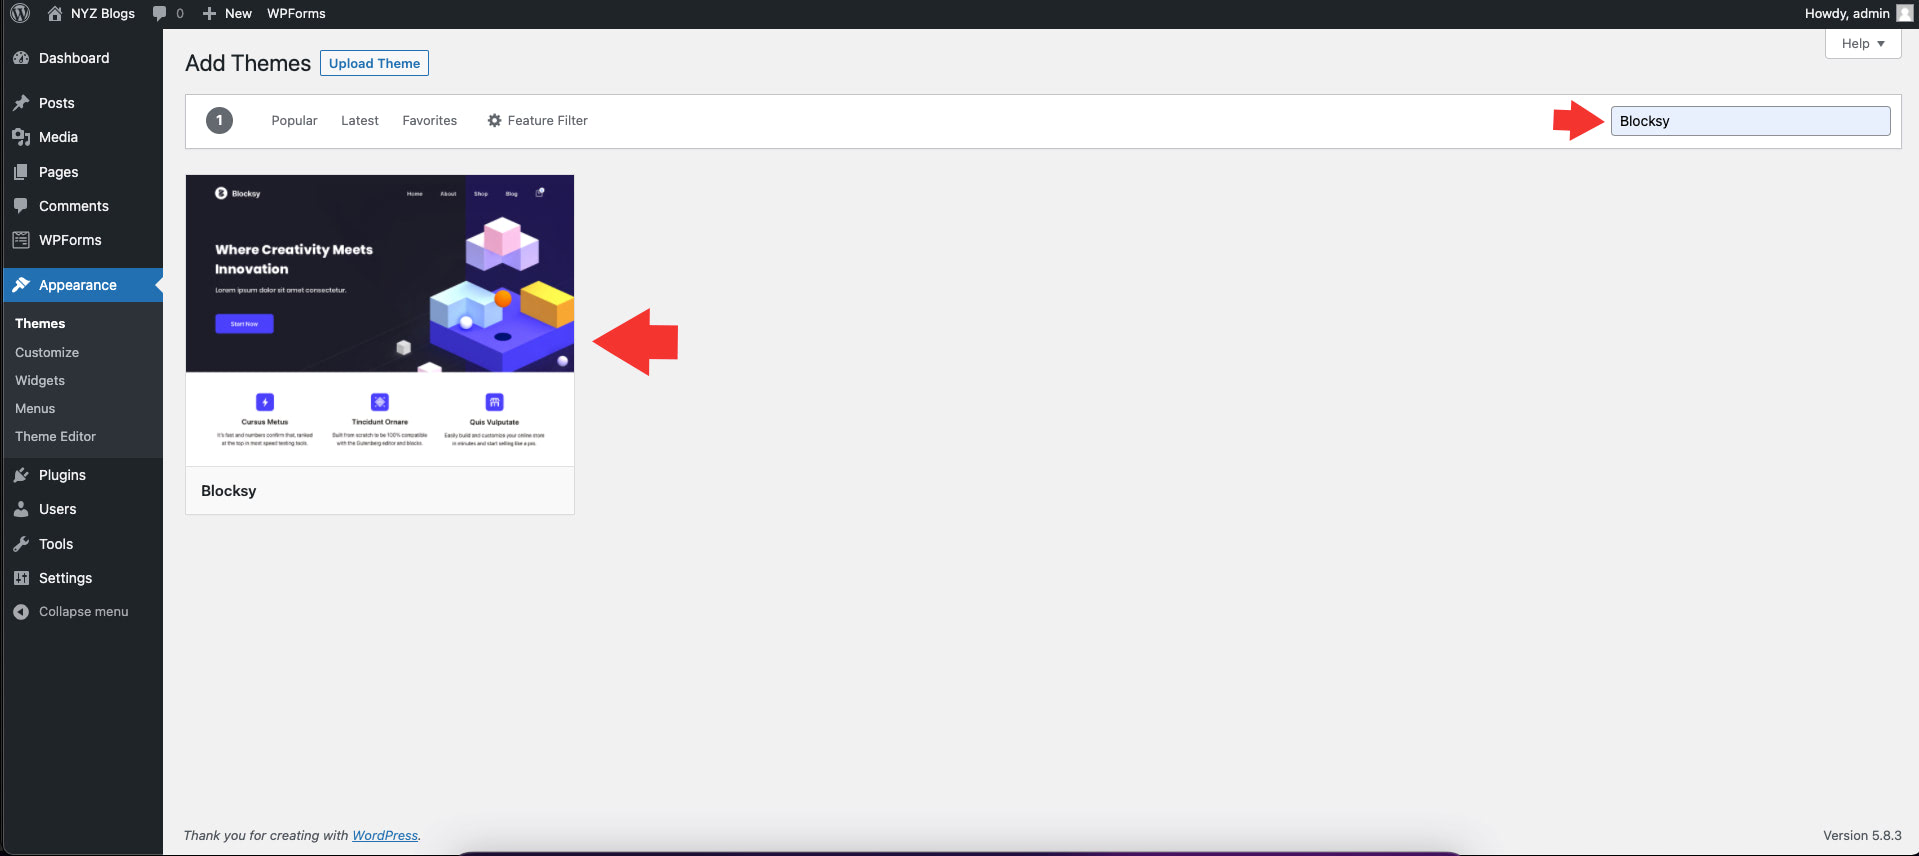
Next, we need to install and activate the Blocksy WordPress Theme by simply clicking on the “Install” button followed by a click on the “Activate” button.
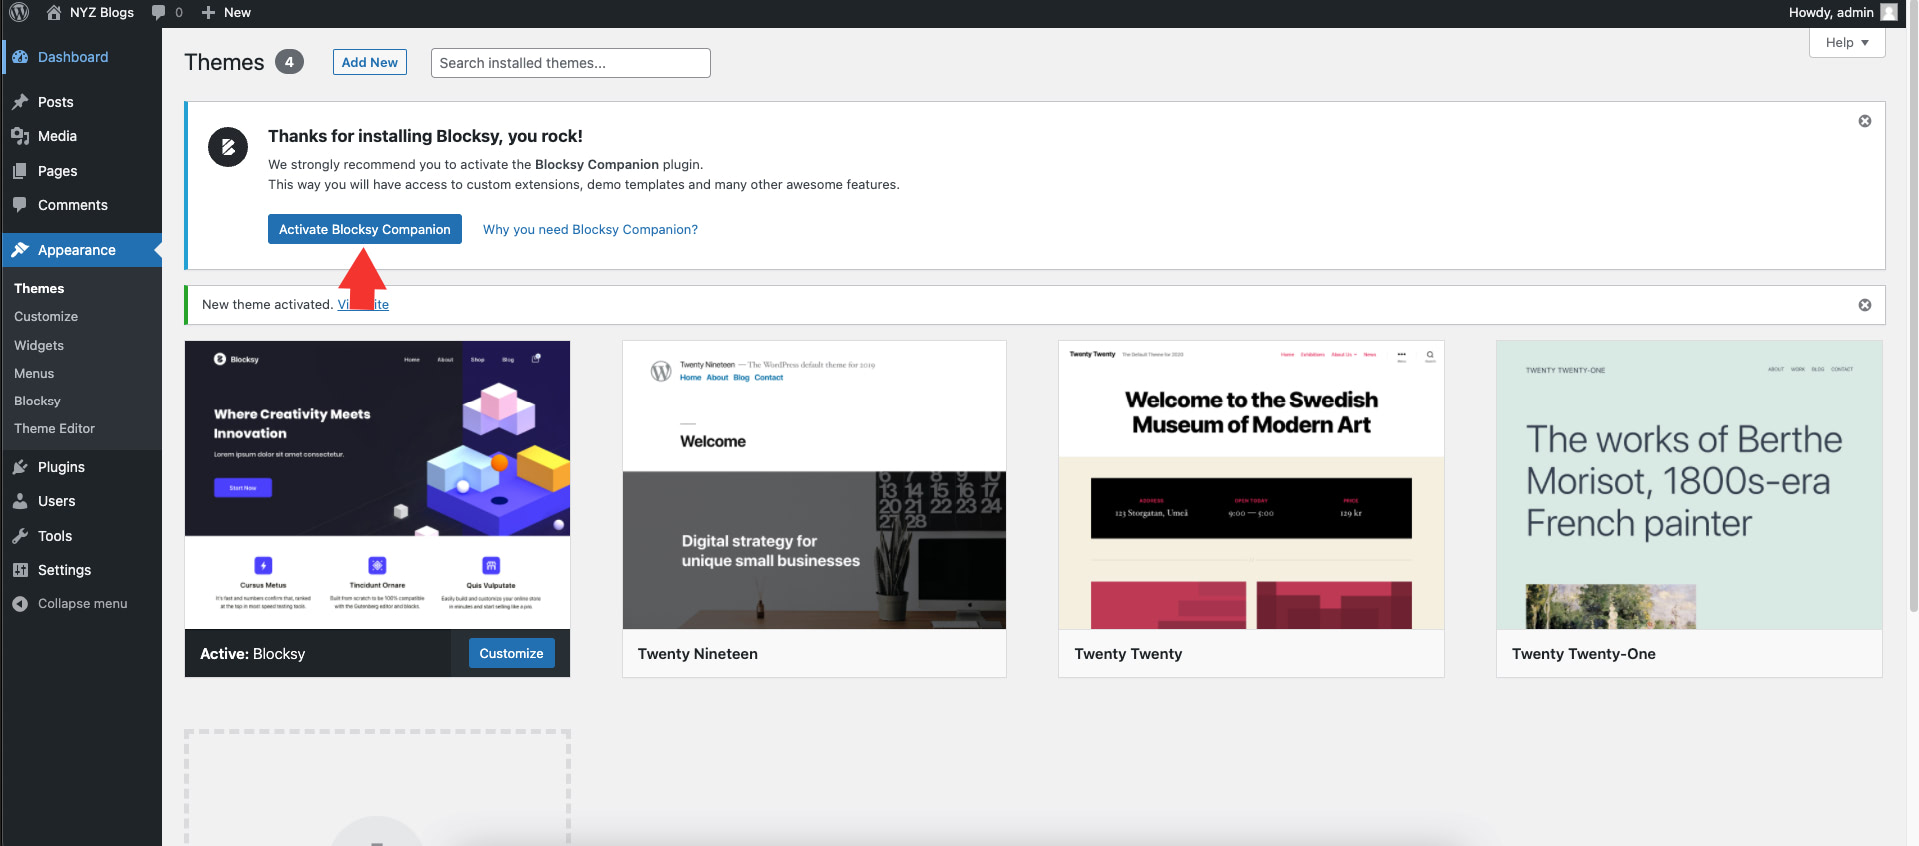
Once we activate the Blocksy WordPress Theme, we need to activate Blocksy Companion where we can choose our preferred design layout for our WordPress website. To do this, click on the “Activate Blocksy Companion” button as seen in the image below.
Next, head on to the Blocksy WordPress Theme Dashboard and click on the “Starter Sites” Tab. On this tab, we can select the look and feel we prefer for our WordPress website.
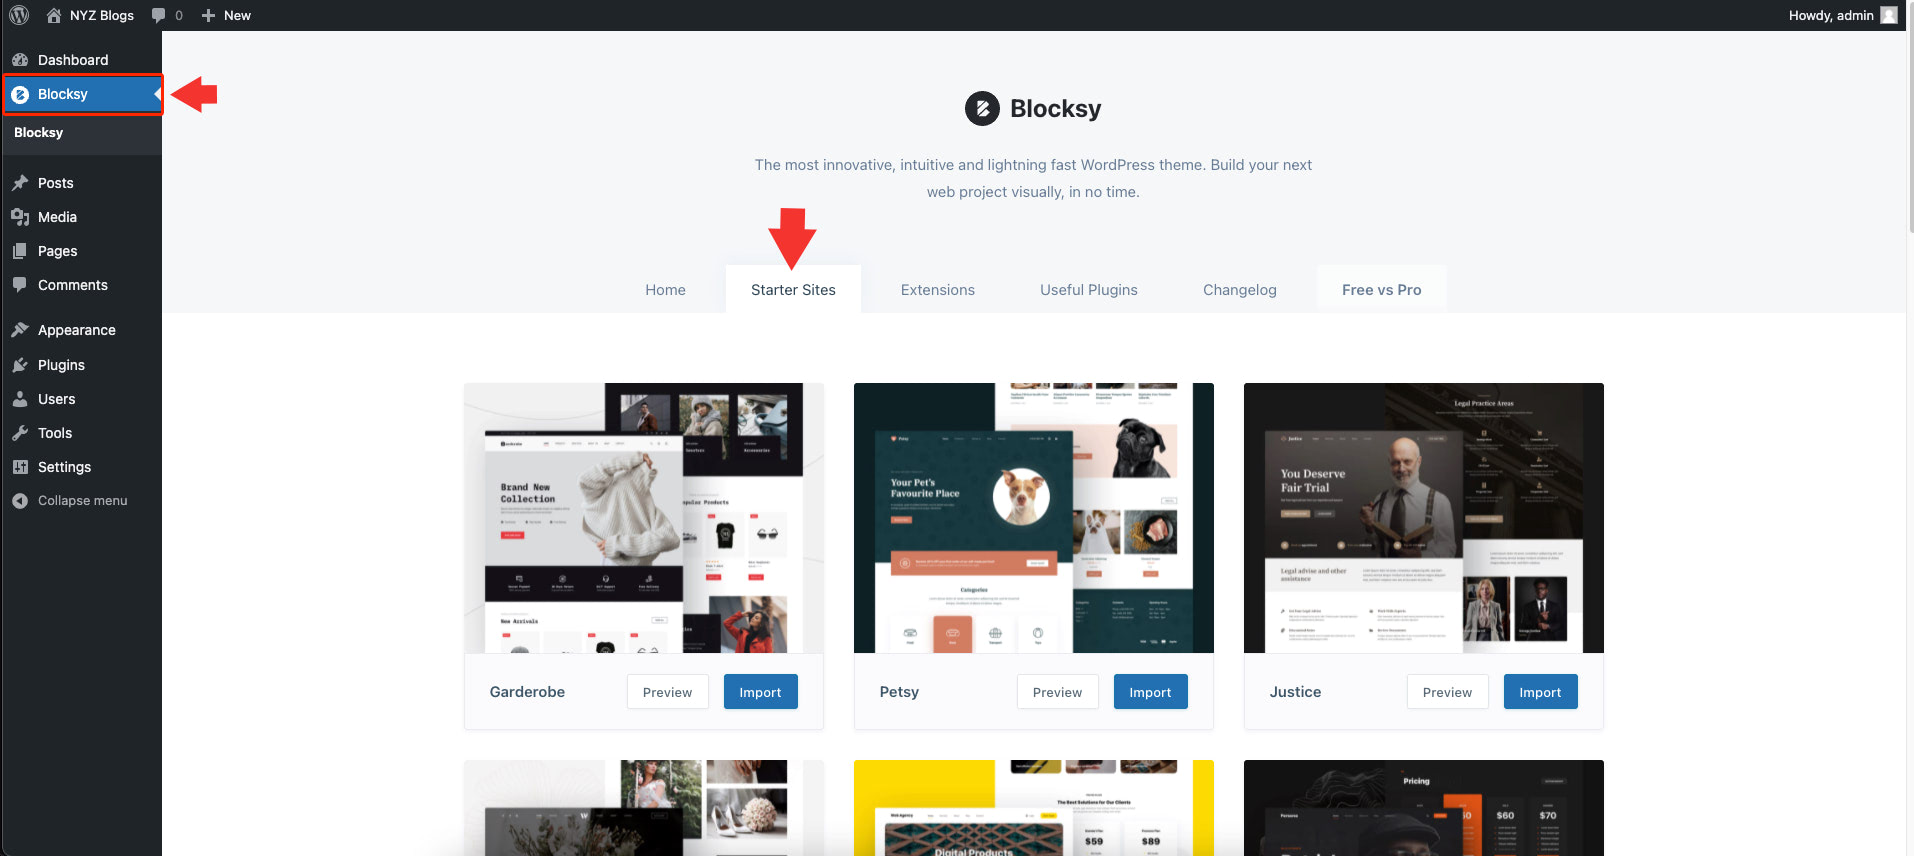
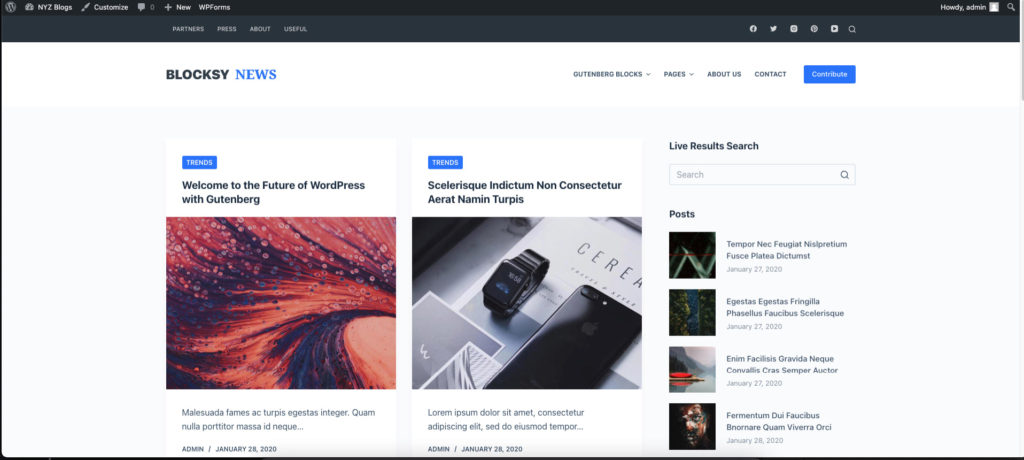
For our demo, let’s use the “Blocksy News” theme which can be found at the very bottom of the theme’s list. Click on the “Import” button and it will start prompting a few questions about the import such as if you want to install it as a child theme including the plugins and widgets that you want to install that comes with the theme design.
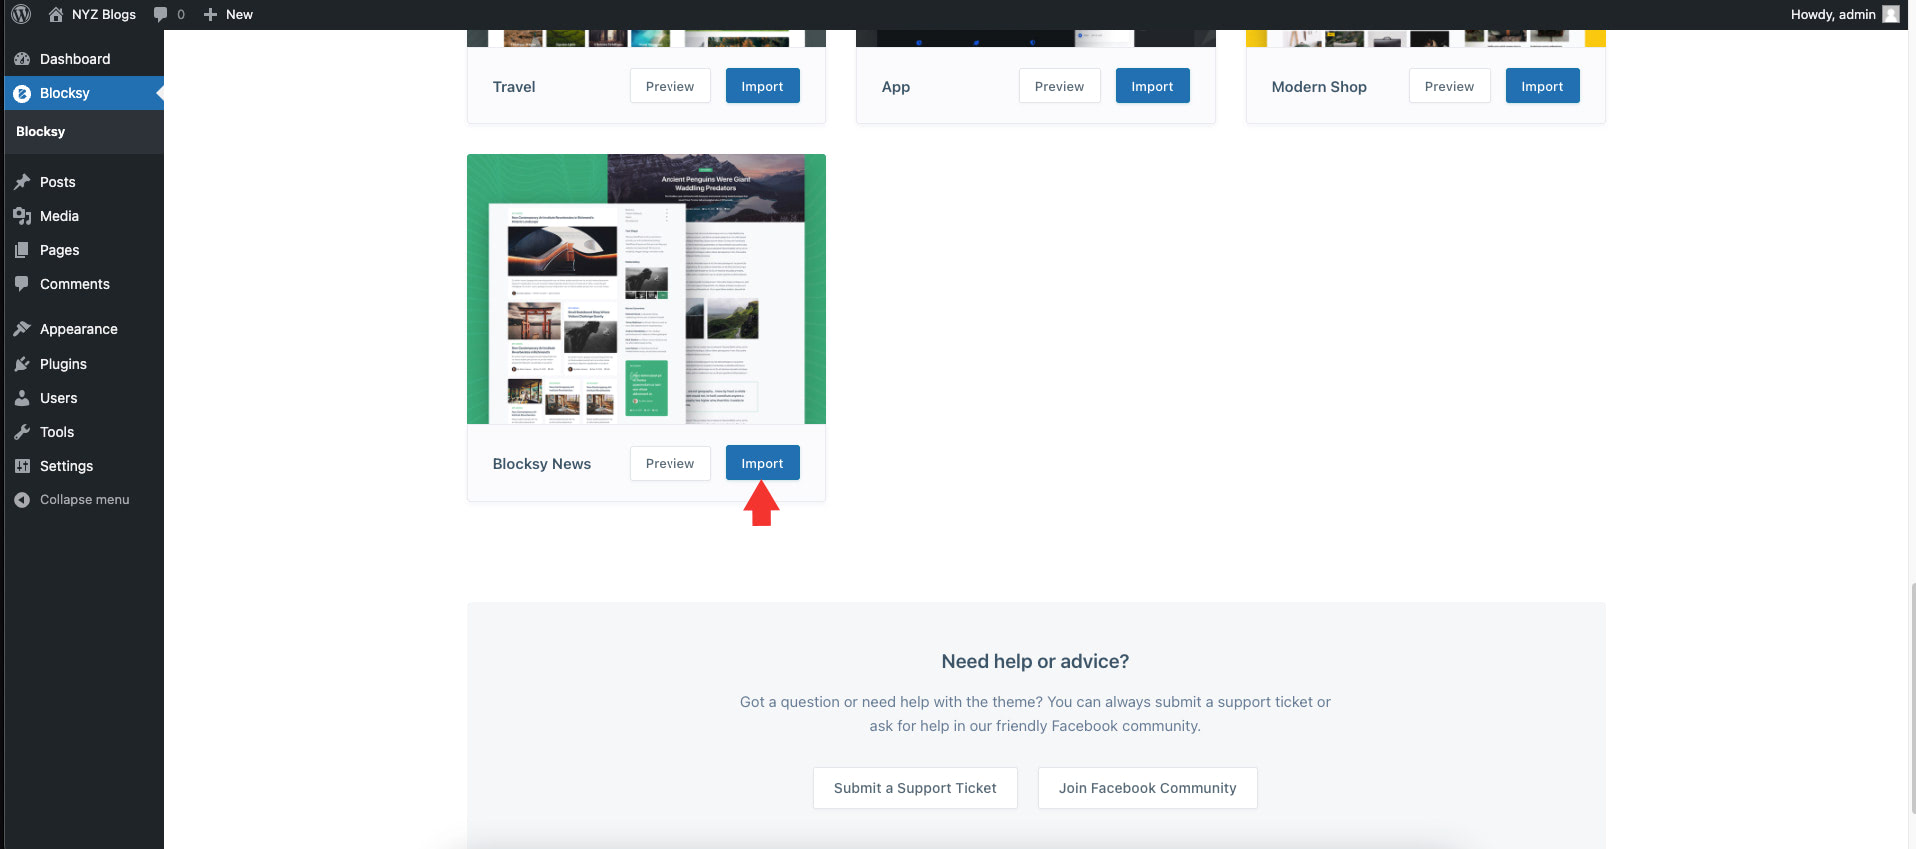
Simply click on the “Next” button until the “Install” button appears and we are good to go.
Once the installation process is complete, we can visit our homepage to see the look and feel of our chosen theme. You can customize the content as you may like but for the sake of our demo this should be sufficient.
Getting Started with Pulsetic
Pulsetic is a website uptime monitoring service platform that enables you to create beautiful status pages and incident management reports by giving you downtime alerts by phone call, SMS, email or Slack when your website is down.
It comes with powerful features including:
- Data center monitoring from around the world. Pulsetic monitors from more data centers around the globe to guarantee redundancy and localize outages. It shows you in which part of the world your website is down or slow.
- Dynamic Alert. Pulsetic sends notifications to you when your site is down in a way that suits you so you can act as fast as possible and minimize any downtime. You can receive instant alerts via email, SMS, Slack and more to you and your teammates.
- Public status pages. Create public status pages to show how your website is performing. You can customize colors, add your logo or even link your custom domain. Send status updates via an email to your Status page subscribers.
- Website speed monitoring. Pulsetic check response times from different locations to know which is the fastest and which is the slowest.
- Customize requests. It offers full request customization, including setting headers, request types, response timeout an
- Efficient website maintenance option. You can schedule your maintenance when you update your website and Pulsetic won’t check it during this period of time.
- Full reports. Pulsetic offers comprehensive reports for the past 30 days available to you, including information for every single request
- SSL certificates monitoring. It monitors the expiration date and notify you when it’s time to update your certificate. Pulsetic will notify you before the expiration of your SSL, so you have time to renew.
In order for us to create our status page for the demo WordPress website, we need to create our free account first.
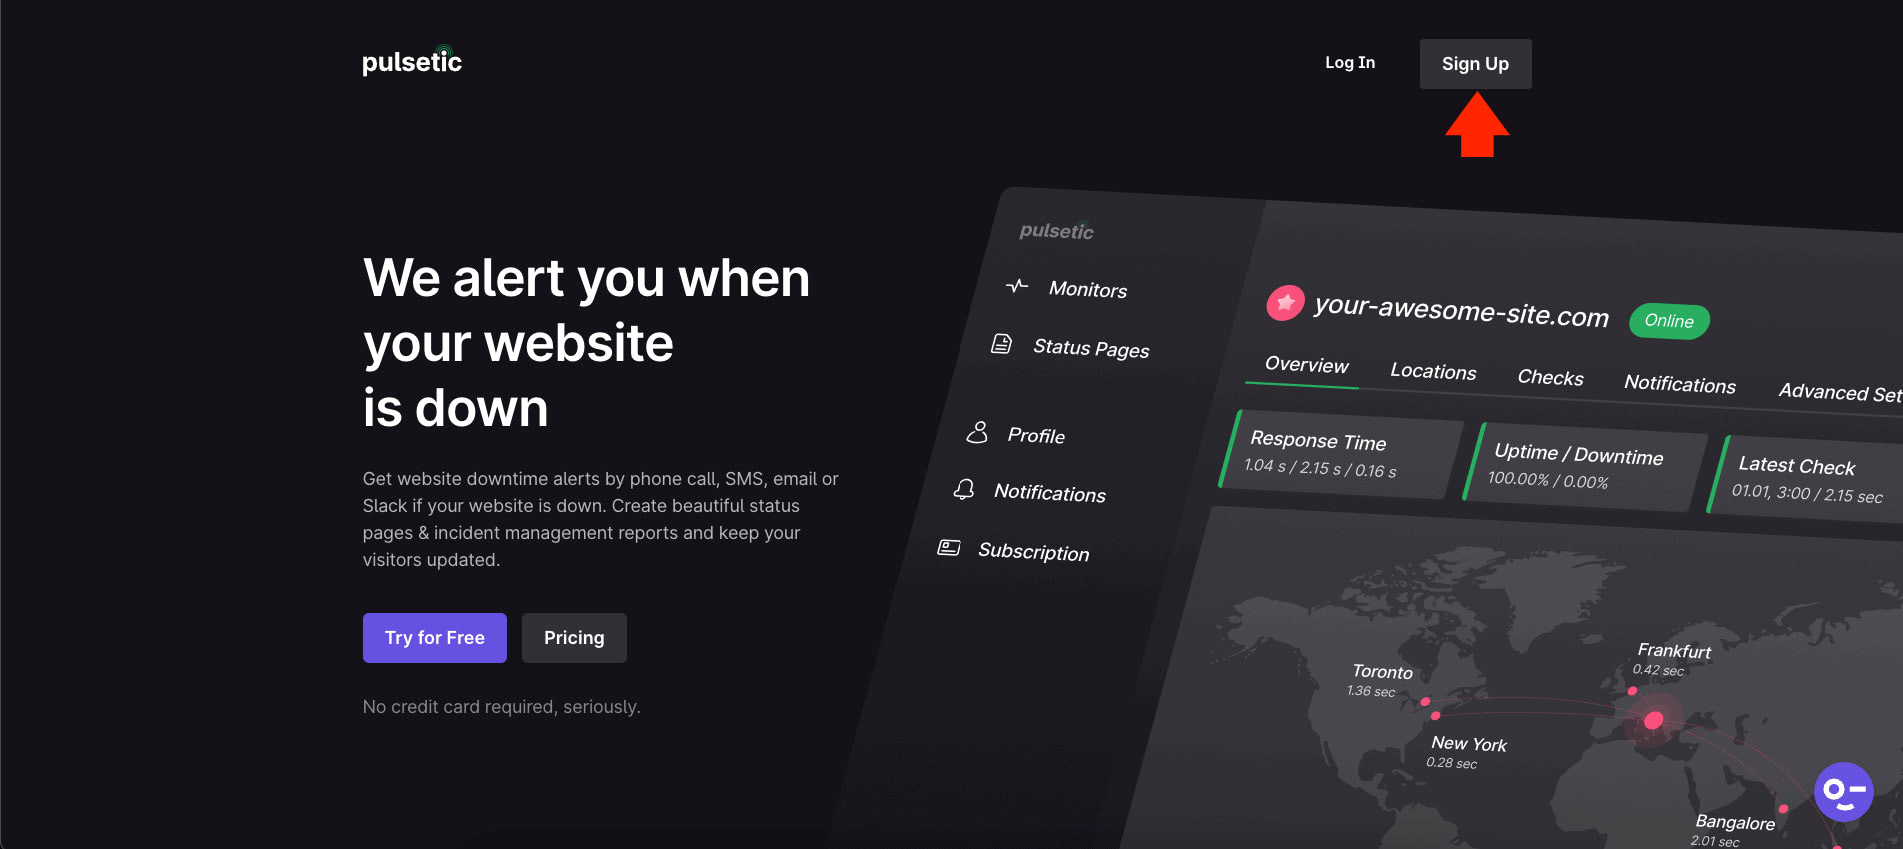
Head on to https://pulsetic.com/ and click on the “Signup” button on the upper right corner of the homepage and you will be redirected to the sign up page.
From here, you need to fill in the sign up form with your information. Take note that you need to verify your email upon signup.
Once your email gets verified, you will see a dashboard that looks similar to the image below.
Notice that there are a few menu items on the left side panel of the dashboard which includes:
- Monitors
- Status Page
- Status Badge
- Profile
- Subscription
- Usage
- Teammates
We won’t discuss all of these features in this tutorial. We will focus mainly on the Status Page. However, we will go over on some of the important menu items related to account management which we will discuss later.
Adding Your Website to the Monitors Dashboard
Before we proceed in creating our Status Page, we need to add our website first on the Monitors dashboard. To do this, simply click on the “Monitors” link located at the left menu panel screen. At the upper right corner of the screen, we need to put the link of our WordPress website and then click on the “Add Monitor”.
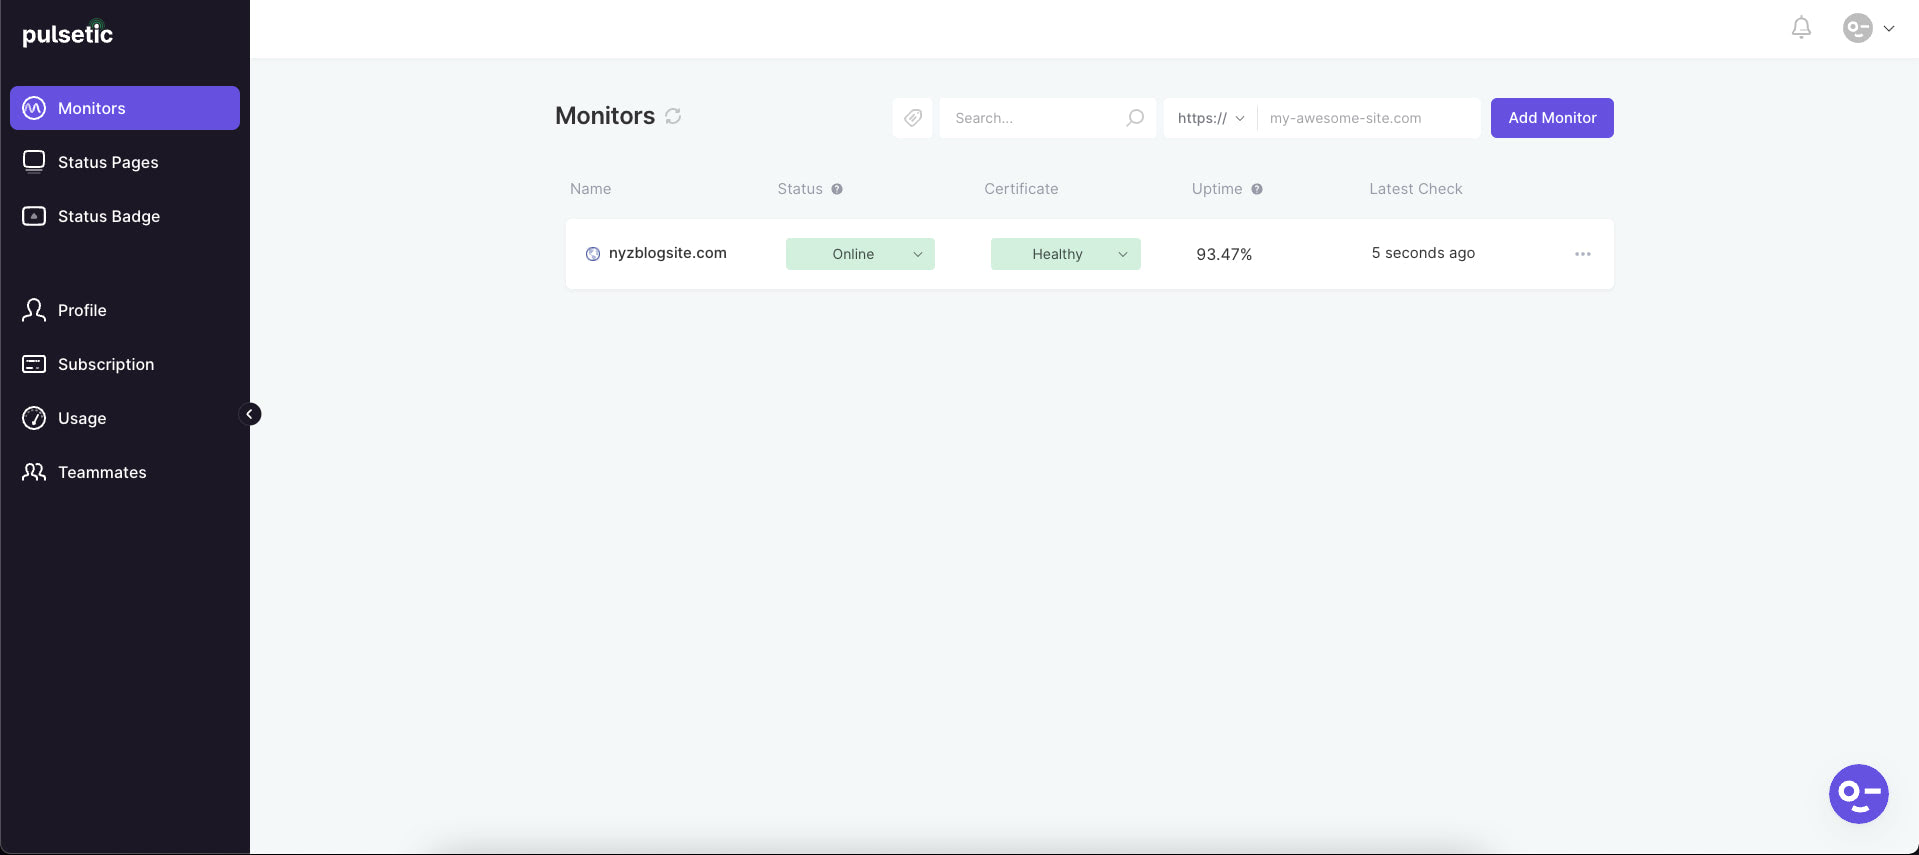
As you can see on the image above, our WordPress website demo has been added to our Monitors dashboard. This means that Pulsetic will now monitor our website’s uptime and downtime including the system operations status from time to time depending on the frequency settings and max time out set within the website Monitor’s general settings.
We won’t go deep on this topic for now as the primary focus of this tutorial is to create a Status Page but I’ll create a separate tutorial discussing this topic in the near future. For now, keep in mind that Monitors dashboard is currently keeping track of our website and sending us reports via email about certain uptime and downtime of your website.
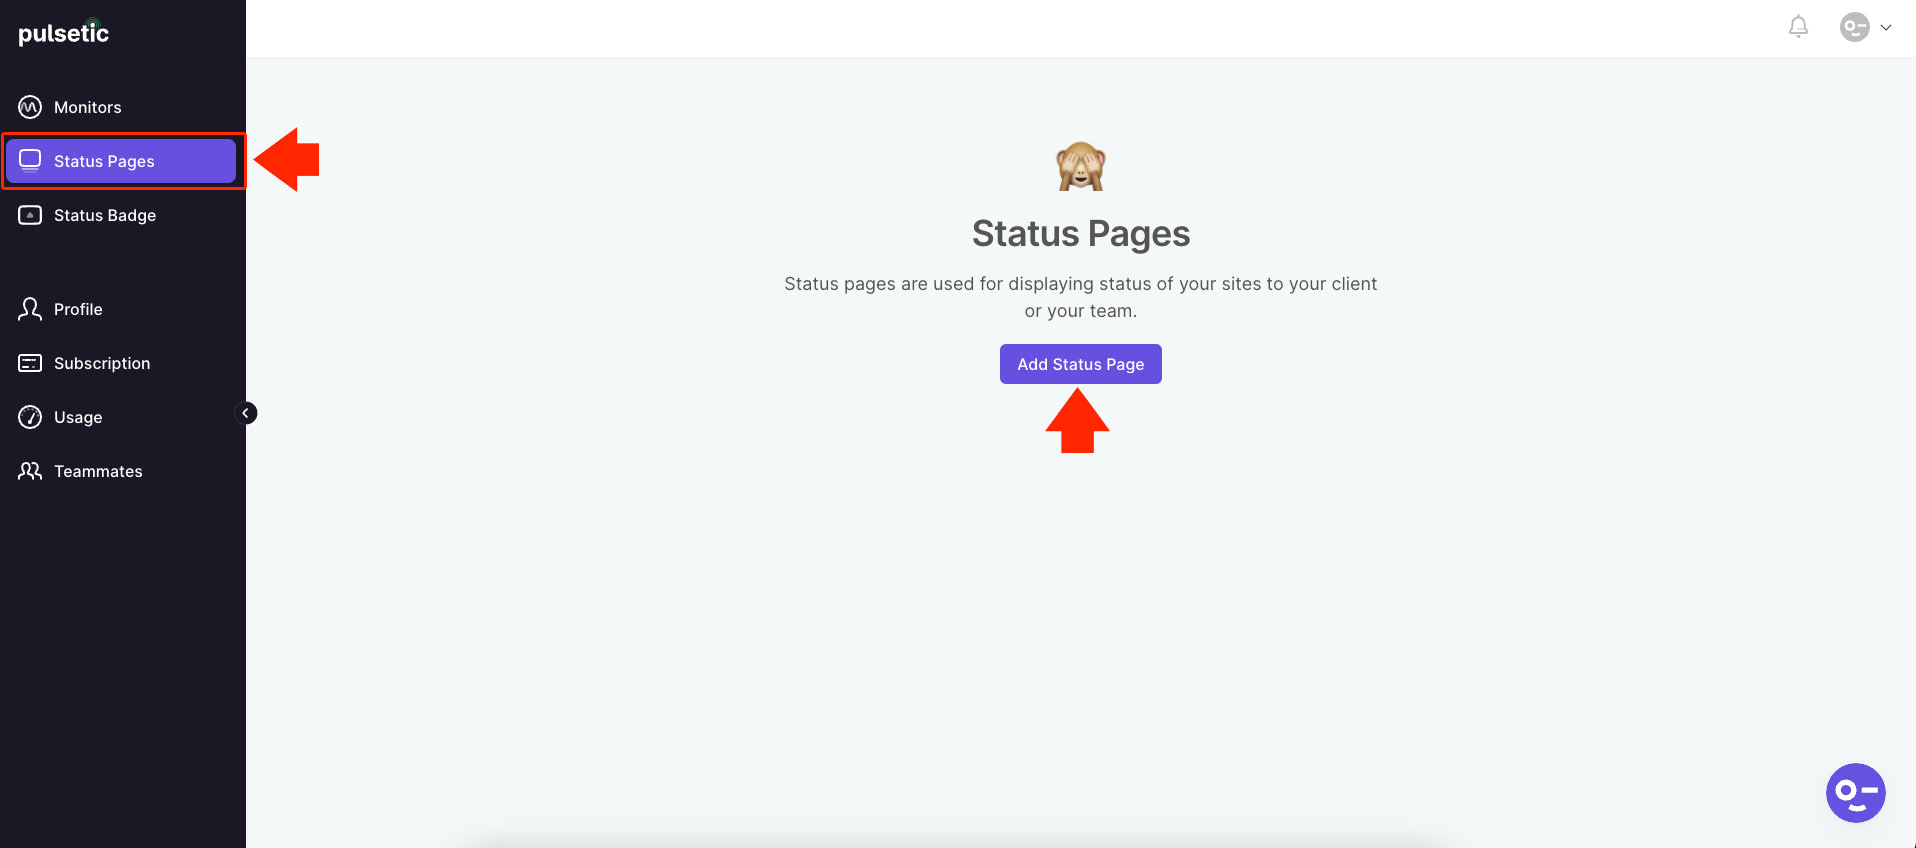
Creating a Status Page
To create a Status Page for our WordPress website demo, simply click on the “Status Page” link located at the left menu panel screen and click on the “Add Status Page” button in the middle of the Status Page screen as seen in the image below.
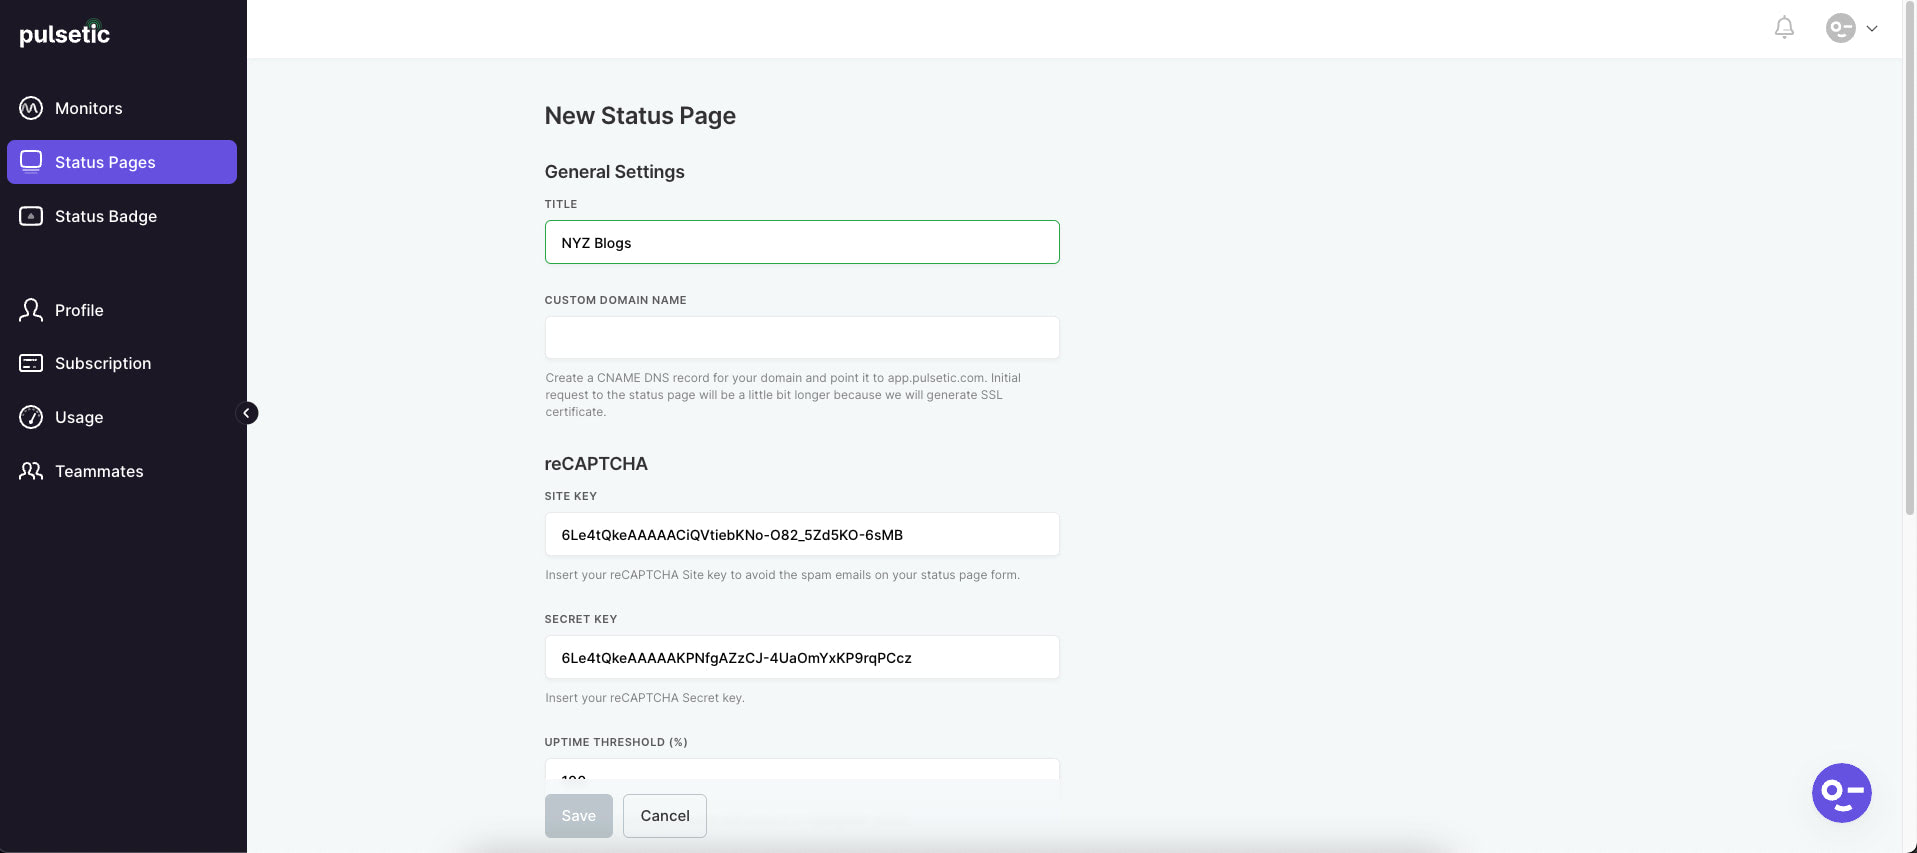
Next, we need to fill up the Status Page form that contains the following information:
- Title
- Custom Domain Name
- reCAPTCHA Site Key
- reCAPTCHA Secret Key
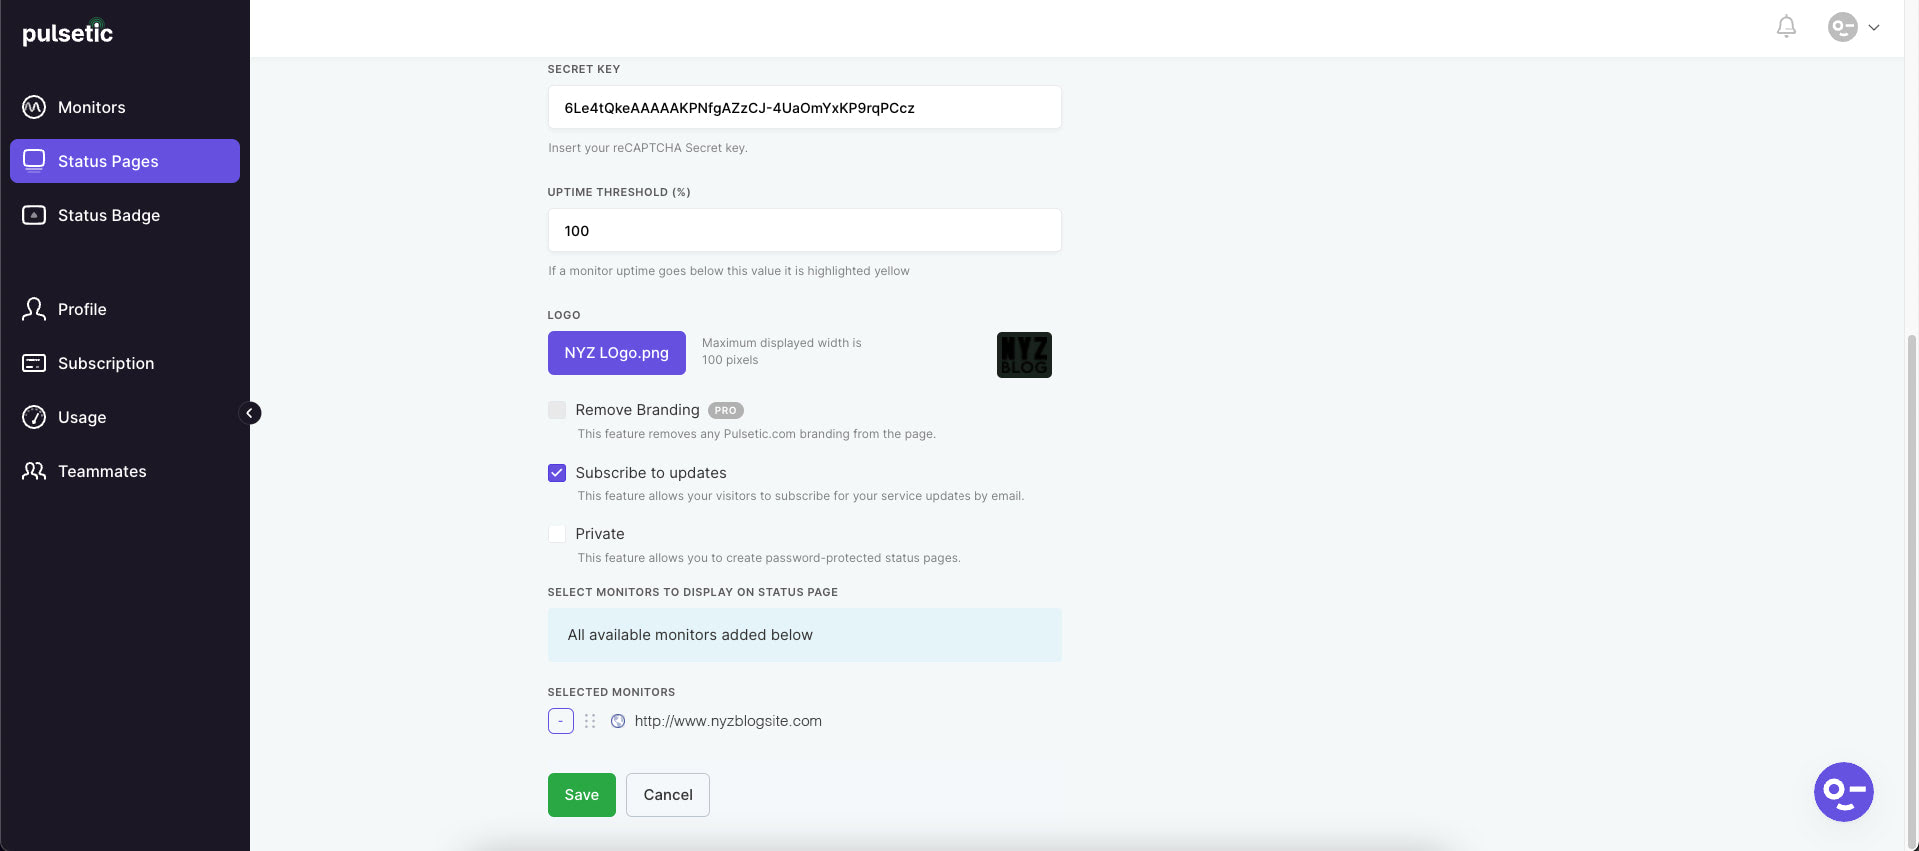
- Uptime threshold
- Logo
- Monitor to display on Status Page
The status page title is very straightforward, we can name it whatever we want. But for the custom domain name, we need to create a CNAME record for the “app.pulsetic.com”. A CNAME or Canonical name record, is simply an alias for another domain. It is frequently used instead of an A record to point different hostnames to the same location.
To do this, simply head on to your Cpanel account and look for “Zone Editor” as seen in the image below.
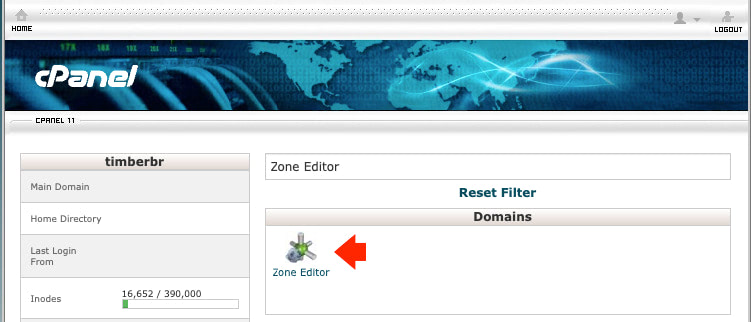
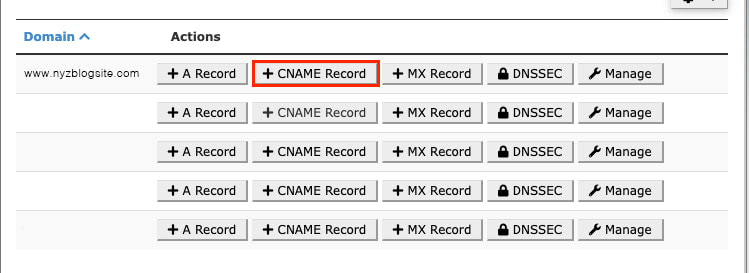
Click on the “Zone Editor” and you will be redirected to your Zone Editor’s domain list. From here, we need to click on the “CNAME Record” button right beside the domain that we are working on to add a new CNAME.
Next, we need to fill in the form like the image below.

Notice that I’ve named it “nyzblogs.nyzblogsite.com” (this will be the custom domain name that we’re going to fill in on our pulsetic status page form) and then added “app.pulsetic.com” on the CNAME record. Keep in mind that you can change the name to your preferred name.
For the reCAPTCHA Site Key and reCAPTCHA Secret Key, we need to generate these using our own Google account. Since the process might change from time to time, I won’t cover all of the steps here but for your reference, here’s a quick guide on how to generate reCAPTCHA v3 keys at the time of this writing.
Once you generate your reCAPTCHA Site Key and reCAPTCHA Secret Key, it will show you something like this on your Google console.
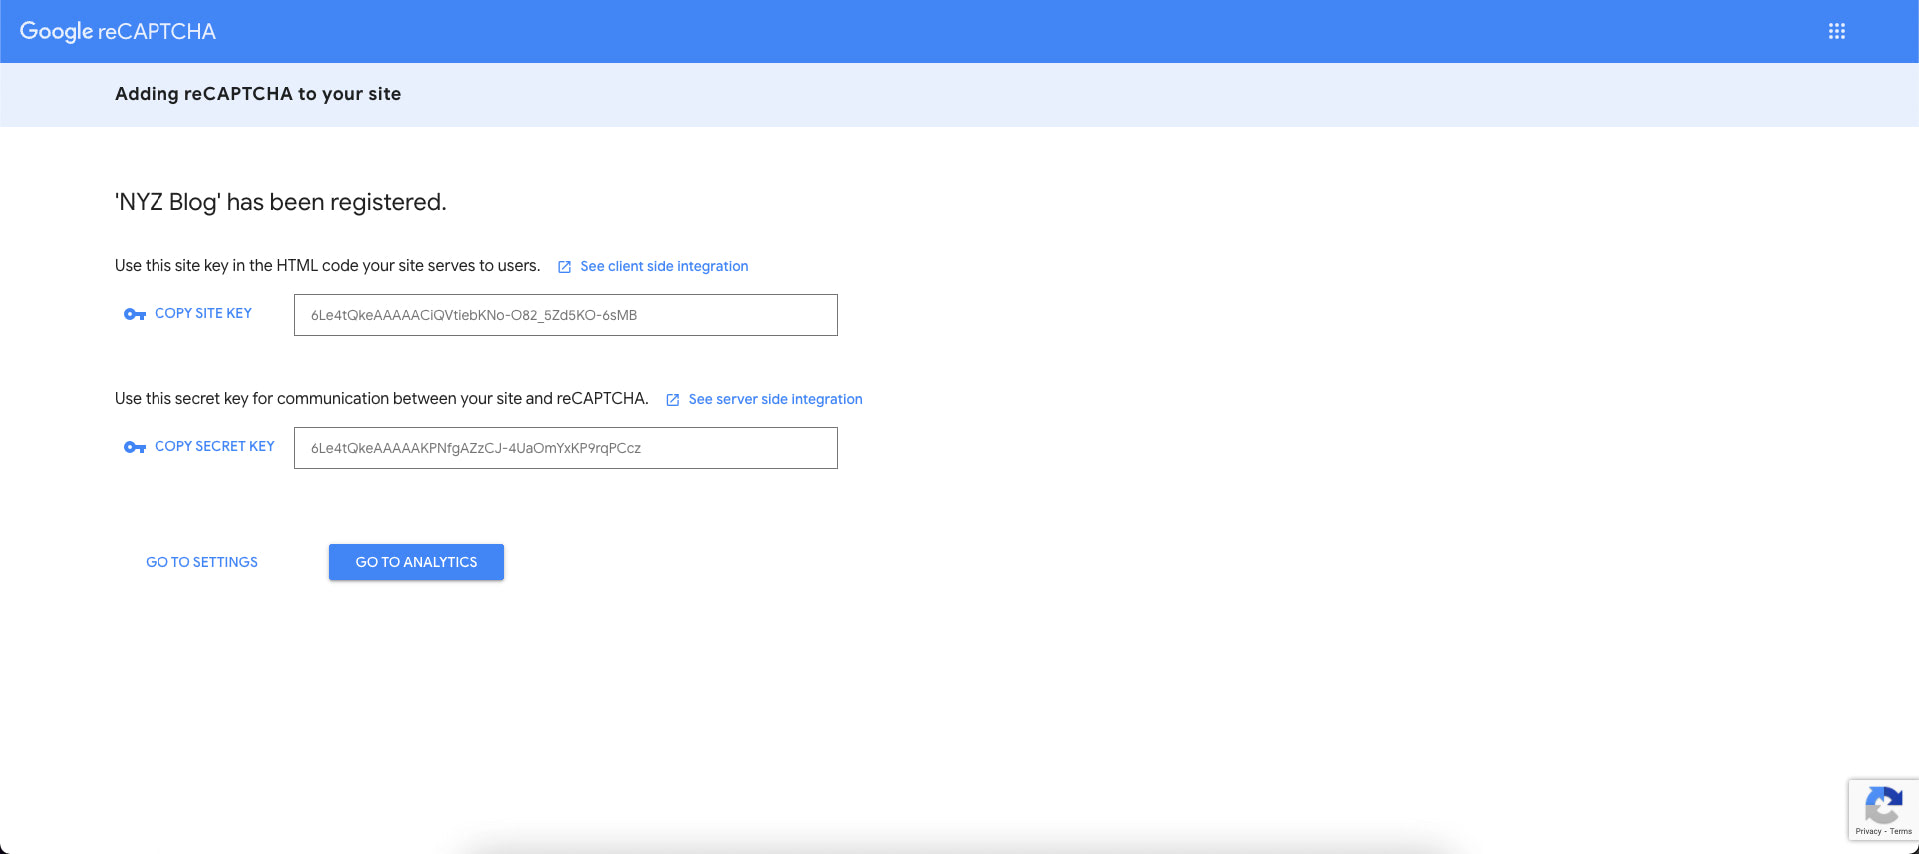
Simply copy these keys to the Pulsetic Status Page form and then proceed by adding the Uptime threshold and uploading your own logo.
One last thing to do is to add or select the website we want to monitor to display on the status page. We already added a website on our monitor’s dashboard so that will be the same website that we’re going to select.
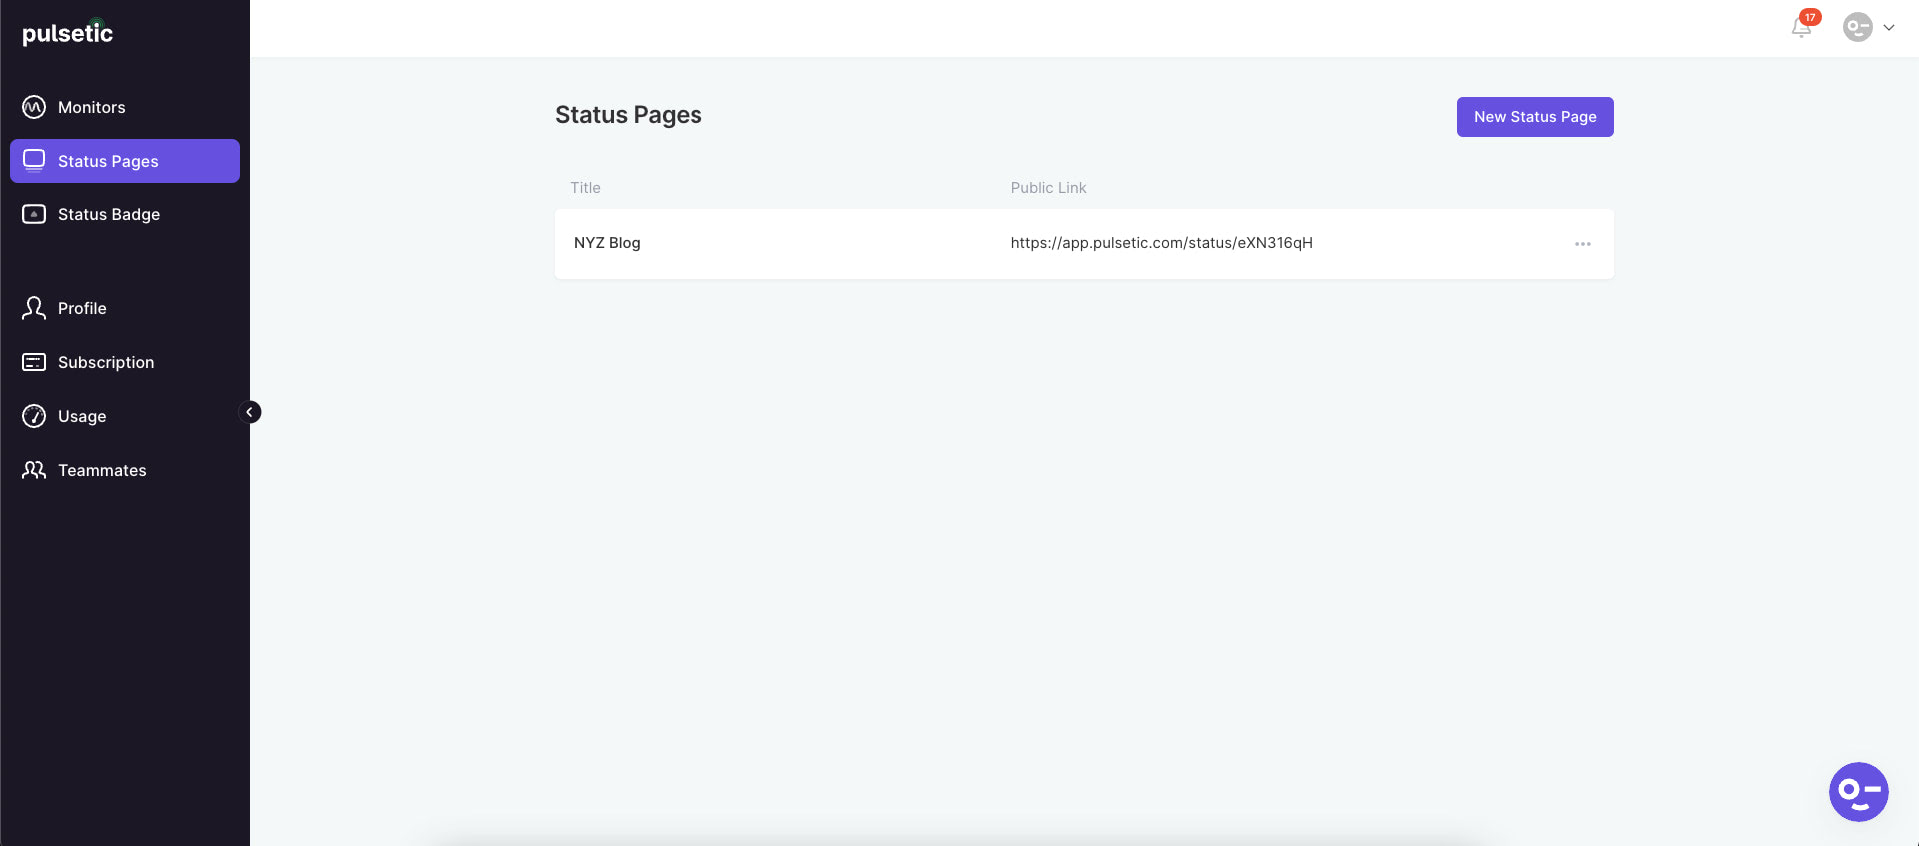
Finally, click on the “Save” button to proceed. If you click on the “Status Page” link located at the left menu panel screen, you will see that your Status Page link for NYZ Blog WordPress website demo is ready as seen in the image below.
If we visit the link website, we will see a status page specific for our WordPress website demo which contains information about all system operations including incident reports.
Congratulations! You just created your own Status Page!
You can put this link to any part of your website as necessary to communicate incidents, scheduled maintenance and downtimes with your website visitors or users.
Note: If your website visitors or users wish to get updates with the status of your website, they can click on the “Get Updates” button located at the upper right corner of the screen and enter their email where they want to get notified.

Embedding a Status Badge on Your WordPress Website
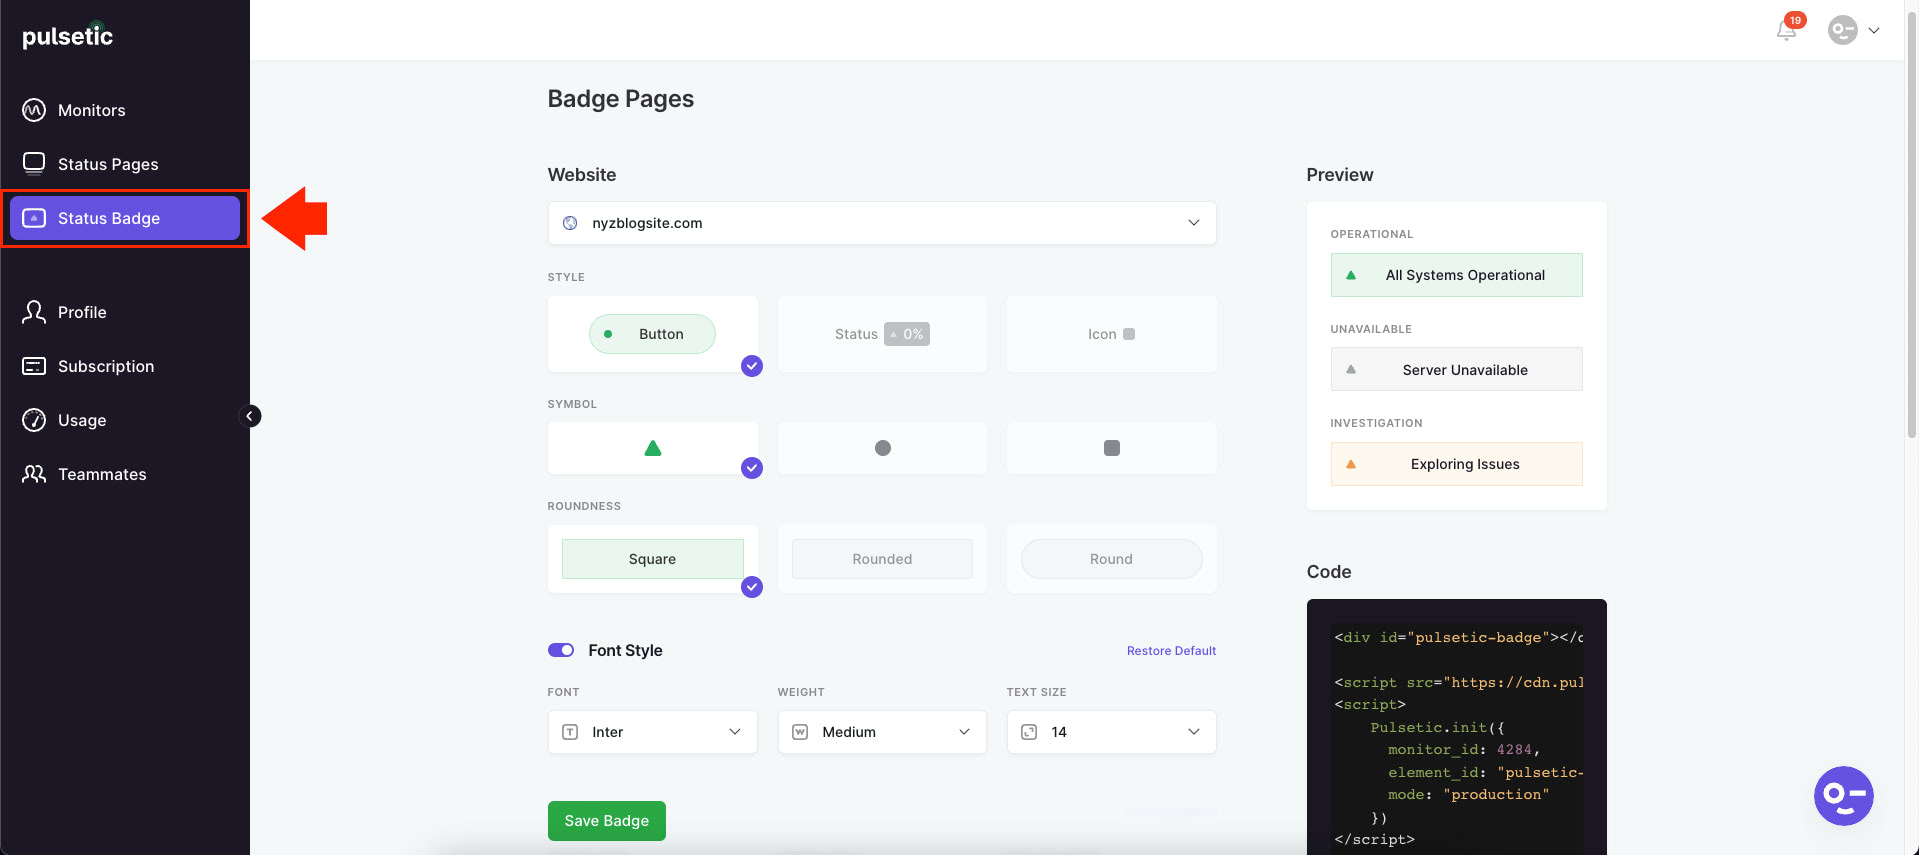
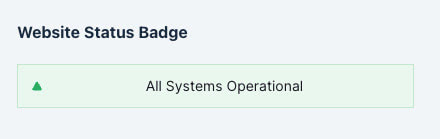
Another feature of Pulsetic that you can add on to your WordPress website is the Status Badge. A Status Badge is simply a visual representation of your website’s status. With Pulsetic, you can customize the style of the button, symbol, roundness, font, text color and other settings of your status badge which can be embedded to any part of your website.
To generate a Status Badge embed script, click on the “Status Badge” link located at the left menu panel screen and select the website url you wish to embed followed by setting up all of your preferred style and settings as seen in the image below.
Once completed, click on the “Save” button at the bottom part of the Status Badge dashboard and your embed script will be generated at the Code section of the dashboard.
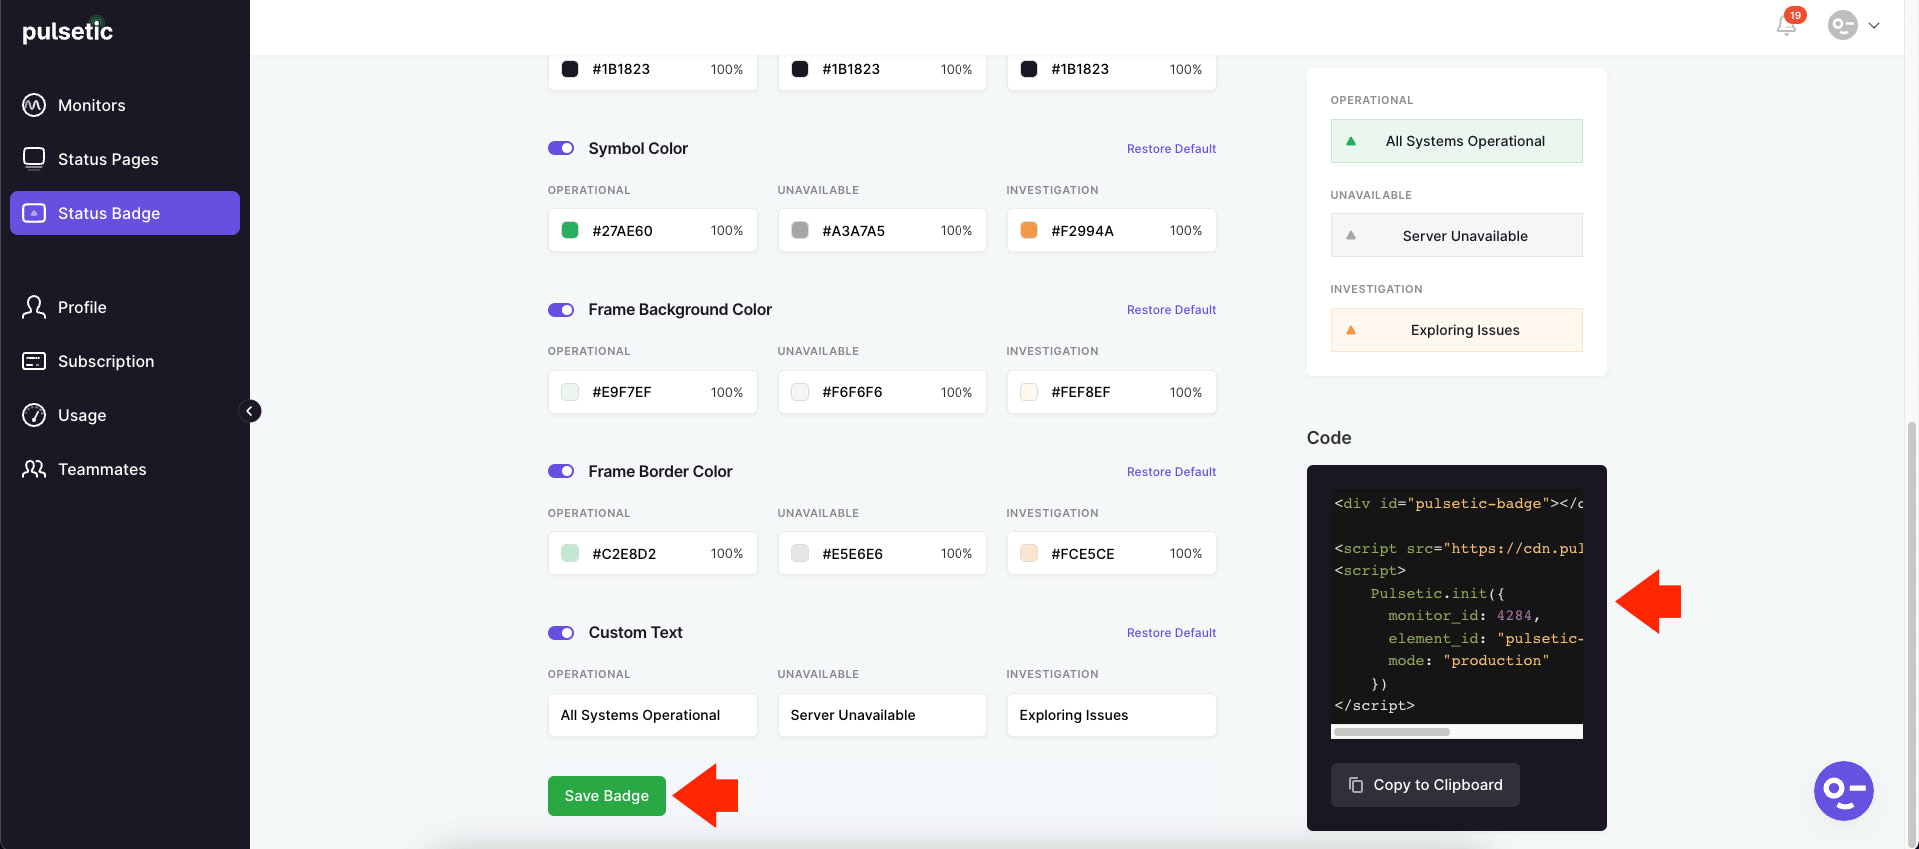
Simply copy the embed code to any part of your website and it will display the status badge like the image below.
Managing Profile and Subscription
Before we end this article, let me give you a quick overview on how you can manage your profile and subscription.
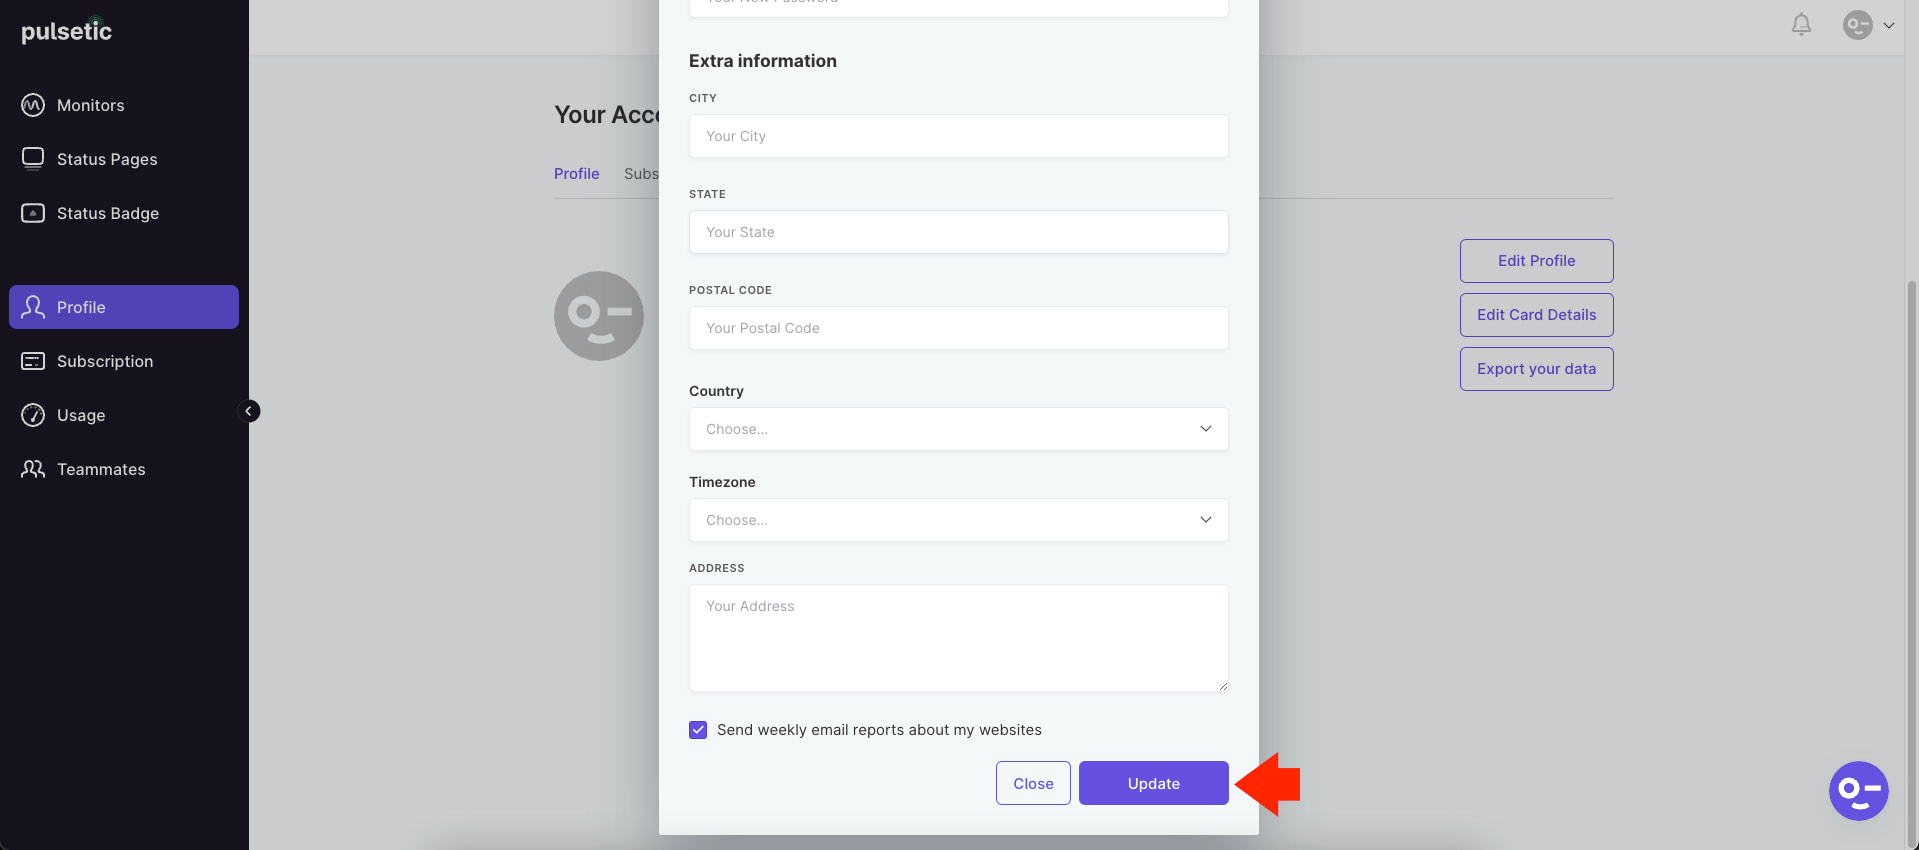
To edit your Pulsetic Profile, click on the “Profile” link located at the left menu panel screen and then click on the “Edit Profile” button right beside your account information.
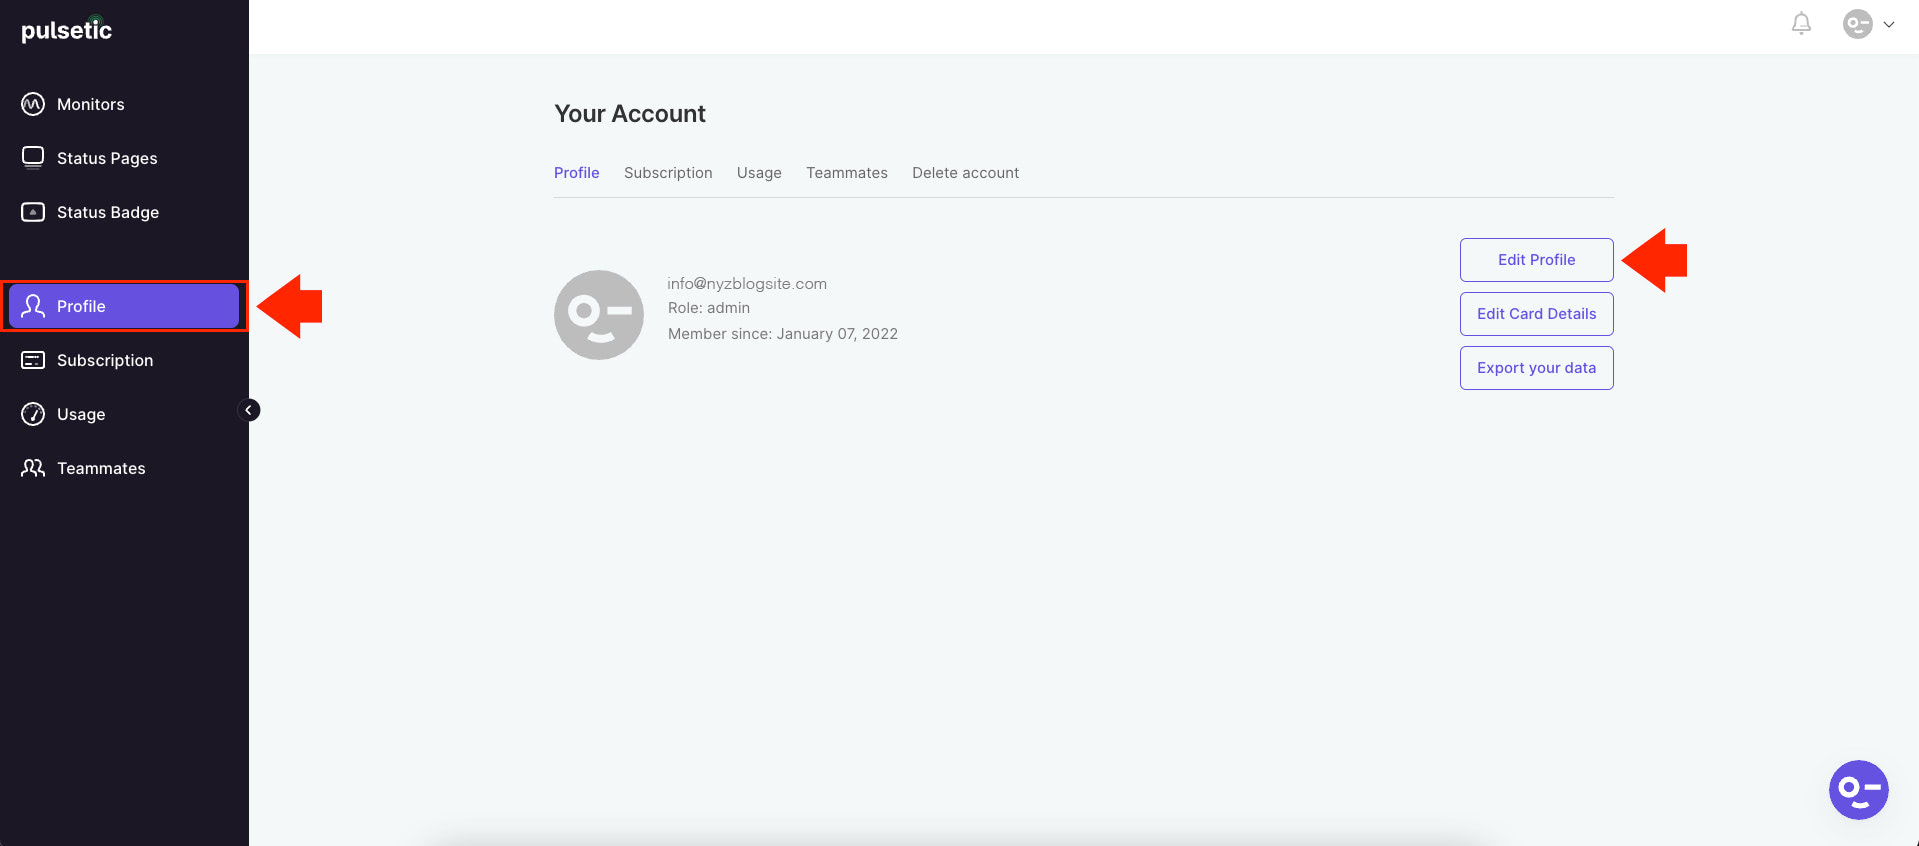
A modal form will pop out at this point where in you can edit your information including:
- Name
- Phone Number
- New Password
- City
- State
- Postal
- Country
- Timezone
- Address
If you wish to save your changes, simply click on the “Update” button which can be seen at the very bottom part of the modal form as seen in the images below.
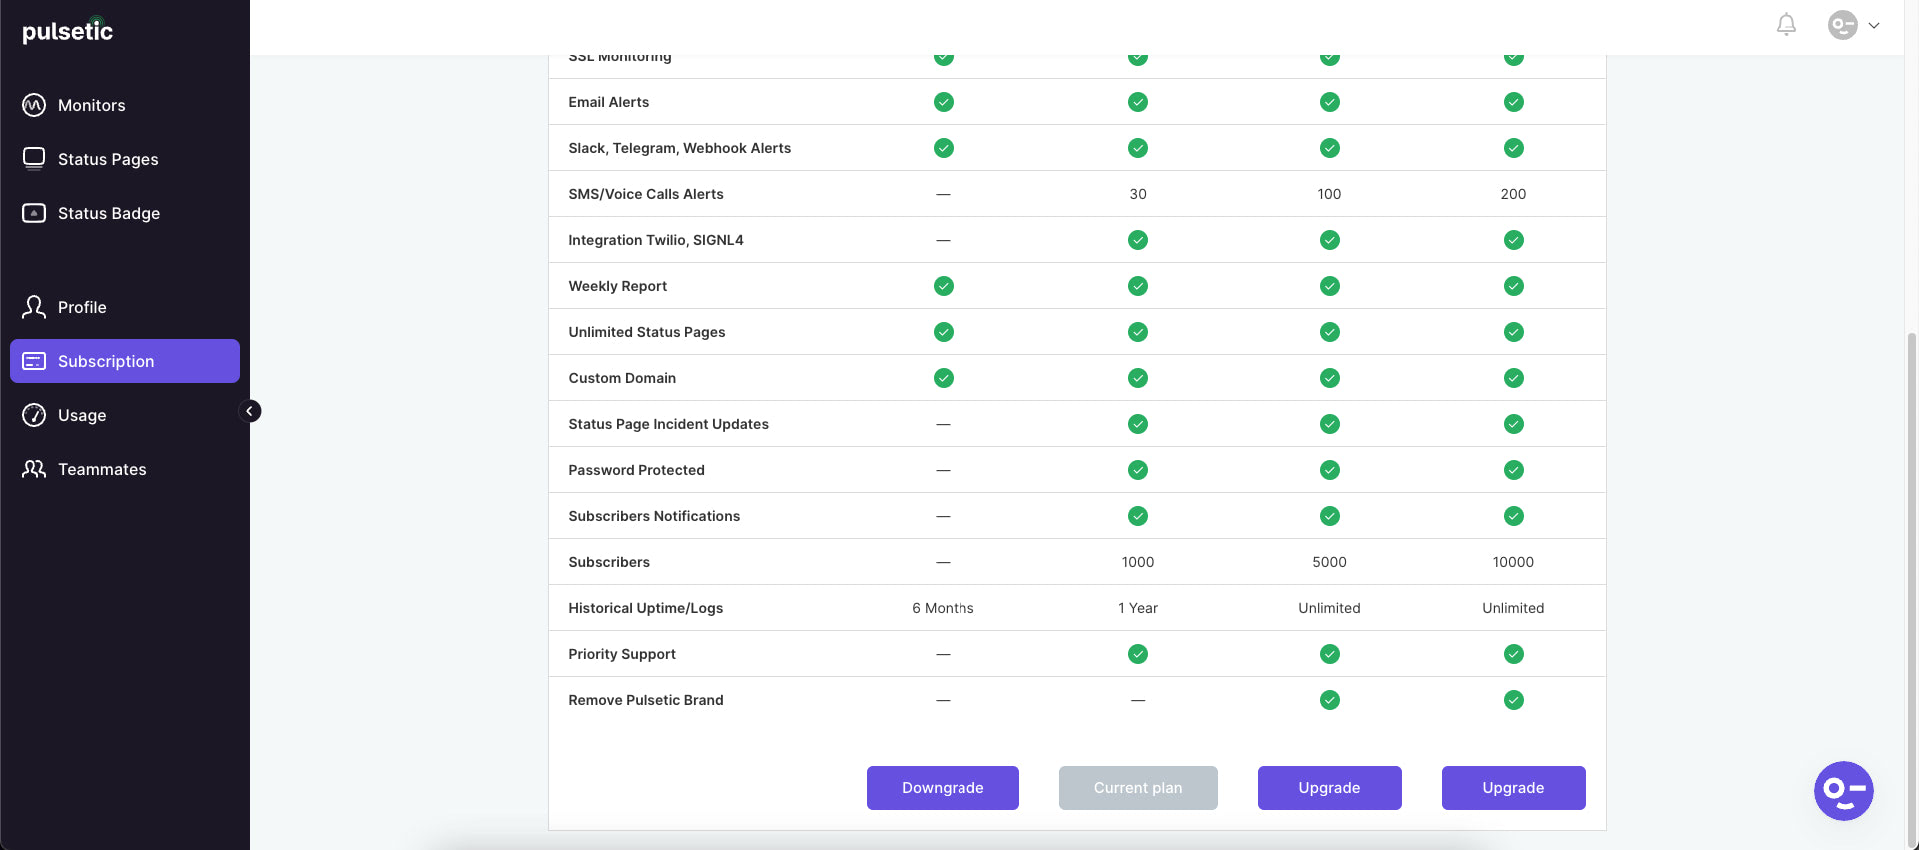
Next, if you want to modify your current subscription plan, click on the “Subscription” link located at the left menu panel screen and then choose your preferred plan. You can either click on the “Downgrade” or “Upgrade” button to the subscription plan of your choice as seen in the images below.
Wrapping Up
A Status Page is a great reporting tool that helps you and your team get notified on your website’s outages and scheduled maintenance. You can embed this to your system status into other interfaces and web properties. The primary goal of the Status page is to inform you and your users and know when incidents occur.
With Pulsetic, it’s really easy to create a public Static Page to show how your website is performing. You can customize colors, add your logo or even link your custom domain and send status updates via an email to your Status page subscribers. Leveraging this tool provides an extreme amount of benefits which focuses on the power of incident management and automation which can bring efficiency in terms of customer satisfaction, transparency, and technical support cost-reduction.
Improve email deliverability with SMTP in WordPress with our new guide came up!


In brief, I can’t recommend this post enough. It’s a must-view for anyone interested in topic above. Bravo to the writer, you have truly outdone yourself! Keep the good content coming.