Searching for a way to create a multi language website with WordPress?
By default, WordPress makes it super easy to create a website in one language. You can use a theme like Blocksy to create a great-looking design, add features with plugins, and just generally make the site of your dreams…in a single language.
But what happens if you want to offer your site in multiple languages and let your visitors choose their preferred language experience? Well, WordPress doesn’t support that by default, but you can add that functionality with the help of a plugin like TranslatePress.
How can you set that up? Well, that’s the topic of this post. Below, we’ll show you step-by-step how to create a multi language website powered by the Blocksy theme and the TranslatePress plugin – with zero code or technical knowledge required.
Let’s dig in!
Table of Contents
Key Takeaways
- Blocksy + TranslatePress = multilingual WordPress made easy – with Blocksy for design and TranslatePress for translations, you can create a multi language site without coding.
- TranslatePress supports automatic and manual translations – use Google Translate or DeepL to auto-translate content, then refine with the visual editor for accuracy.
- Full content coverage – TranslatePress lets you translate Blocksy theme elements, plugin text, SEO titles/meta, and even images for a complete multilingual experience.
- Built-in multilingual SEO – URL slugs, meta descriptions, and Open Graph data can be translated, boosting your site’s international search visibility.
- Flexible language switcher options – add a floating selector or embed it into Blocksy’s header/footer menus for a seamless user experience.
How to Create Your Multi Language Website: Step-by-Step Guide
To create a great-looking multi language website, you’ll need a working WordPress site and two key extensions:
- Blocksy – the Blocksy theme lets you create a beautiful design for your site and set up its original language. You can either design your site from scratch or import one of Blocksy’s premade starter sites.
- TranslatePress – the TranslatePress plugin lets you take your Blocksy site and translate all of its content into one or more new languages. TranslatePress will create static pages for each translation, which means you can benefit from multilingual search engine optimization (SEO) and your visitors will be able to link directly to content in different languages.
Once you set up TranslatePress, you’ll be able to manage all of your site’s translations using a simple visual editor like this:
You also have the option to use automatic machine translation from Google Translate or DeepL if you don’t want to translate your content from scratch.
Here’s how you can set up your multilingual website with Blocksy and TranslatePress…
1. Set Up Your Site In Your Default Language
Before you can make your website multilingual, you first need to fully set up your site in its original language.
If you don’t have a website yet, the Blocksy theme makes it easy to get up and running with a great-looking website.
You can either design your site from scratch using Blocky’s flexible options in the WordPress Customizer. Or, to save some time, you can import one of Blocky’s professionally designed starter websites with just a few clicks:

When you import a Blocksy starter site, you can choose which content editor/page builder to use for the demo content. While it depends on the specific starter site, your options are typically the native block editor, Elementor, or Brizy.
Feel free to choose any content editor—you’ll be able to fully translate your content no matter which editor you’re using.
For this example, we’re going to use the free Blocksy Business starter site powered by the native block editor.
After you’ve imported the starter site, you can continue on to add your own unique content and make any other tweaks needed.
2. Install TranslatePress and Choose Languages
Once your website is fully functional in its default language, you’re ready to turn it into a multi language website. That’s where the TranslatePress plugin comes into play.
To get started, install and activate the free TranslatePress plugin from WordPress.org.
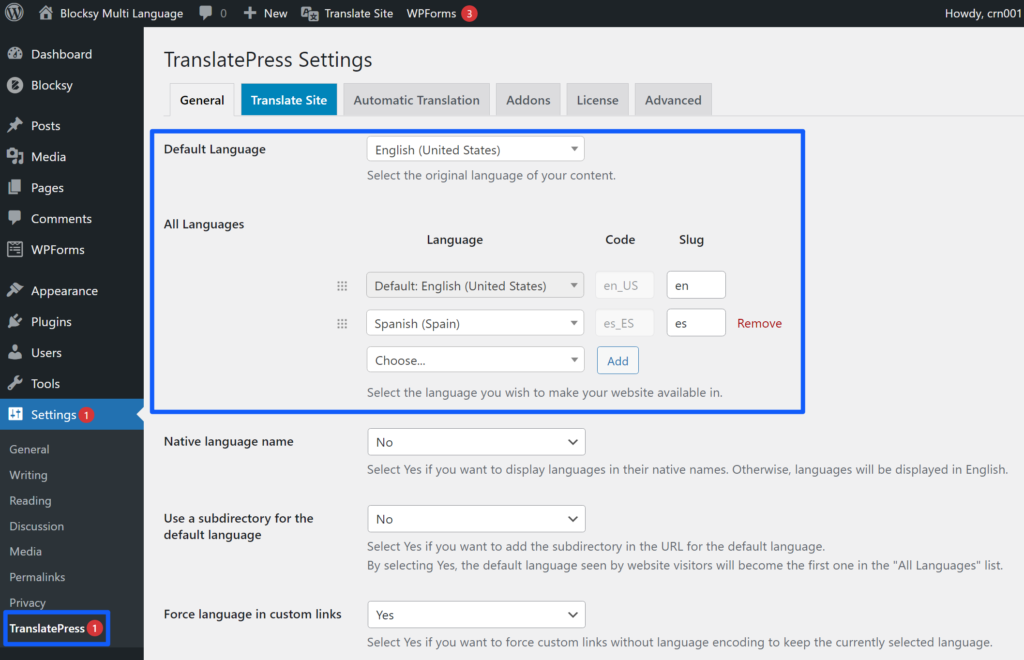
Then, head to Settings → TranslatePress in your dashboard to choose the languages that you want to use on your site:
- Default Language – the language that your site currently exists in. TranslatePress should automatically detect this, but you’ll want to verify that it’s correct.
- All Languages – one or more new languages into which you want to translate your site’s content. The free version of TranslatePress lets you translate your entire site into one new language. If you want multiple new languages, you’ll need the premium version of TranslatePress (which supports unlimited languages).
For example, if your site currently exists in English and you want to translate it into Spanish, you’d configure it like so:
TranslatePress offers out-of-the-box support for over a hundred languages and locales, so you should be able to find your desired language in the drop-down list. However, if you can’t, TranslatePress also lets you add custom languages.
You can add a custom language from the Advanced tab of the TranslatePress settings area (just scroll down to the Custom language section).
3. Set Up Automatic Translation (Optional)
This step is totally optional. However, if you want to save time while translating your site, TranslatePress gives you the option to use automatic machine translation from Google Translate or DeepL.
If you enable this option, TranslatePress will send your content to the service for translation. Then, TranslatePress will store the translations locally in your site’s database (so there’s no need to query the service for each page load). Because the translations are stored locally, you’ll also be able to fully edit them, just as if you’ve manually added the translations from scratch.
So, if you want to save time, you might prefer a setup like this:
- Use automatic machine translation to generate your site’s baseline translations;
- Manually edit the machine translations for clarity and accuracy where needed.
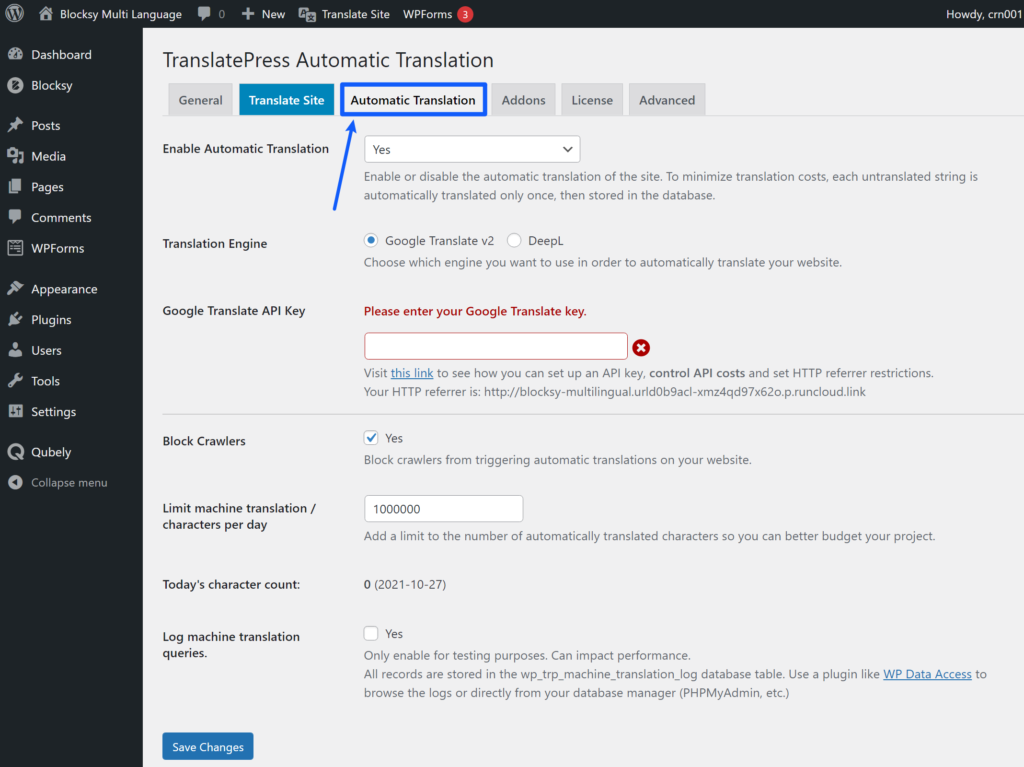
If you do want to enable automatic translation, you can do so from the Automatic Translation tab of the TranslatePress settings area.
You’ll first want to enable the automatic translation feature. Then, you can choose your preferred translation service:
- Google Translate – available in the free version of TranslatePress;
- DeepL – requires the TranslatePress Business license.
In order to connect to your chosen service, you’ll need to enter the API key that you get from that service. TranslatePress maintains documentation on how to get the API keys for both Google Translate and DeepL:
In the settings, you also have the option to limit the number of machine translation characters per day. TranslatePress itself does not charge you anything based on your machine translation usage. However, you might need to pay Google Translate or DeepL if you exceed the limits on their free tiers.
Both services let you translate up to 500,000 characters per month for free (approximately 100,000 words). If you exceed the monthly free limit, you’ll need to pay the following:
- Google Translate – $20 per one million characters over the free limit;
- DeepL – a flat $5.49/month fee plus $25 per one million characters over the free limit.
If you want to control your budget, you can configure TranslatePress to limit its machine translation usage (though your site will take longer to fully translate if you have a lot of content).
4. Translate Your Content (or Edit Automatic Translations)
Now, you’re ready to manage your site’s translations using the visual translation editor:
- If you didn’t enable automatic translation, you’ll need to translate your content from scratch.
- If you did enable automatic translation, the translations will be pre-filled with those from the service, but you’ll still be able to fully edit them if needed.
To launch the translation editor, open a page that you want to translate on the frontend of your site. Then, click the new Translate Page option on the WordPress toolbar:
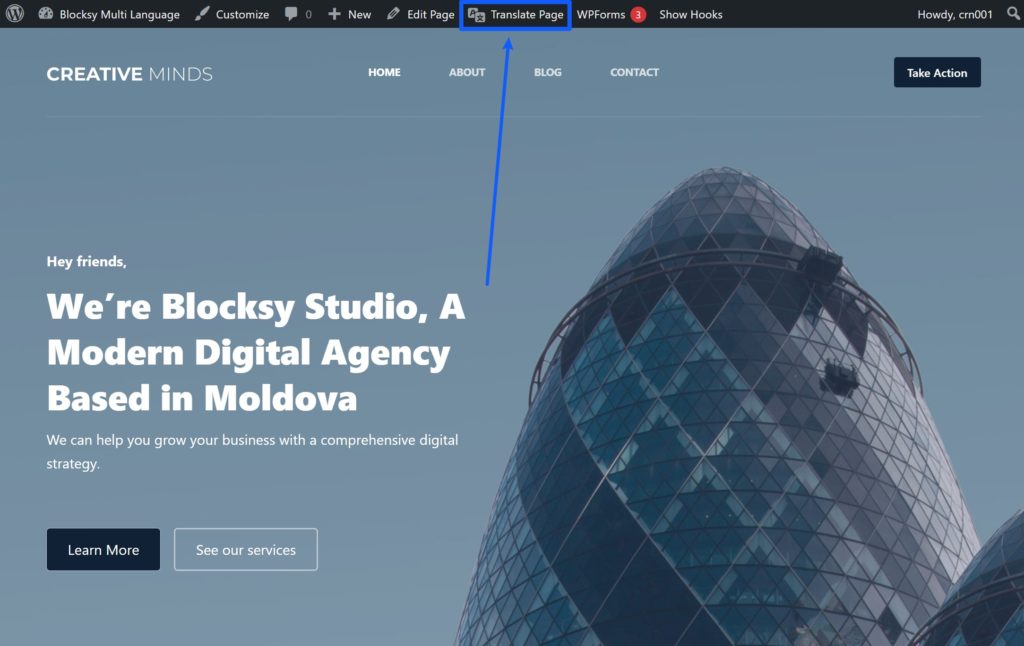
In the translation editor, you’ll see a large real-time preview of your site on the right along with a sidebar on the left where you can manage your translations.
To translate any content/text on your site, you just need to:
- Hover over the content on the live preview of your site;
- Click the pencil icon to open the translation in the sidebar;
- Add/edit the translation using the field in the sidebar;
- Save your changes by clicking the Save translation button or using the keyboard shortcut – “Ctrl + S” or “Cmd + S”.
You can use this same point-and-click approach to translate all of the content on the front-end of your site, whether it comes from Blocksy, the native WordPress editor, a plugin, or anything else.
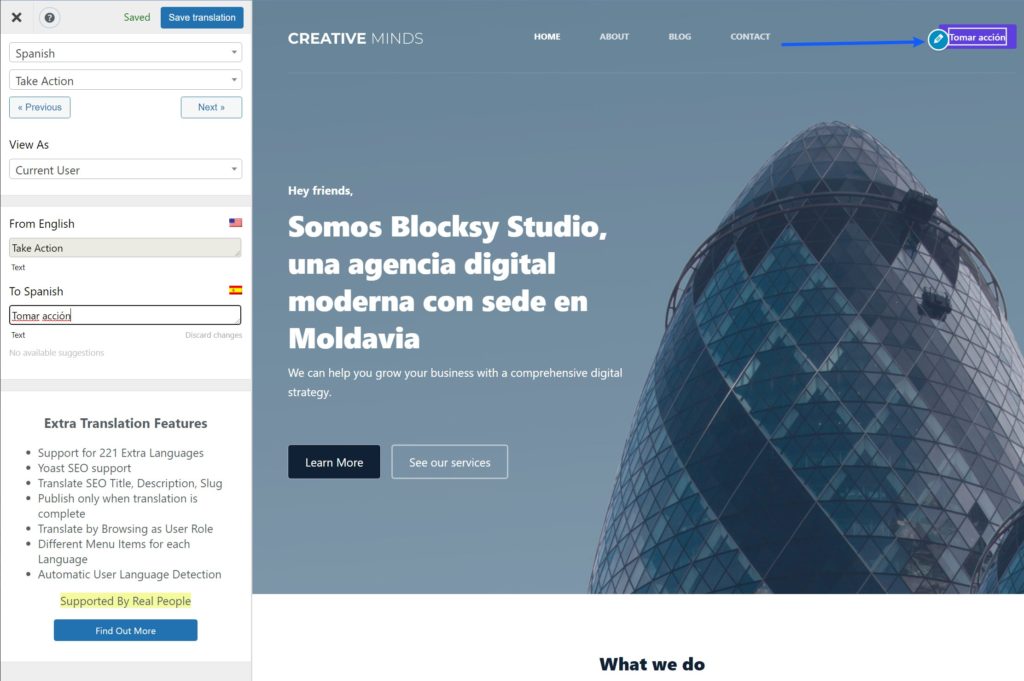
How to Translate Blocksy Theme Content
You can use the same point-and-click approach to translate any content from the Blocksy theme. For example, Blocksy adds a custom “Take Action” CTA button to the menu on our demo site.
To translate this button, all you do is hover over it and click the pencil icon:
You can use the same approach to translate the rest of your menu items, as well. Once you translate a menu item one time, that translation will automatically work sitewide. That is, you never need to duplicate your translation efforts.
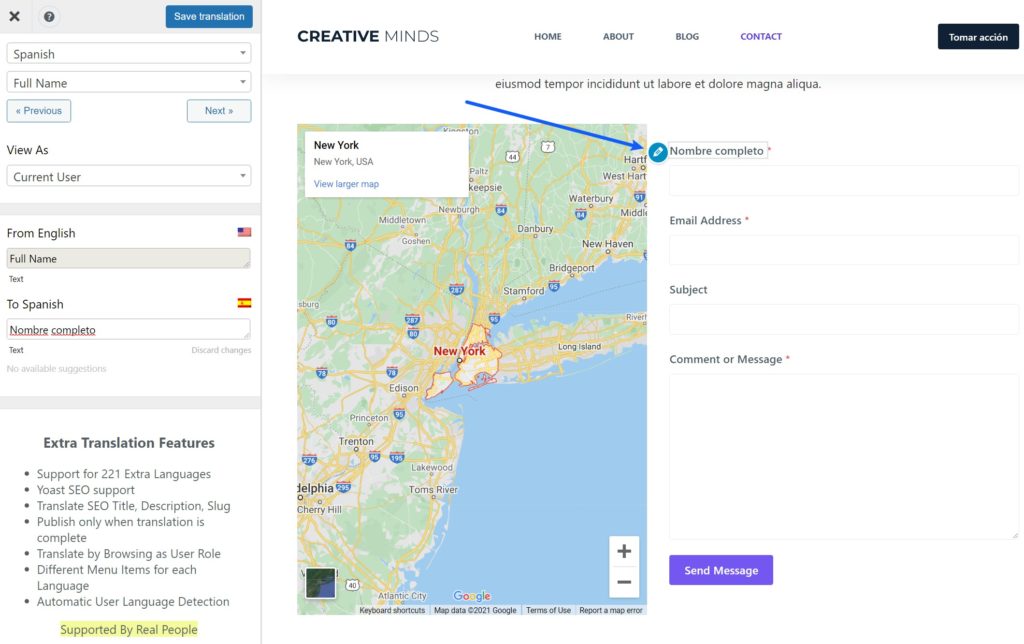
How to Translate Plugin Content
TranslatePress also offers out-of-the-box support to translate the front-end content from any WordPress plugin.
For example, Blocksy includes a form from WPForms on the contact page of most starter sites. With TranslatePress, you can easily translate the form’s labels, placeholder text, buttons, and so on:
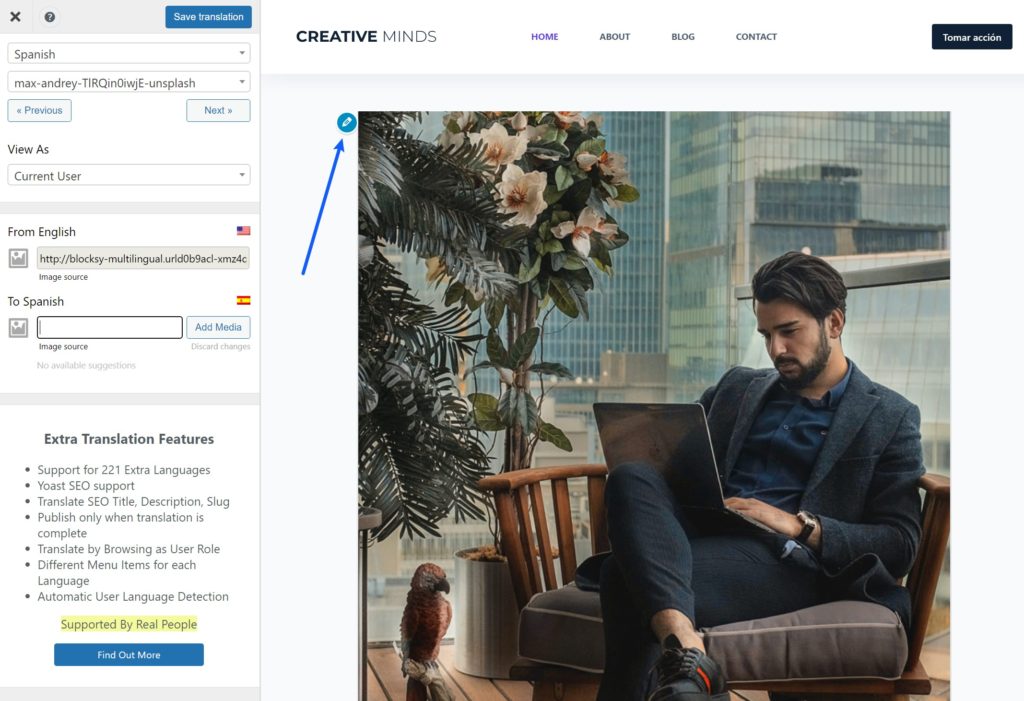
How to Translate Images
In addition to translating text content, TranslatePress also lets you “translate” images so that you can show a different image based on a visitor’s selected language.
You can translate images just like any other content—hover over the image and click the pencil icon. You’ll then be able to choose a different image file from your Media Library. If applicable, you’ll also be able to translate the image title and alt text:
How to Translate SEO Details and URL Slugs
The free version of TranslatePress lets you translate all of the visible content on your Blocksy site. However, if you’re planning to use multilingual SEO as a strategy to grow your site’s traffic, you might want to also translate backend details such as SEO titles, meta descriptions, image alt text, URL slugs, and more.
TranslatePress can do this, but you’ll need to purchase at least the TranslatePress Personal license so that you can access the SEO Pack add-on.
With the SEO Pack add-on, you’ll be able to translate…
- SEO titles and meta descriptions. TranslatePress will automatically detect the titles/descriptions that you’ve set with popular plugins such as Yoast SEO and Rank Math.
- Open graph information to translate the content that appears when your site gets shared on social media.
- URL slugs for individual posts, as well as sitewide URL slugs (such as category base URLs).
Once you activate the SEO Pack add-on by going to Settings → TranslatePress → Addons, you’ll be able to select these back-end translations using the drop-down in the translation editor:
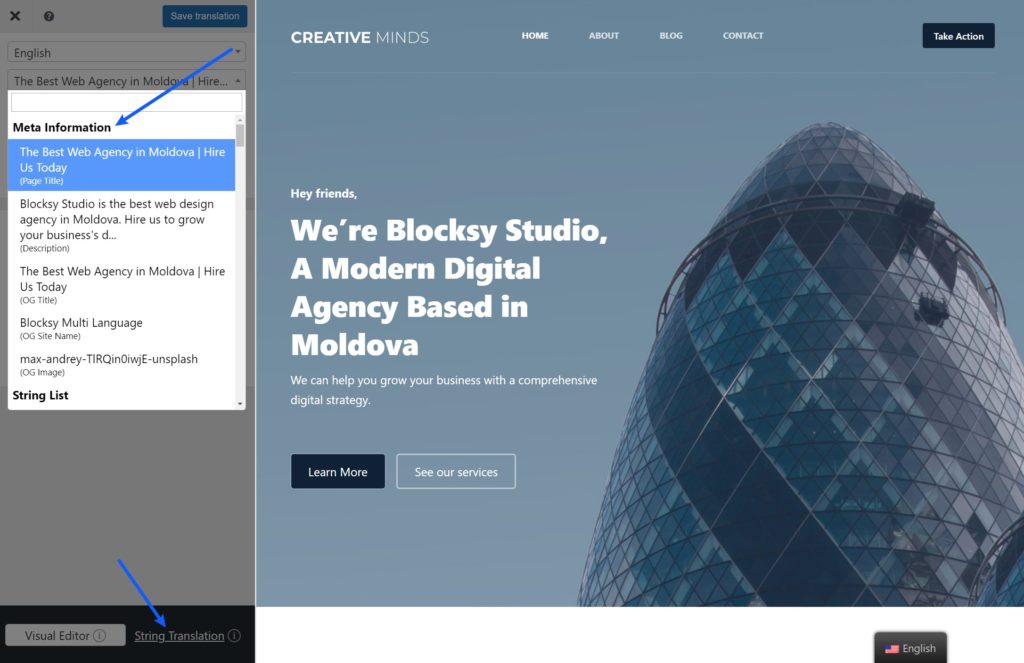
You can also translate sitewide URL slugs by opening the String Translation interface.
5. Configure Your Language Switcher
In order to let your site’s visitors choose their preferred languages, you need to add a language switcher to the front-end of your site.
By default, TranslatePress adds a floating language switcher to the bottom-right corner of your site. However, you’re also able to change this position or use one of the other placement options:
- Menu language switcher – you can add a language switcher to one of your site’s menus (the menus that you create by going to Appearance → Menus).
- Manual placement – you can manually place the language switcher anywhere on your site using a shortcode.
One really nice thing about pairing Blocksy and TranslatePress is that Blocksy Pro includes its own integrated language switcher menu item that works great with TranslatePress. Note: to access Blocksy’s language switcher, you’ll need to purchase Blocksy Pro.
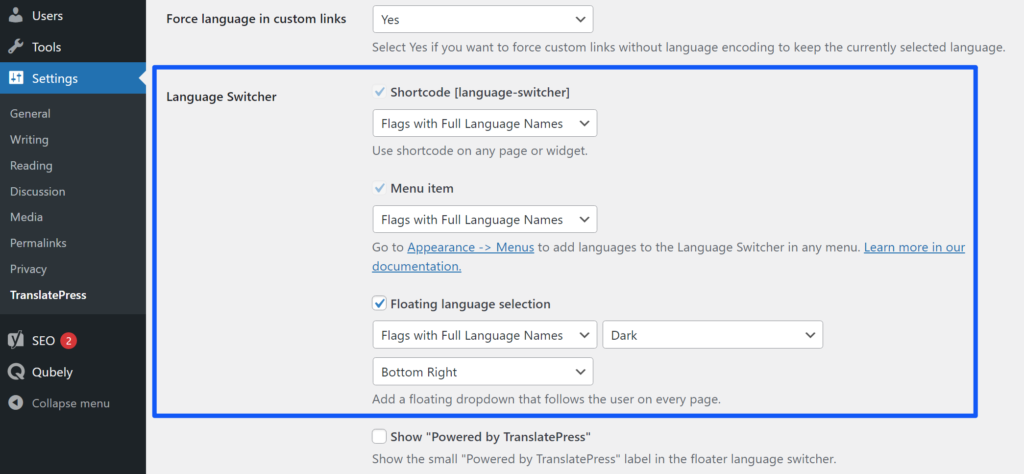
First off, you’ll want to configure the basic language switcher settings. You can access these by going to Settings → TranslatePress and scrolling down to the Language Switcher area in the General settings tab.
Here, you’ll get settings to control each type of language switcher. If you’re not going to use a certain placement, you can just ignore the settings for that placement.
Some of the settings you can configure include:
- How to display each language – you can show the full name or only show the two-letter country code. You can also choose whether to display a country flag. Note that TranslatePress will show the flag for the locale that you selected. So if you chose “Spanish (Mexico)”, TranslatePress will show the Mexican flag instead of the Spanish flag because you chose Mexico as the locale.
- Placement and color scheme – for the floating language switcher, you can adjust its placement and change its color scheme. Or, you can disable it.
Now, let’s look at how to add a language switcher to your navigation menu.
How to Add a Language Switcher to the Blocksy Header or Footer Menu
Now, let’s say you want to add a language switcher to your main navigation menu. Here’s an example of what it might look like:
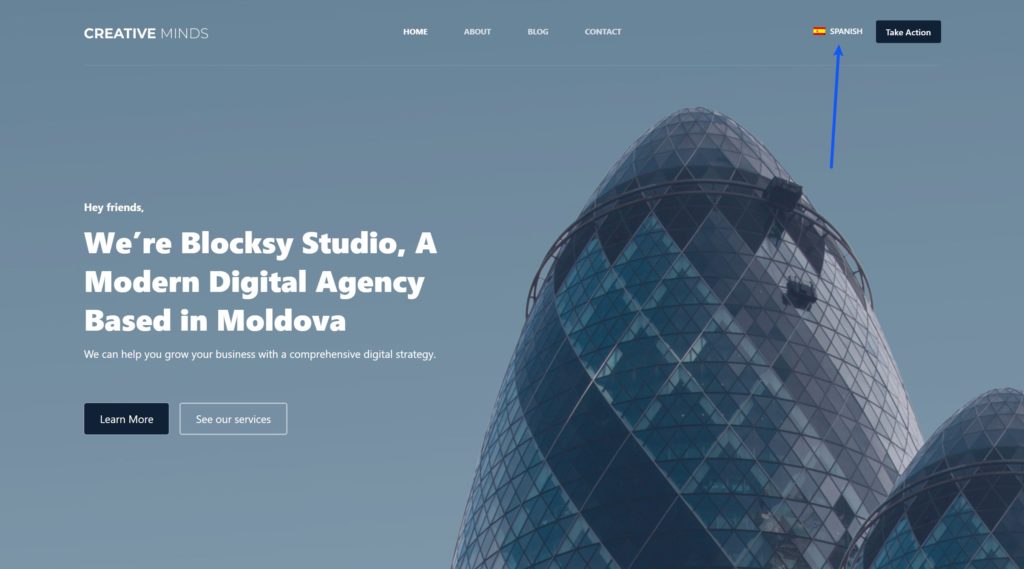
You have two options for setting this up with Blocksy:
- If you have Blocksy Pro, you can use Blocky’s Languages element in the Blocksy header or footer builder;
- If you’re using the free version of Blocksy, you can use TranslatePress’s built-in feature. If you do this, you can add the language switcher as a menu item (Appearance → Menus). Then, the language switcher will appear wherever you’ve added that menu in the Blocksy header or footer builder.
We’ll show you how it works with both…
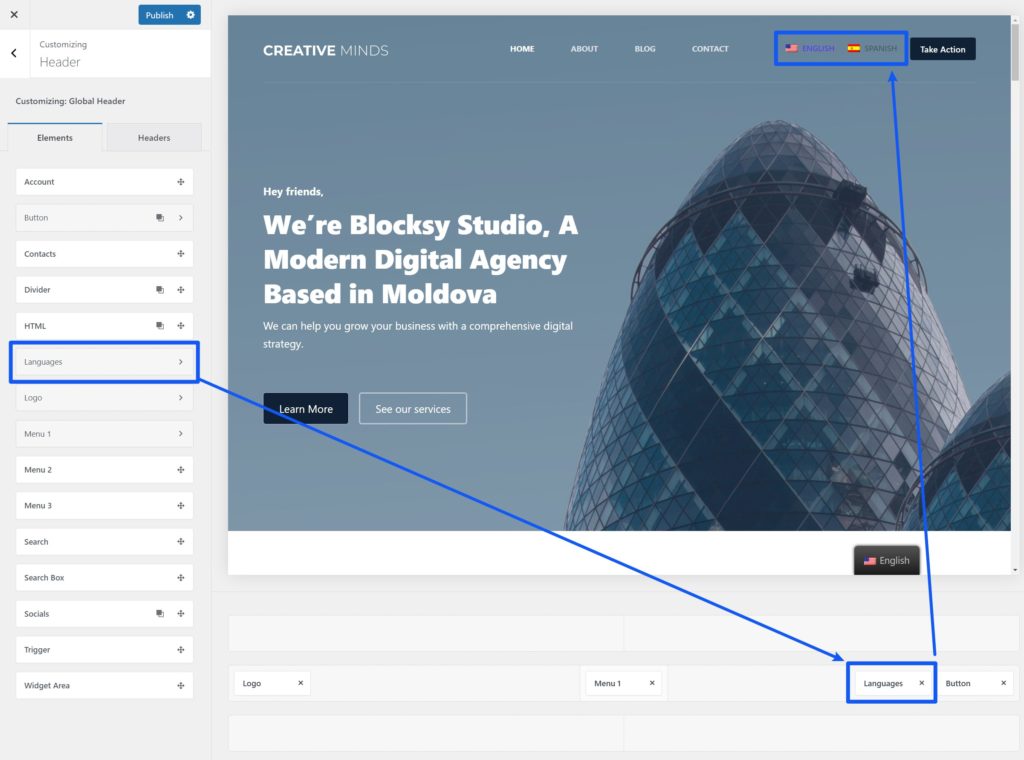
To set this up with Blocksy Pro, open the Customizer by going to Appearance → Customize. Then, open the Header settings to access Blocksy’s header builder (or the Footer settings if you want to place the language switcher in the footer of your site).
To add your language switcher, drag the Languages element where you want the switcher to appear. You’ll then see the language switcher appear on the live preview of your site:
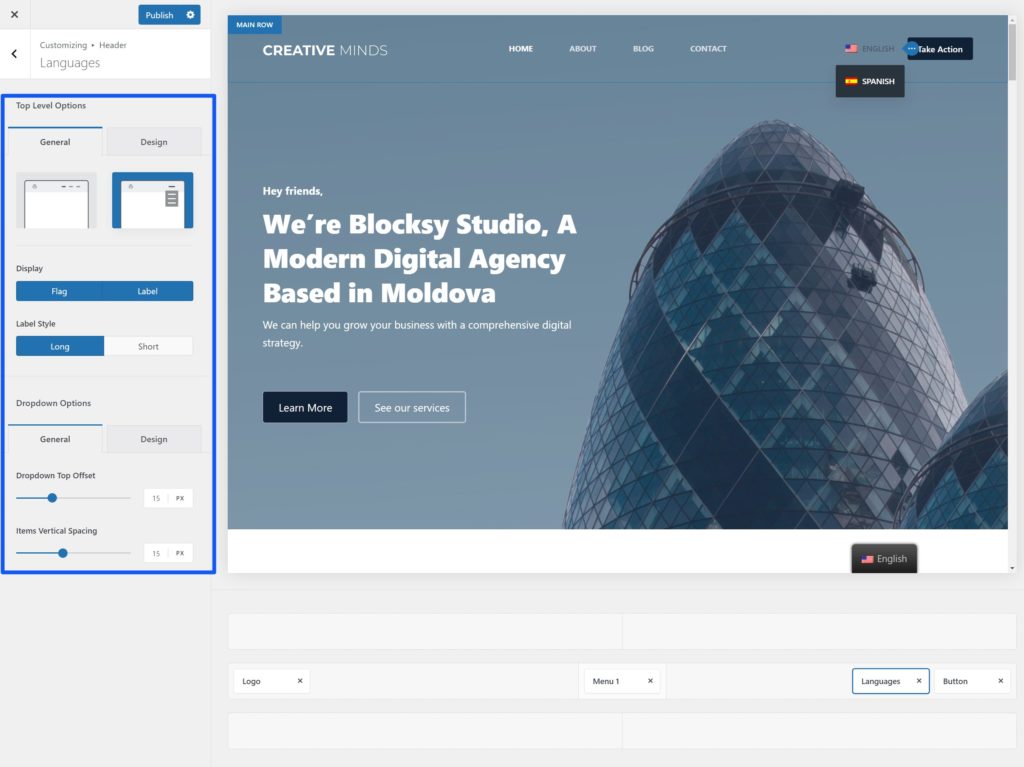
Then, click on the Languages element in the header builder interface to open its settings. Here, you can configure the following options:
- Choose between the default inline approach (where each language appears as a menu item) or showing languages in a drop-down;
- Choose whether or not to show the flag and/or label;
- Configure the label style—”Long” will show the full country name and “Short” will show the two-letter code;
- Adjust the spacing for different devices;
- Choose whether to hide the current language. For example, people browsing in English wouldn’t see the English language selector.
You’ll also get some other design options:
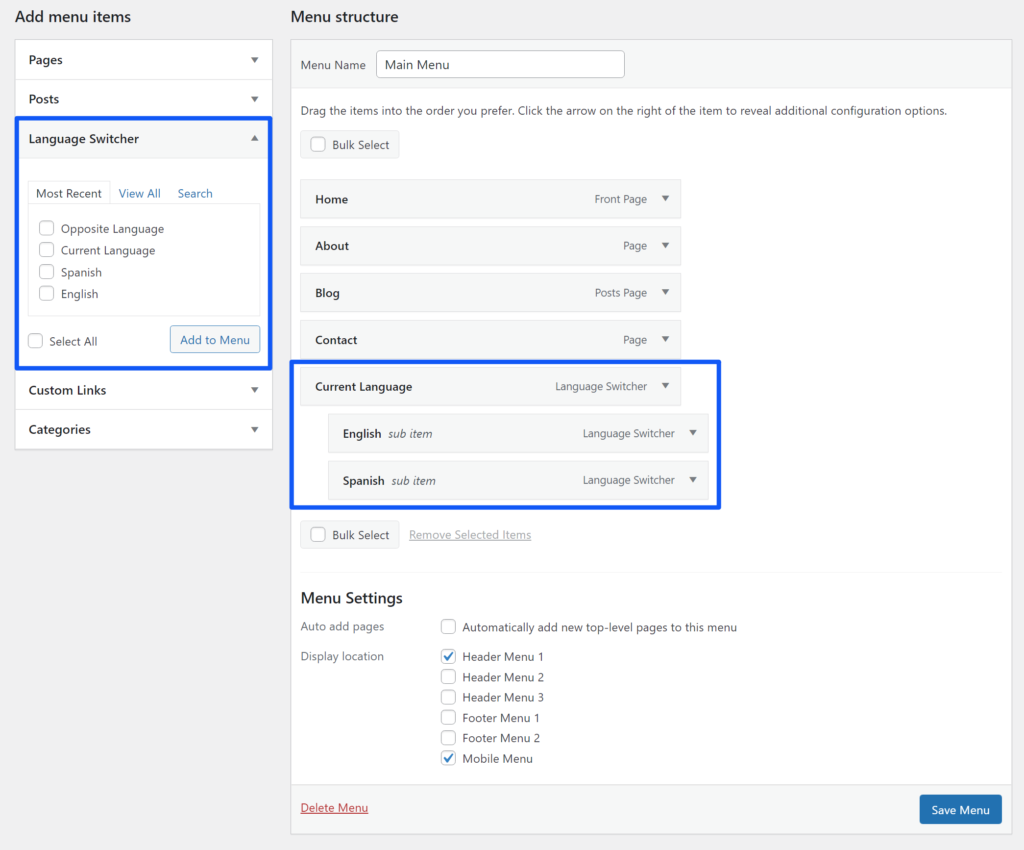
If you’re using the free version of Blocksy, you can add a language switcher to your menu using TranslatePress’s feature—you just won’t have quite as much control over where it appears in your header or footer. Go to Appearance → Menus and add the languages to the menu that you’ve included in Blocksy’s header builder:
Create Your Multi Language Website With Blocksy and TranslatePress Today
Key features and benefits of using Blocksy and TranslatePress together for creating a multilingual WordPress site:
| Feature | Blocksy | TranslatePress |
|---|---|---|
| Design and Customization | Modern, responsive, and highly customizable themes with drag-and-drop header/footer builder. | Easy-to-use visual editor for translating all elements of your site, including custom themes. |
| Multilingual Support | Built-in language switcher for Pro users, seamlessly integrates with translation plugins. | Supports over 100 languages, allows manual or automatic translations, and stores them locally. |
| Ease of Use | User-friendly interface with beginner-friendly tools to build stunning websites quickly. | Point-and-click translation interface for effortless multilingual content management. |
| SEO Optimization | SEO-friendly themes with Schema integration and lightweight structure for faster loading times. | Multilingual SEO with options to translate titles, meta descriptions, URL slugs, and alt texts (Pro SEO Pack). |
| Performance | Lightweight and optimized for speed to enhance user experience and SEO rankings. | Stores translations locally, avoiding frequent external API calls, improving site speed. |
| Plugin Compatibility | Compatible with major WordPress plugins, including TranslatePress, WooCommerce, and Elementor. | Works seamlessly with all WordPress plugins, including WooCommerce, Yoast SEO, and WPForms. |
| Content Translation | Supports easy translation of theme content such as menus, headers, footers, and CTAs. | Translates all site content, including plugin-generated text, images, and dynamic content. |
| Language Switcher | Integrated language switcher (Pro version) for easy visitor navigation. | Provides various language switcher options, including floating widgets, menu items, or manual placement via shortcode. |
| Pricing | Free theme with Pro features starting at $69 per year. | Free version supports one additional language; Pro starts at $89/year for unlimited languages and advanced SEO features. |
If you want to create a multi language website, the Blocksy theme and the TranslatePress plugin make the perfect pair.
With Blocksy, you can create a beautiful site in your original language using Blocky’s starter sites, flexible Customizer options, and useful features.
Once you’ve fully set up your site in its original language, TranslatePress makes it easy to translate your content into one or more new languages using a simple visual editor and/or automatic machine translation. There is an alternative tool in our article “How to translate a WordPress site with WPML” published recently.
TranslatePress also offers out-of-the-box support for Blocksy and any WordPress plugins you might be using, including WooCommerce. And the benefits go beyond convenience — a CSA Research study found that multilingual websites can drive up to 47% more traffic than single-language sites, making translation a real growth strategy, not just a feature.
If you’re ready to get started with your multi language website, install the Blocksy theme today and then follow this tutorial to translate your site with TranslatePress.


Does they support automatically rtl option or we have to design it manually?
Hi Imran,
Yes, Blocksy supports RTL mode, it will automatically adapt to RTL.
Anyway, in case you are sure that something is not working as expected in RTL mode – please submit a support ticket here and we will take a closer look at your use case.
Is rtl version is in blocksy or they just translate it only
Thanks for such a great information
Nice article, thanks for such a great article