Google Analytics 4 (GA4) is Google’s next-generation analytics platform, designed for modern cross-platform tracking. Here’s how to add it to your WordPress site – and why it’s worth it.
In this guide, we will tell you what Google Analytics 4 is and how it is different from the previous edition of Google Analytics – called Universal Analytics. Then, we’re going to show you how to enable it on your WordPress website.
Key Takeaways:
- Google Analytics 4 uses an event-based model, unlike Universal Analytics, which was pageview-based. This allows more flexible and detailed tracking.
- GA4 supports cross-platform tracking for both websites and mobile apps under one property, making it ideal for multi-channel businesses.
- You can run GA4 alongside Universal Analytics, so there’s no need to switch completely right away.
- Setting up GA4 is simple with the GA4 Setup Assistant, which lets you add a new GA4 property with just a few clicks.
- GA4 can be added to WordPress manually, via a plugin, or through a theme like Blocksy, depending on your setup and comfort level.
Table of Contents
Google Analytics 4 – What Is It 💪
Google Analytics seems like a product that worked perfectly well and was probably complicated enough already, right? Who needs a new version?! 🤷♂️
The long story short is that v4 is Google’s answer to the ever-increasing popularity of mobile and the need for a more flexible way of collecting data.
The way things used to work with Universal Analytics (UA) all happened around pageviews. GA4, on the other hand, is based on events. Moreover, with this new version of Google Analytics, you can track not only a website but also an app that you might have alongside your website.
Apart from that, Google Analytics 4 also has its own new spin on reports and report looks. Among them: a new home report, real-time report, games reporting, monetization reports, and more.
Overall, Google Analytics 4 is the next step for analytics – a more modern and optimized solution.
“Will I Lose My Current Google Analytics Panel After I Switch?”
The good news is that you don’t have to lose any sleep over it at this point. In this early stage of Google Analytics 4’s adoption, you can run both Universal Analytics and Google Analytics 4 simultaneously.
What Are the Benefits of Using GA4?
Google Analytics 4 (GA4) represents a significant upgrade from Universal Analytics (UA) for several reasons:
- Cross-platform tracking: now you can track users from your website and mobile app. This can be vital for businesses that are promoting their mobile apps. In Universal Analytics such tracking was complicated.
- Event-based tracking: GA4 is built around events, not pageviews. You can now track a wide variety of user actions more accurately and efficiently.
- GDPR-compliance: GA4 can be crucial in some cases where GDPR and CCPA compliance is needed.
| Feature | Universal Analytics (UA) | Google Analytics 4 (GA4) |
|---|---|---|
| Data Model | Pageviews-based | Event-based |
| Cross-Platform Tracking | Web tracking primarily | Web and app tracking unified under one property |
| Reports | Predefined reports | Customizable, more flexible reports |
| AI/ML Insights | Limited use of AI/ML | Built-in AI/ML-driven insights and predictive metrics |
| Privacy & Cookies | Relies on cookies for data collection | Designed with privacy in mind; can work with limited cookies |
| User Tracking | Session-based, with limited user-level tracking | Event-based with improved user-centric tracking |
| Custom Dimensions/ Metrics | Restricted number of custom dimensions/metrics | More flexibility with unlimited event parameters |
| Real-time Reporting | Basic real-time reporting | Enhanced real-time reporting with better data visualization |
| Conversions | Goal-based (session-oriented) | Event-based conversion tracking |
| Cross-domain Tracking | Manual setup | Automatic with better user-ID tracking across domains |
How to Get Started With Google Analytics 4 🤔
Here’s the kicker, the recommended way of setting your site up with Google Analytics 4 is to run it alongside UA and not instead of it. You can test it with some custom pages like landings dedicated to special events or occasions for users. Learn how to upload HTML files to WordPress and create such landings.
Just to emphasize this again, in the recommended setup, you’re going to be running both UA and GA4 at the same time – at least for now. As GA4 matures, we might see UA go away, but that’s not where we’re at yet.
Here’s how to set up Google Analytics 4 and then integrate it with your WordPress website:
1. Sign up to Google Analytics
💡 Note; If you already have an account with Google Analytics and your website hooked up to it, you can skip to step #3.
The first step is to create a new Google Analytics account and create a standard – UA – property for your website.
To begin, go to analytics.google.com and log in to your Google account (the one you use for Gmail).
You’ll see the main welcome screen:
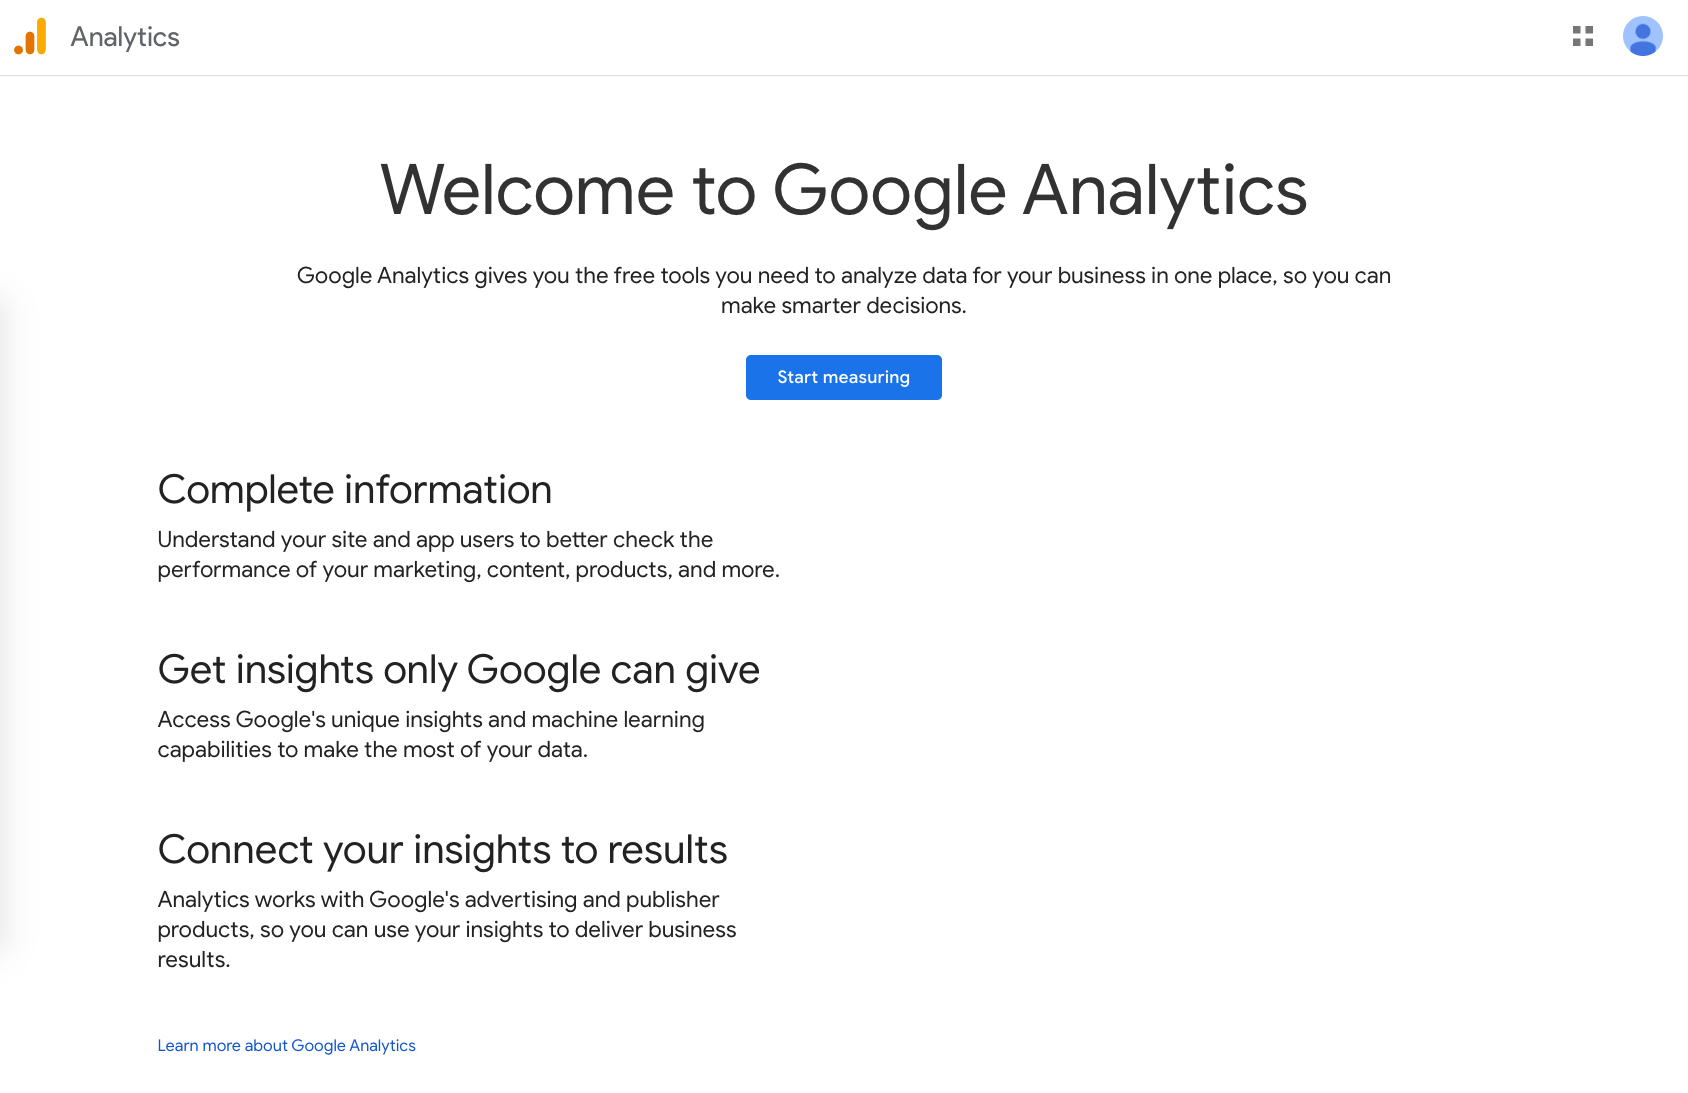
Google Analytics will invite you to get started. The account creation process isn’t too complicated, but you’ll need to go through a couple of forms.
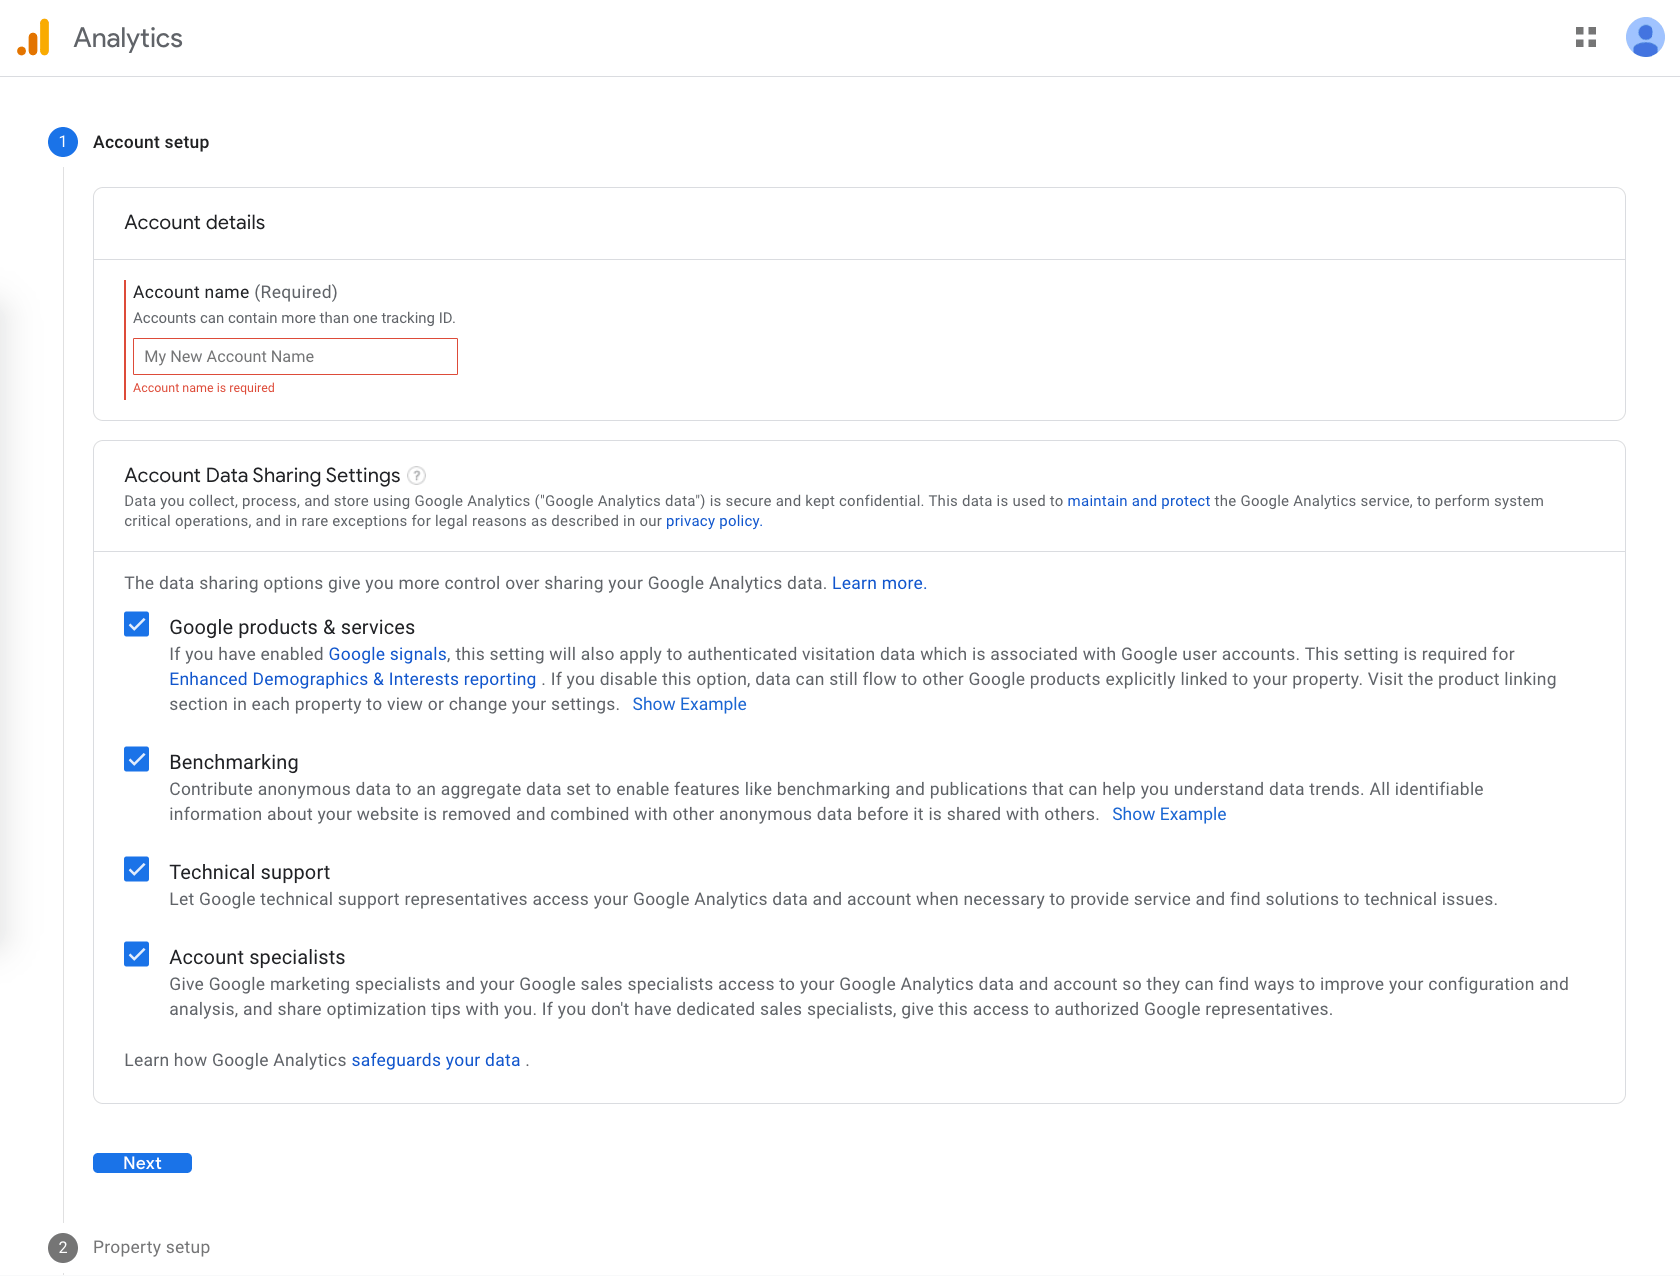
2. Create a UA Property
After getting the account set up, it’s time to add a “property.” A property is Google Analytics’ fancy term for the website that you want to track.
From the admin panel of Google Analytics, click on + Create Property to begin.

Again, at this stage, Google Analytics will ask you for some necessary details about your site. The important part is to click on the Show advanced options button and then enable UA by switching this toggle button:
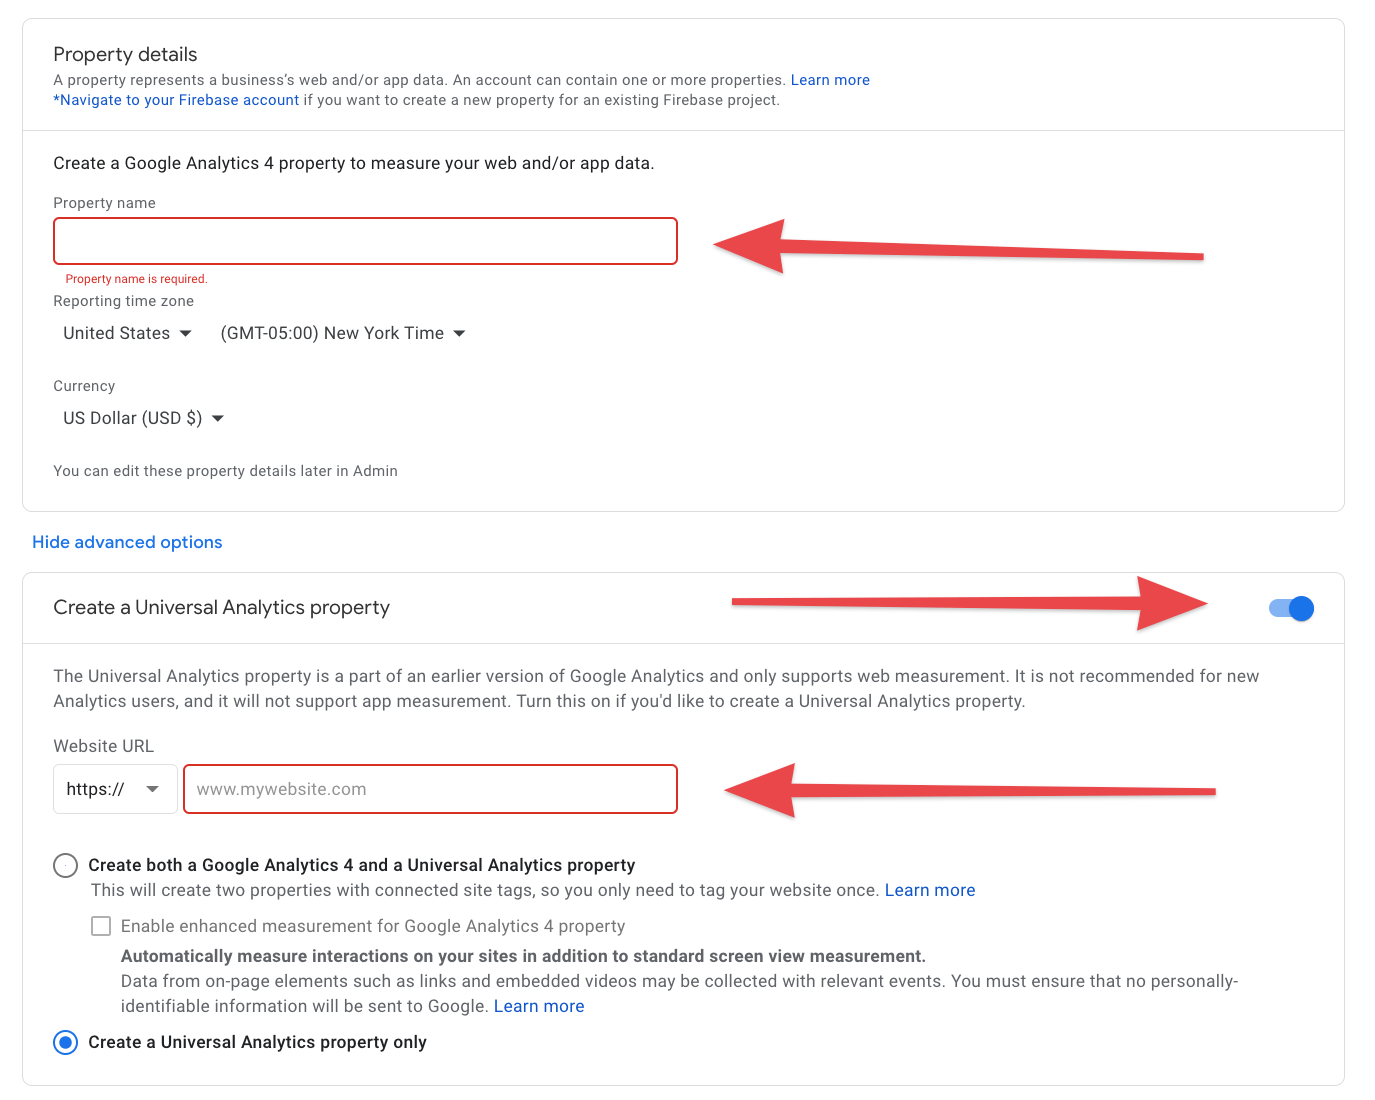
Once you have all the required info filled in, click on Create.
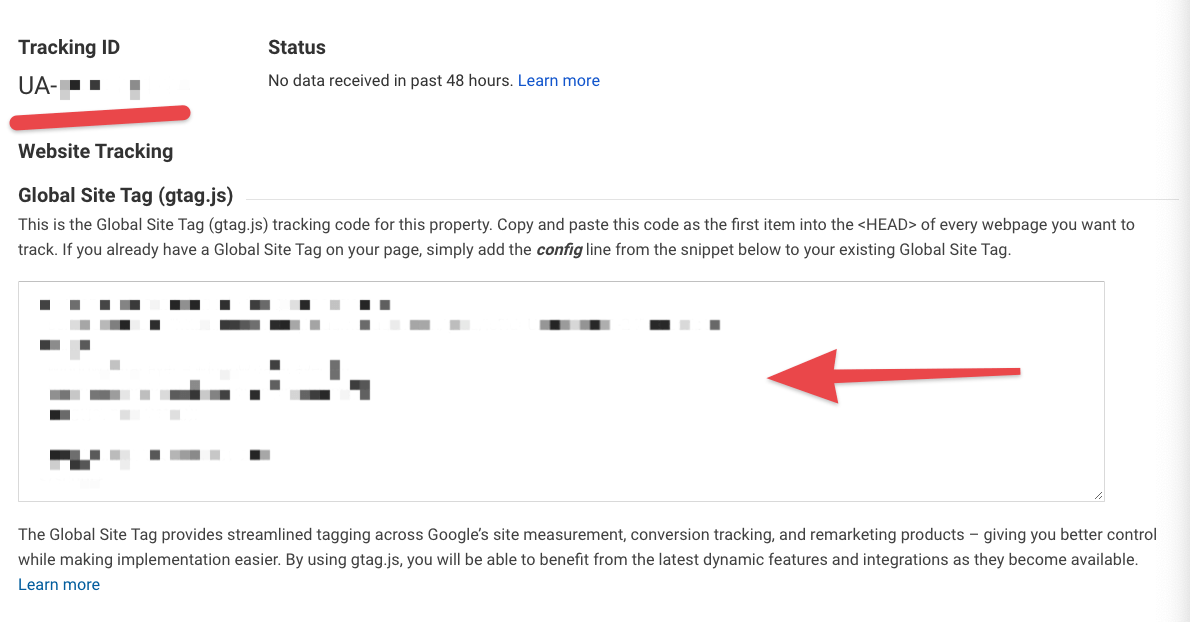
After a couple of seconds, you should see a confirmation screen. This is where you’re going to get your unique tracking ID and the tracking code snippet that you can use to integrate your site with Google Analytics later. Lear about rich snippets in our guide.
- Need help on how to get through the basic setup with Google Analytics? Read this official doc.
3. Add a Google Analytics 4 Property
With your UA property alive and well, let’s now add a GA4 property alongside.
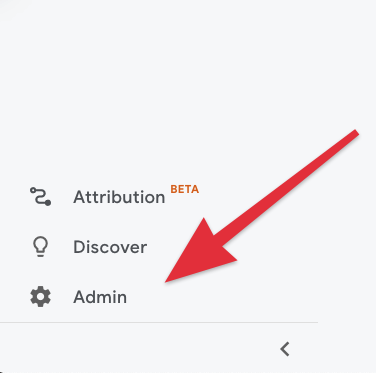
Luckily, Google Analytics makes this really easy with the official GA4 Setup Assistant. To access it, go to the Admin section of your current property – find the link in the bottom left corner of the GA interface:
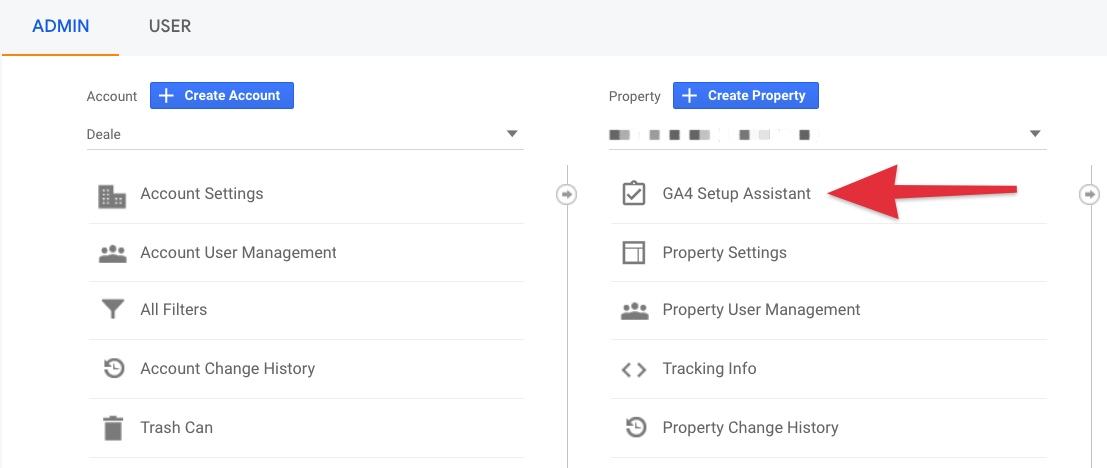
In the Property column, there’s a link labeled GA4 Setup Assistant. Click on it to begin.
The on-screen wizard will get you through the steps needed. It’s all very clear.
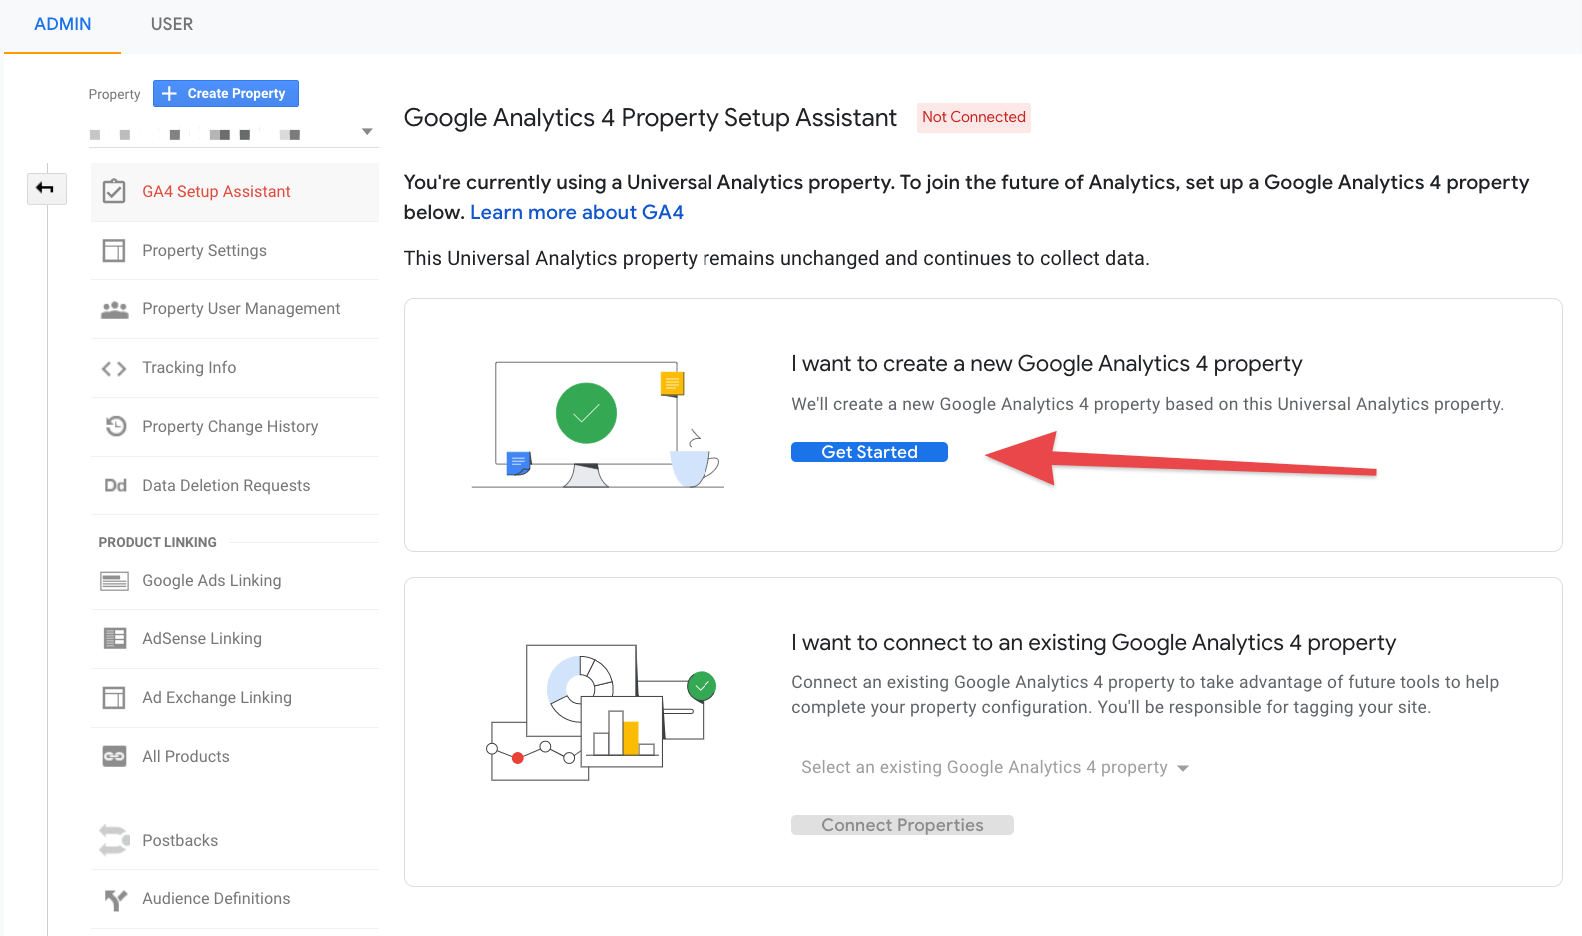
Click on Get Started to create a new property. This whole process consists of just a single step. You’re literally one click away from having your new Google Analytics 4 property up and running.
- Need help with the GA4 Setup Assistant? Read this official doc.
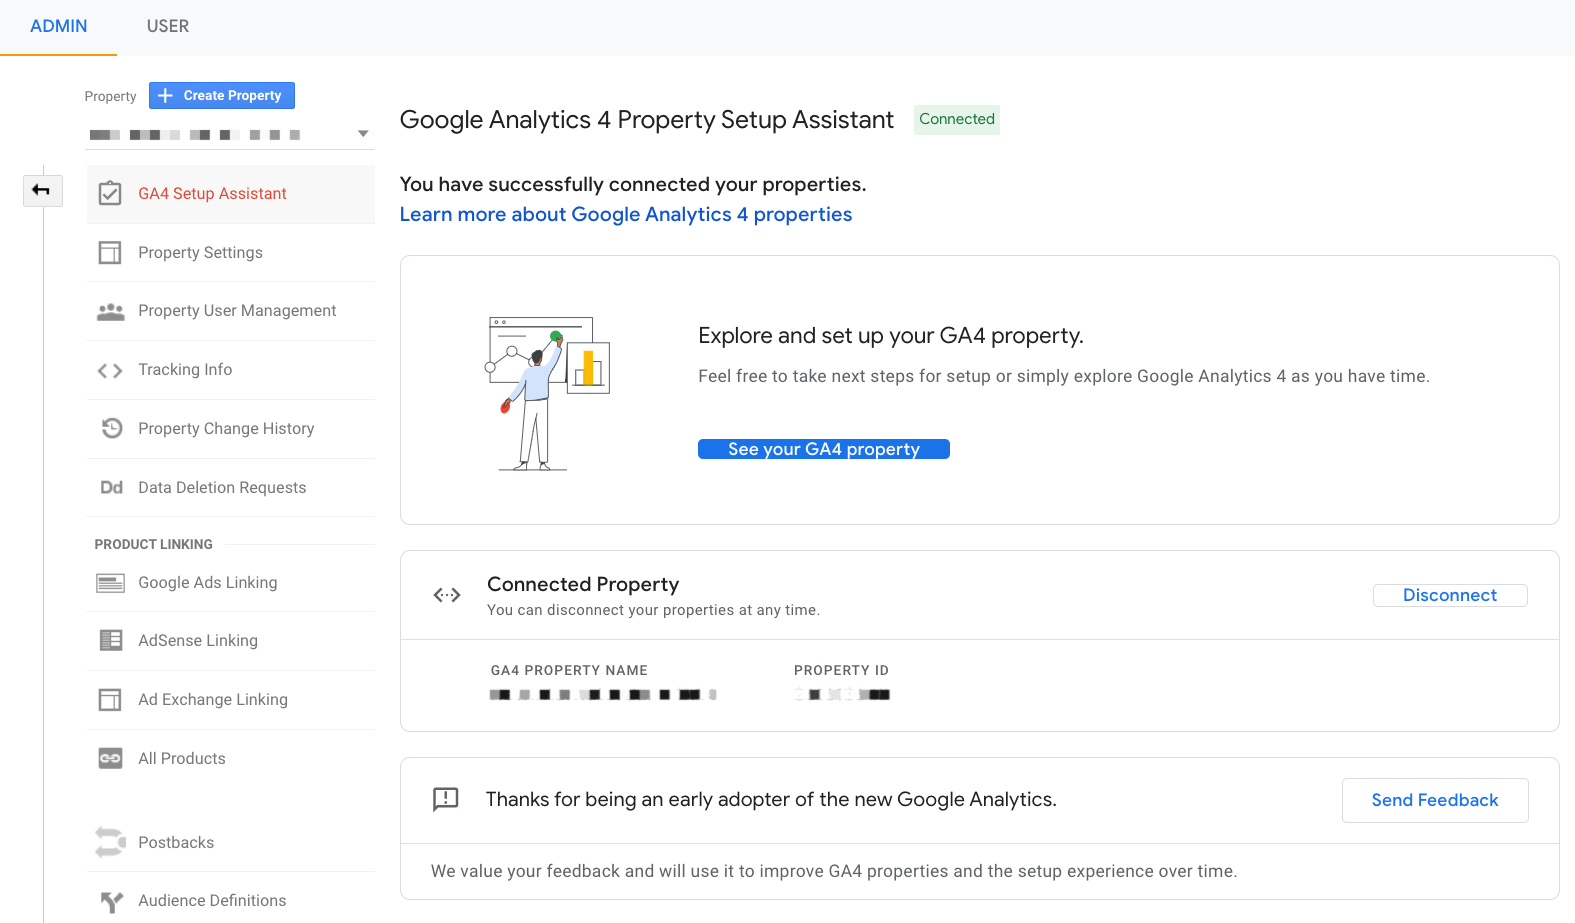
From this screen, click on the button labeled See your GA4 property. This will land you on an intro screen where you’ll be able to get your global site tag – a piece of code used to integrate your site with Google Analytics.
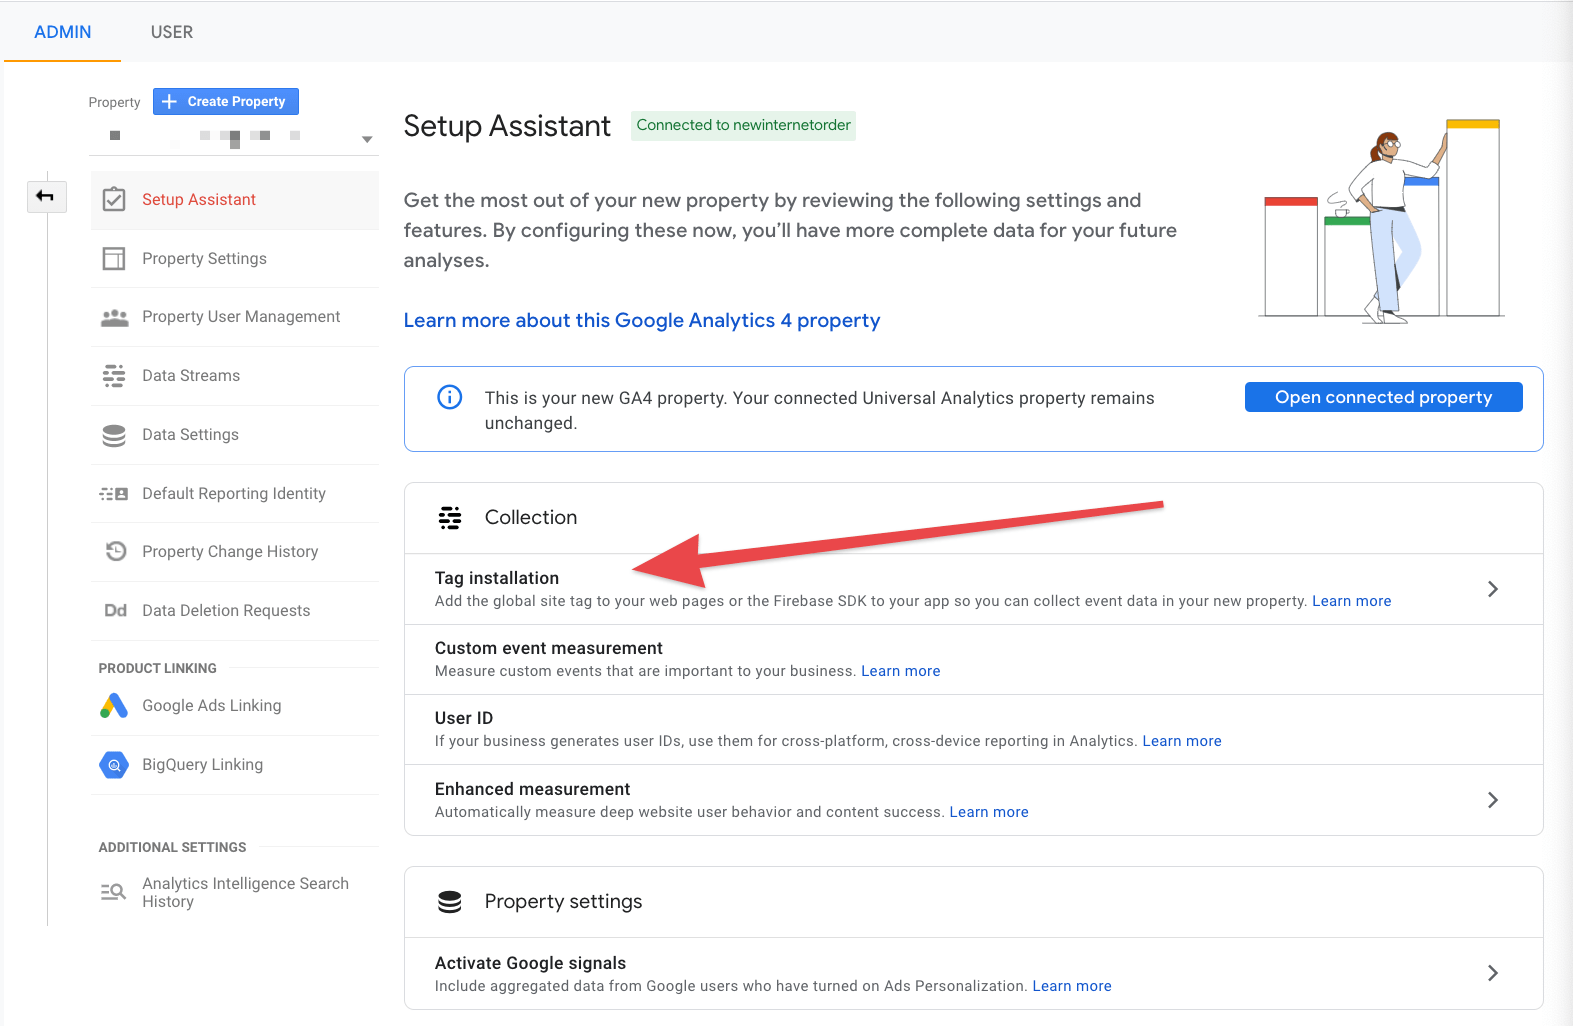
Click on Tag installation to begin.
Your main web data stream should be there on the list.
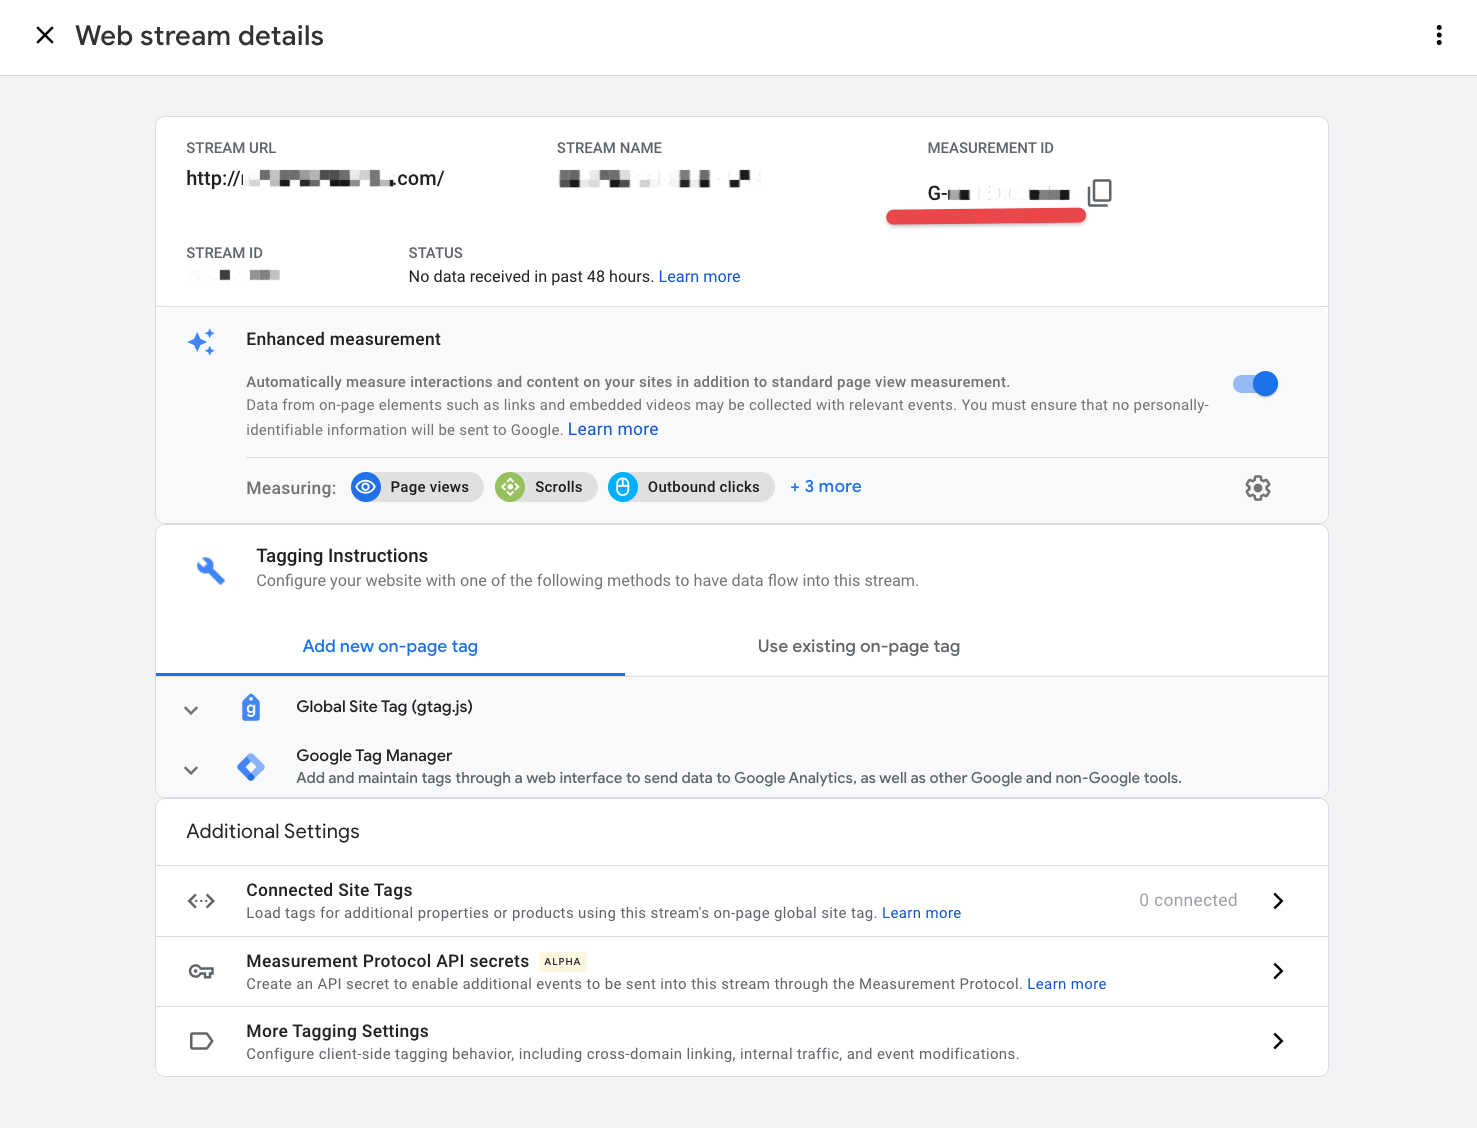
This page holds all the info you need to integrate your WordPress site with Google Analytics 4. The most important piece of data is your measurement ID.
To get your GA4 embed code, expand the section labeled Global Site Tag (gtag.js):
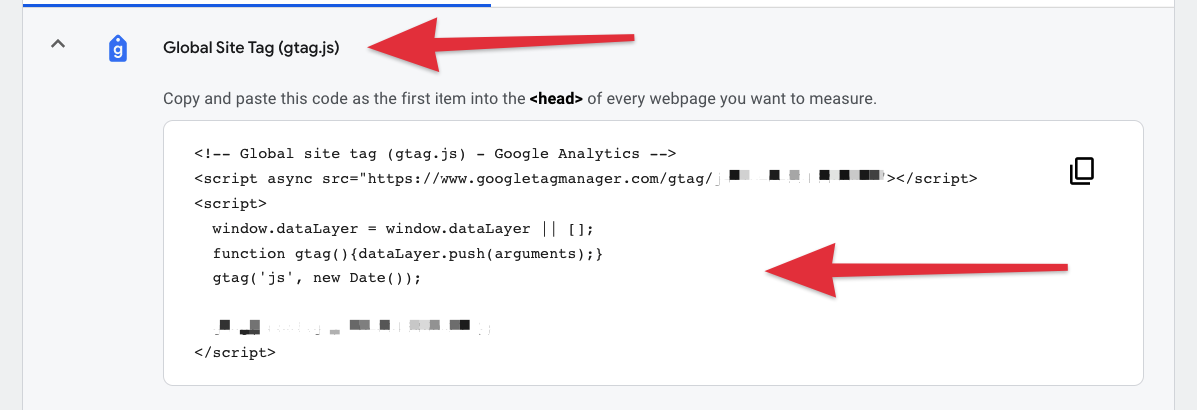
You can copy and paste it someplace handy.
4. How to Embed Your GA4 Code in WordPress
There are two ways you can do this:
- manually
- with the help of your theme
Let’s start with the latter.
First, check if your theme came with any Google Analytics integration out the box. If it did, using it will be the easiest way to add Google Analytics 4 to your WordPress site.
For example, in Blocksy, you can add your Google Analytics 4 code (and UA code) when you go to the WordPress Customizer and then into Visitor Engagement → General.
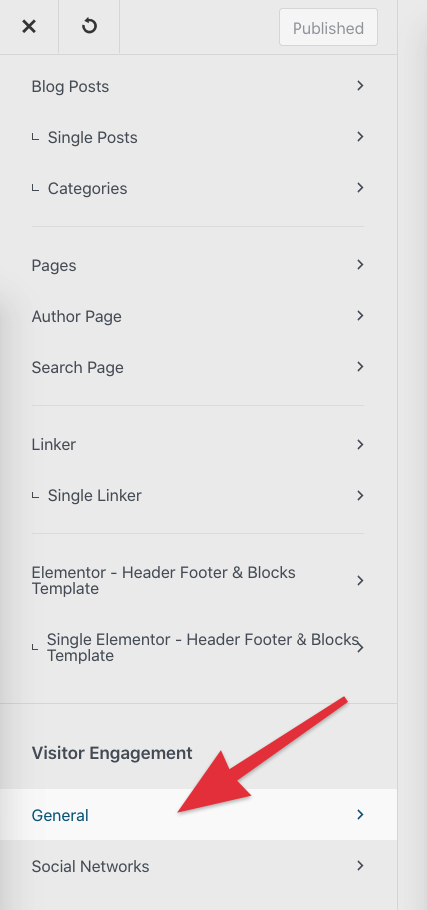
From there, you can add both your standard UA ID and your new GA4 ID.
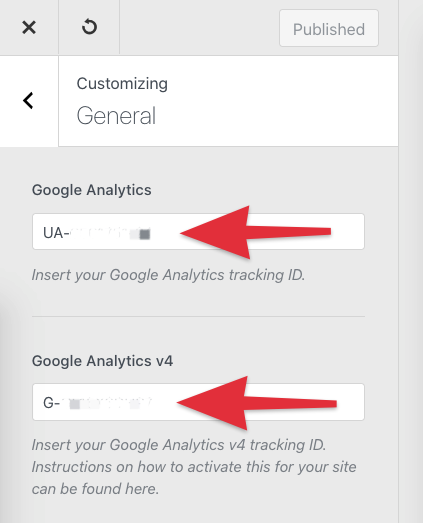
This is literally all you have to do to enable GA4 in Blocksy. Just publish the changes in Customizer, and you’re done!
In other themes, you might find these settings in different places.
⚠️ Important; some WordPress themes won’t allow you to enable Google Analytics 4 through their existing integrations with Google Analytics. For instance, it’s common for themes to require a UA- ID to integrate with your Google Analytics. The new v4 ID starts with G- and this by itself might be enough to prevent the theme from allowing it (not to mention the lack of code structures to handle it under the hood).
If your theme doesn’t come with a built-in integration, you can either:
- use a Google Analytics plugin (just go to the official plugin directory and put “Google Analytics” into the search box, there’s plenty of those things), or
- include the code manually in the source files of your theme – usually in the
footer.phpfile or through a hook infunctions.php(the plugin route is more straightforward, honestly).
FAQ – How to Add Google Analytics to WordPress
What Is Google Analytics 4 (GA4)?
GA4 Is the Newest Version of Google Analytics, Using an Event-Based Tracking Model That Provides Deeper Insights and Works Across Websites and Apps.
Can I Use GA4 and Universal Analytics at the Same Time?
Yes, You Can Run Both Together. This Dual Setup Is Recommended During the Transition to GA4.
How Do I Get My GA4 Tracking Code?
After Creating a GA4 Property, Go to Tag Installation, Select Your Web Stream, and Find Your Global Site Tag (gtag.js) and Measurement ID.
What’s the Easiest Way to Add GA4 to WordPress?
Use Your Theme Settings (If Supported), a Plugin, or Manually Paste the Tracking Code Into Your Theme’s Footer or Functions File.
Why Should I Switch to GA4?
GA4 Offers Flexible Event Tracking, Better Real-Time Data, Cross-Platform Support, and Improved Privacy Features Over Universal Analytics.
That’s It! 🍾
You now have GA4 up and running. Go to the new Google Analytics dashboard and check out what’s going on. The real-time views panel is fascinating – something that the previous versions of Google Analytics were not that good at. Remember, you can always use a Google Analytics alternative.
Sidebars can be a great CTA solution to track via analytics. Read our guide to WordPress custom sidebars next.
Want an easier way to implement GA4? Blocksy Pro includes built-in analytics support and other performance-focused features.
Another tool from Google is Google Ads with the help of which you can monetize your site by placing ads in WordPress. If you want to boost Facebook traffic with ads, read how to add Facebook Pixel to WordPress guide.
If you have any questions about how to use Google Analytics 4 with WordPress, let us know in the comments below.



Worth to mention that WooCommerce users should still use old analytics – the latest one (v4) is still under maintenance and conversions doesn’t work well… even doesn’t work at all 🙂