If you’re wondering how to add Facebook pixel to WordPress, you’re in the right place. In this straightforward tutorial, we explain what a Facebook pixel is, why you’d want to use it on your WordPress site, and how to set it up.
Table of Contents
What Is the Facebook Pixel and Why Use It? 🔸
Let me just read you a part of the official definition, since it’s actually quite good:
The Facebook pixel is a snippet of code that lets you track visitor activity on your website.
Now, what sort of activity can you track?
This is entirely up to you. You can track whatever activity is important to you. The most common usage is to track conversions or events that lead to sales or other visitor interactions.
What basically happens is that the Facebook pixel works quietly in the background of your site, tracks all those events and the user actions that trigger them. Then, when the event happens, an information gets sent back to Facebook. You can then use that information as input points or feedback for your ad campaigns. It gives you insights about how your visitors interact with your site.
In the end, what the Facebook pixel allows you to do is make a connection between your site and the ad campaigns that you have running on Facebook. This, for example, lets you target ads to only those visitors who have seen a particular page or product on your site. More details on how to place ads on a WordPress site in our guide.
These sort of things are great at recovering abandoned shopping carts or getting the person back to your site in any other circumstances.
💡 Just to emphasize this, you only need the Facebook pixel on your site if you’re going to be running any ad campaigns with the Facebook Ads platform. Scratch that, it’s not that you need the Facebook pixel then, you absolutely must get it for your site! It will give you a whole new level of tracking capabilities with your campaigns.
How to create your Facebook pixel
Before you can add the Facebook pixel to your site, you have to first create it within the business section of the Facebook interface.
Depending on whether you’ve set your Facebook ad presence through your personal account or a business account, you’re going to use either the normal version of Facebook’s Events Manager or the Events Manager in Facebook Business.
Facebook Business is a more advanced area of Facebook, mainly meant for people working with multiple pages, ad accounts, and even client campaigns.
One want to create a custom test page and test the pixel there. Look for our guide to uploading HTML in WordPress if so!
How to create a Facebook pixel when advertising through a personal account
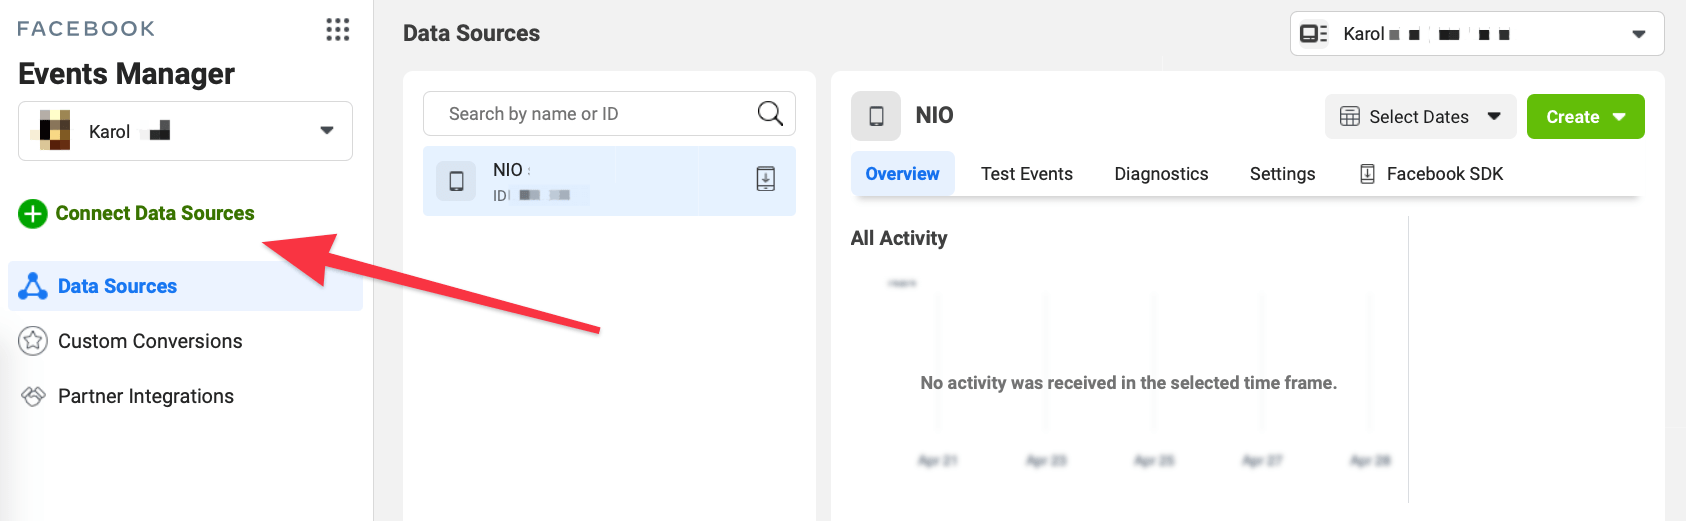
To start, go to the Events Manager.
Click on the + Connect Data Sources button and select Web.
Select Facebook Pixel and click on Connect.
Add a name for your pixel and enter the website URL.
Click Continue.
You will receive your personal Facebook pixel code at this stage.
Copy this code somewhere safe for the time being. We’ll use this snippet in a moment to enable the pixel on your WordPress website.
How to create a Facebook pixel in Facebook Business
Go to the main Business Settings in Facebook Business.
From the left sidebar, go to Data Sources → Pixels. Click on the Add button that’s in the center.
Enter a name for your pixel and the address of your website. Click on Continue.
In the next step, select the option to Set up the Pixel Now.
Lastly, select the option to Manually add pixel code to website.
In the next panel, you will get your unique Facebook pixel code.
You’ll use that piece of code in the next step, which is when we’ll finally add Facebook pixel to WordPress:
How to add Facebook pixel to WordPress using the Blocksy theme 👍
📋 Note; if your site doesn’t use the Blocksy theme, first of all, it should! Seriously, check it out! In the meantime, we do show you the manual method of adding the Facebook pixel to your site later in this guide as well.
The great thing about using Blocksy as your theme is that it can handle many additional side-elements that go beyond your website’s appearance. One of those side-elements is letting you add Facebook pixel to WordPress easily.
Moreover, with Blocksy, you can choose whether you want the Facebook pixel added to the entire website or just select pages/posts within the site. This type of setup can be useful if you’re only running Facebook campaigns that relate back to parts of your site and you don’t want to have Facebook lurking in the dark on every single sub-page.
Here’s how to add Facebook pixel to WordPress with Blocksy:
Activate the Custom Code Snippets extension
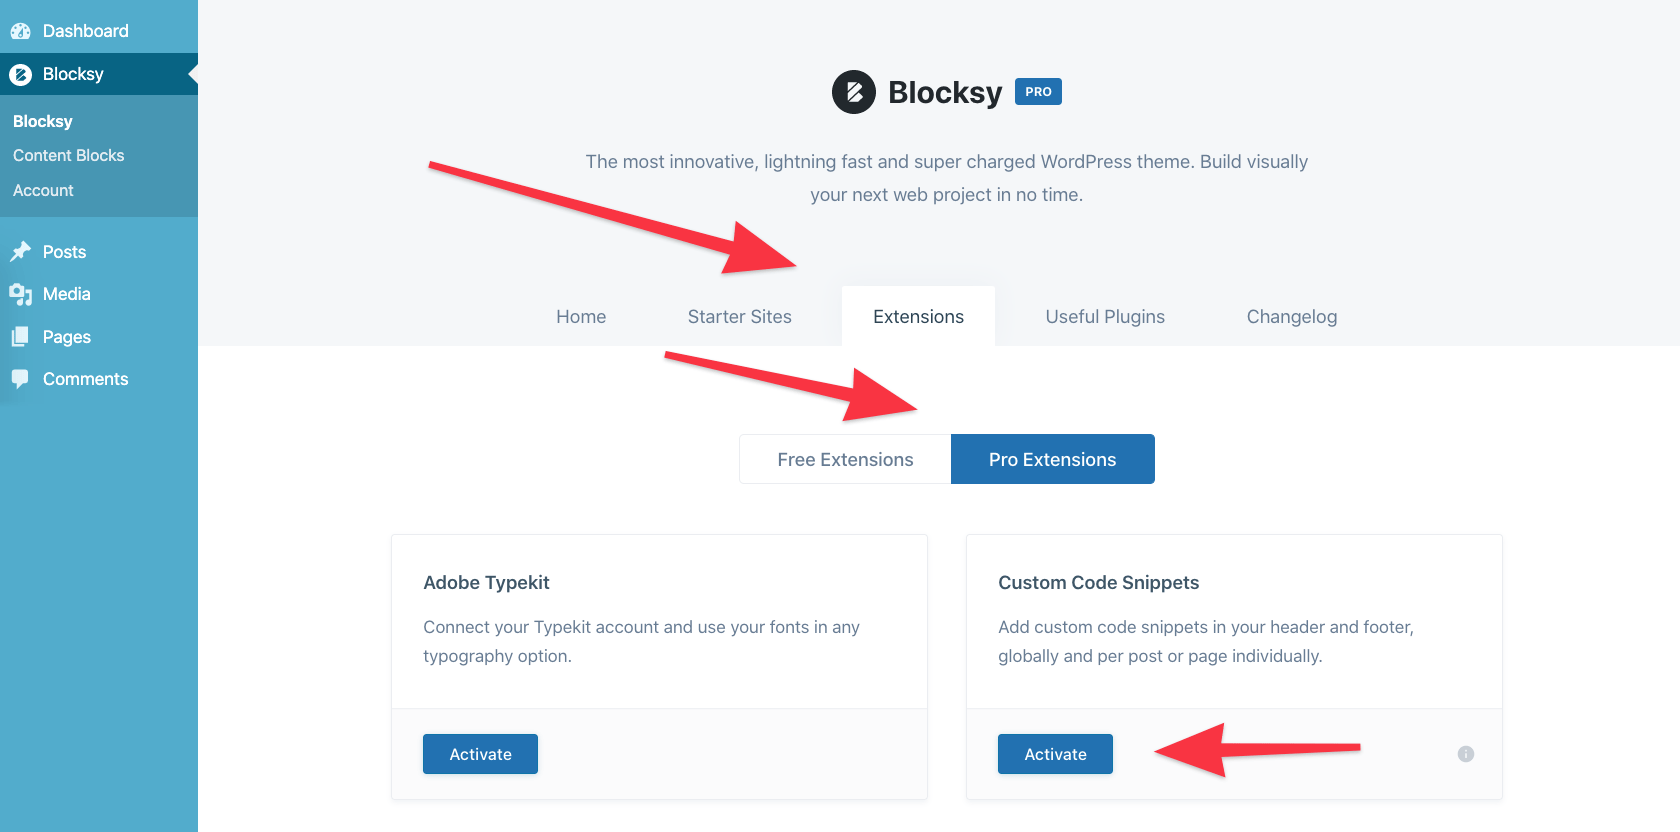
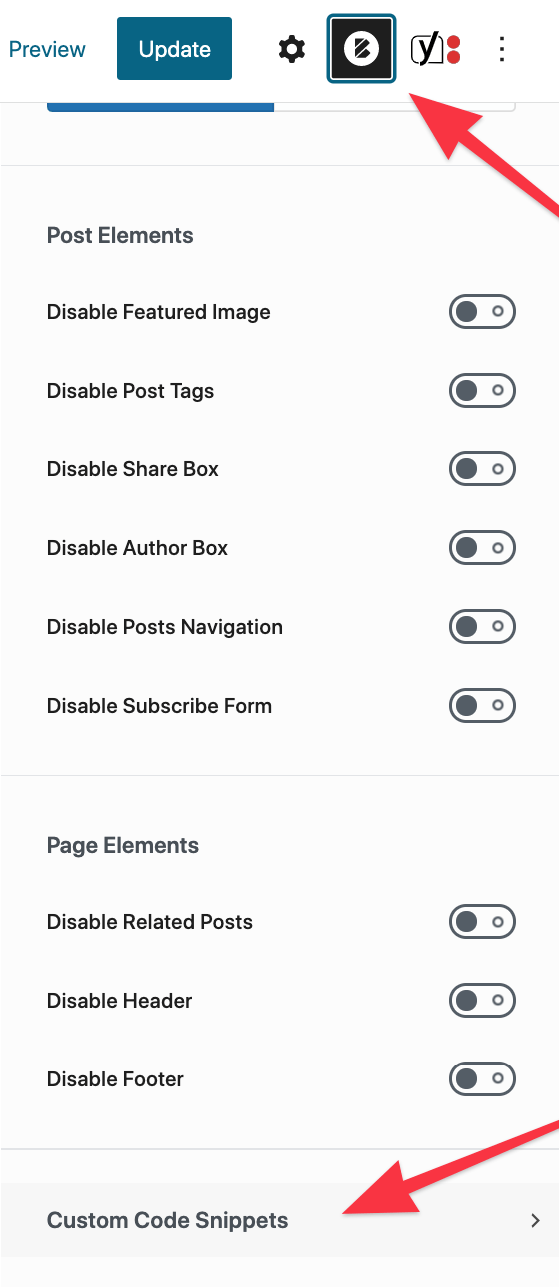
With Blocksy enabled as your theme, go to your wp-admin, into Blocksy → Extensions → Pro Extensions. (A Blocksy Pro subscription is required.)
Activate the Custom Code Snippets extension:
At this stage, you can pick whether you want to add the Facebook pixel only to select pages or your entire website:
Option a): Add the Facebook pixel to the entire website
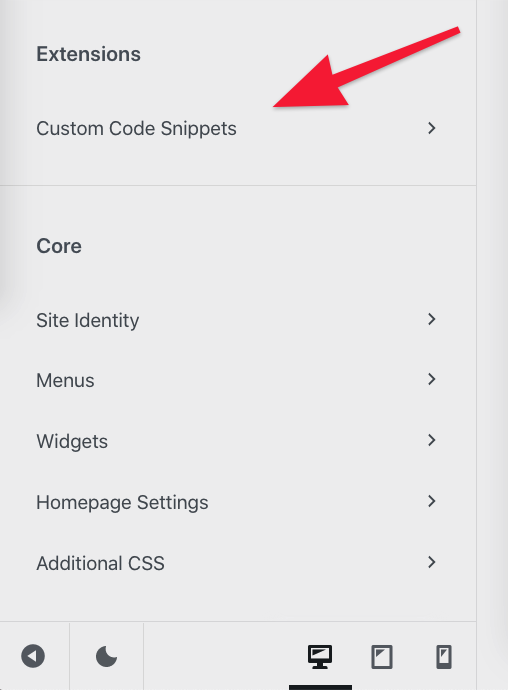
Fire up the WordPress Customizer and scroll down to the Custom Code Snippets section in the sidebar.
Grab your Facebook pixel code and paste it into the Header scripts box:
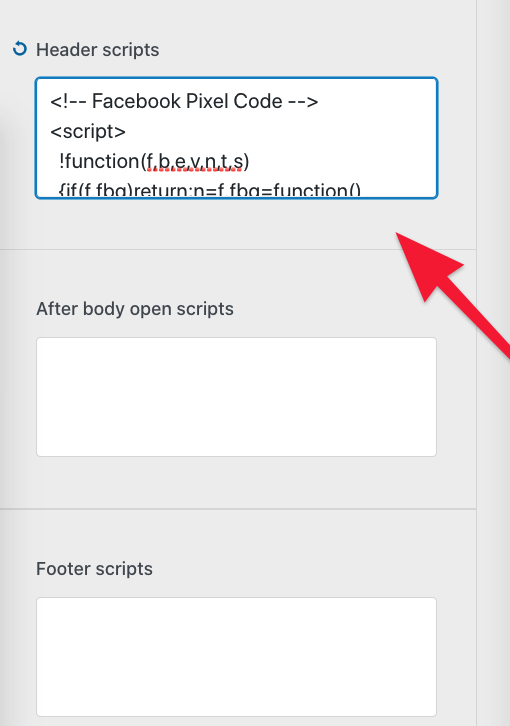
Click on the Publish button to save the changes.
From now on, the Facebook pixel is enabled on all pages and posts within your website!
Option b): Add the Facebook pixel to select pages/posts only
If you want only a few select pages to have some interaction established with your Facebook ad campaigns, then there’s no need to add the pixel to the entire site. Blocksy lets you add the pixel only to the exact pages where it is needed.
When editing any post or page, click on the Blocksy icon in the corner and then scroll down to the Custom Code Snippets section:
Grab your Facebook pixel code and paste it into the Header scripts box:
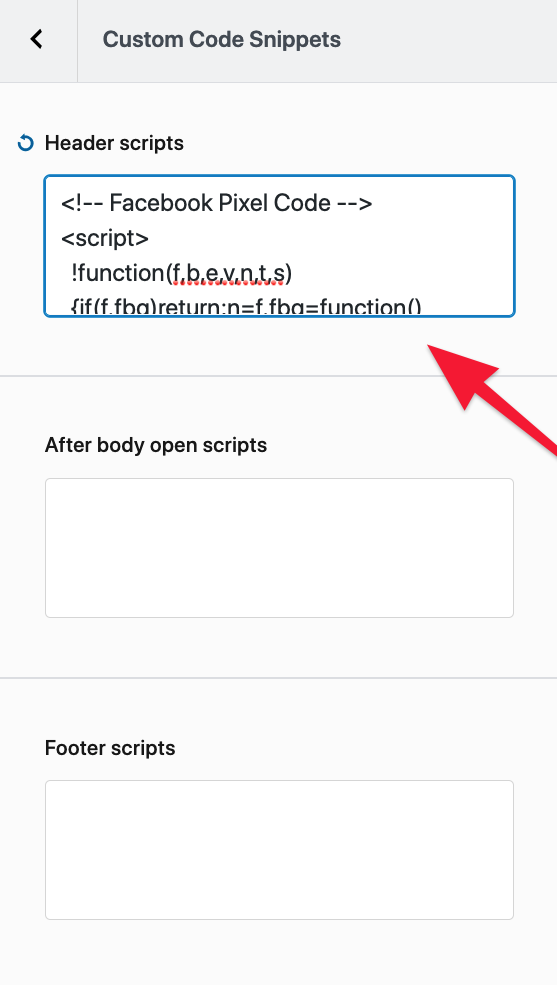
Click on the Update button to save the post.
At this stage, the Facebook pixel has been enabled on a single page/post only. To add the pixel to more posts or pages, edit them one by one and repeat the steps above.
How to add Facebook pixel to WordPress manually
If your blog runs on a different theme than Blocksy, you can still add the Facebook pixel pretty easily. Use a plugin called Insert Headers and Footers for that.
Once you have the plugin activated, go to Settings → Insert Headers and Footers and paste your Facebook pixel code into the Scripts in Header section, like so:
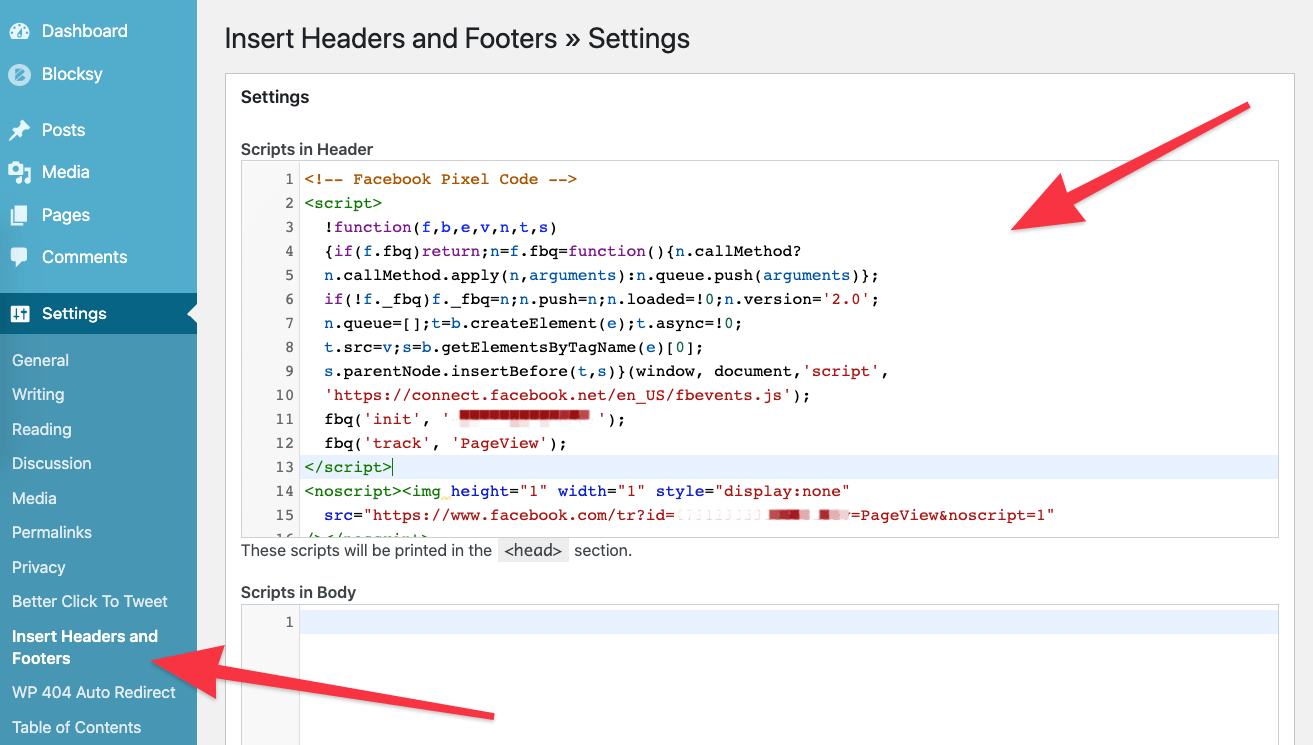
This will add the pixel to the entire site. As far as adding the pixel to individual posts, this is not a feature that the plugin offers.
Alternatively, for an ultra-manual setup, you can also add the Facebook pixel snippet by hand to your theme’s source files directly. Most probably, you will need to add that to the header.php file, but the exact file will depend on the structure of your theme.
Keep in mind, however, that this is a more invasive operation, and it can lead to some problems down the road. Particularly, if you ever update the theme, the code will go away and you’ll need to re-include it.
As for where to place the pixel code, here’s an excerpt from Facebook’s rulebook:
Copy and paste the pixel code into the bottom of the header section of your site, just above the tag. Install the base code on every page of your website.
Many still wonder how to integrate Google Analytics 4 in WordPress? We are here to solve this issue with our new guide.
Specific Use Cases for Facebook Pixel
- Retargeting Website Visitors. The Facebook Pixel allows businesses to retarget users who visited specific pages but didn’t complete desired actions. For example:
- An eCommerce store can show ads to visitors who abandoned their carts, encouraging them to complete their purchase.
- A blogger can retarget users who read an article but didn’t subscribe to the newsletter.
- Tracking Sign-Ups or Leads. Businesses can track when users sign up for services, download resources, or fill out forms. For instance:
- A SaaS company can measure how many people clicked on their “Start Free Trial” button and completed the signup process.
- A webinar host can identify which users registered for the event after seeing a Facebook ad.
- Monitoring Sales Conversions. By integrating Facebook Pixel with their checkout process, businesses can track sales conversions and the return on ad spend (ROAS). Examples include:
- Tracking purchases from specific ad campaigns to understand which ads are driving the most revenue.
- Identifying trends, like which product categories are most popular among Facebook ad-driven traffic.
- Optimizing Ad Campaigns. Pixel data can be used to create Lookalike Audiences—targeting new potential customers who share traits with your existing audience. For example:
- A fitness brand can use Pixel data to find users similar to those who recently purchased a yoga mat.
- An online course provider can create ads targeting users who resemble those who completed a registration form.
- Analyzing User Behavior. The Pixel tracks interactions, such as viewing content, adding items to a wishlist, or spending time on certain pages. Businesses can:
- Identify popular content to amplify in future ad campaigns.
- Adjust their website design to guide users toward conversion points.
Scenarios Where Not Using Facebook Pixel Could Hurt Your Campaigns
- Inefficient Ad Spending. Without a Facebook Pixel, ads target broader audiences with less precision. This increases the cost per click (CPC) and lowers the return on investment (ROI).
- Lack of Retargeting. Without retargeting capabilities, businesses miss out on engaging users who showed interest but didn’t convert. For example:
- An online retailer loses the chance to remind visitors about items they left in their shopping carts.
- Missed Insights for Optimization. Without Pixel data, businesses can’t measure which ads drive results or how visitors interact with their site after clicking an ad. This leads to poorly optimized campaigns.
- Inability to Create Lookalike Audiences. Without the Pixel, businesses can’t build Lookalike Audiences, which are proven to deliver better results by targeting people similar to existing customers.
- Reduced Conversion Tracking. Without the Pixel, businesses have limited visibility into what happens post-click. For instance, an ad might drive traffic, but there’s no way to measure how many people purchased, signed up, or engaged.
Advantages of Blocksy’s Custom Code Snippets Over Manual Methods
Blocksy’s Custom Code Snippets feature, available in the Pro version, offers significant advantages over traditional manual methods for adding Facebook Pixel code:
- Unlike traditional methods that apply Facebook Pixel globally, Blocksy allows users to target specific pages or posts. This is ideal for:
- Running campaigns focused on particular products or landing pages.
- Avoiding unnecessary Pixel code on non-relevant pages, which can reduce site load time and improve privacy compliance.
- The Blocksy interface is designed with ease of use in mind. Users can manage and update their snippets without diving into theme files, reducing the risk of errors.
- Blocksy eliminates the need for third-party plugins like Insert Headers and Footers, reducing plugin overhead and improving site performance.
- Traditional manual methods involve editing theme files (e.g.,
header.php), which can lead to issues during theme updates. With Blocksy, snippets are stored independently, ensuring updates don’t overwrite custom code. - Changes made using Blocksy’s Custom Code Snippets are instantly reflected in the WordPress Customizer preview, allowing users to see how their code affects the site in real time.
That’s it! 🍾
With these simple steps, we’ve just managed to add Facebook pixel to WordPress!
As you can see, this is super-easy with the Blocksy theme. Plus, you get the added benefit of being able to add the pixel to select posts or pages only.
If you haven’t checked out Blocksy yet, give it a go here. The free version of the theme is one of the most functional and easy-to-use solutions of this type on the market!
We are publishing guides and how-to’s constantly. If you want to know how to create custom contact forms in WordPress, move to the next article.