
The Blocksy theme is ideal for all ranges of sites, distinctly professional ones. Be it a news website, a travel blog with a huge database of articles, or pretty much anything imaginable, it’ll be presented in a beautiful, SEO-friendly, and usability-oriented way with Blocksy.
Once you get into the rhythm of releasing engaging and well-researched content regularly, you’re surely going to look for strategies to get a return on the investment of your time and the usage of your skills.
Naturally, most publishers turn to online advertising to monetize their sites. But managing the growing amount of ad units soon becomes a chore and, with the increasing number of interconnected posts and pages, nearly impossible. Moreover, blindly dumping static ads into posts lacks the finesse necessary to be in any control of their yield.
That’s where WordPress plugin Advanced Ads comes into play. Mindfully made and reliably maintained by its developers, this excellent piece of software will enable you to automatically inject adverts into your content, rotate them, track their performance, and tend to them in order to maximize both the satisfaction of your visitors as well as your profits.
In this short tutorial, we’ll dip into installing Advanced Ads and setting up your first ads from several sources.
Table of Contents
Monetize Your Site in 2 Easy Steps with Advanced Ads and Blocksy
For what you’ve come to love about Blocksy you’ll also cherish the Advanced Ads plugin – creating the framework of your content without writing a single line of code! Let’s start by setting it up.
Install Advanced Ads
In your WordPress dashboard, go to Plugins > Add New and search for ‘Advanced Ads’. Locate “Advanced Ads”, click Install Now, and then Activate. And that’s it! There’s no need to go into the plugin’s settings for now, as you will only have to supply just a bit of information to get started.
Create Your First Ad
In your WordPress dashboard, go to the freshly added menu item Advanced Ads > Ads. You’ll be sent directly to the ad creation screen, skipping the yet empty list of ads.
Think of a title for your ad, check ‘Image Ad’ in section ‘Ad Type’, and select an image from your media library with ‘Select Image’ in section ‘Ad Parameters’. After supplying the target URL below the preview, publish the ad. Now, you’ll be able to select the ad’s placement.
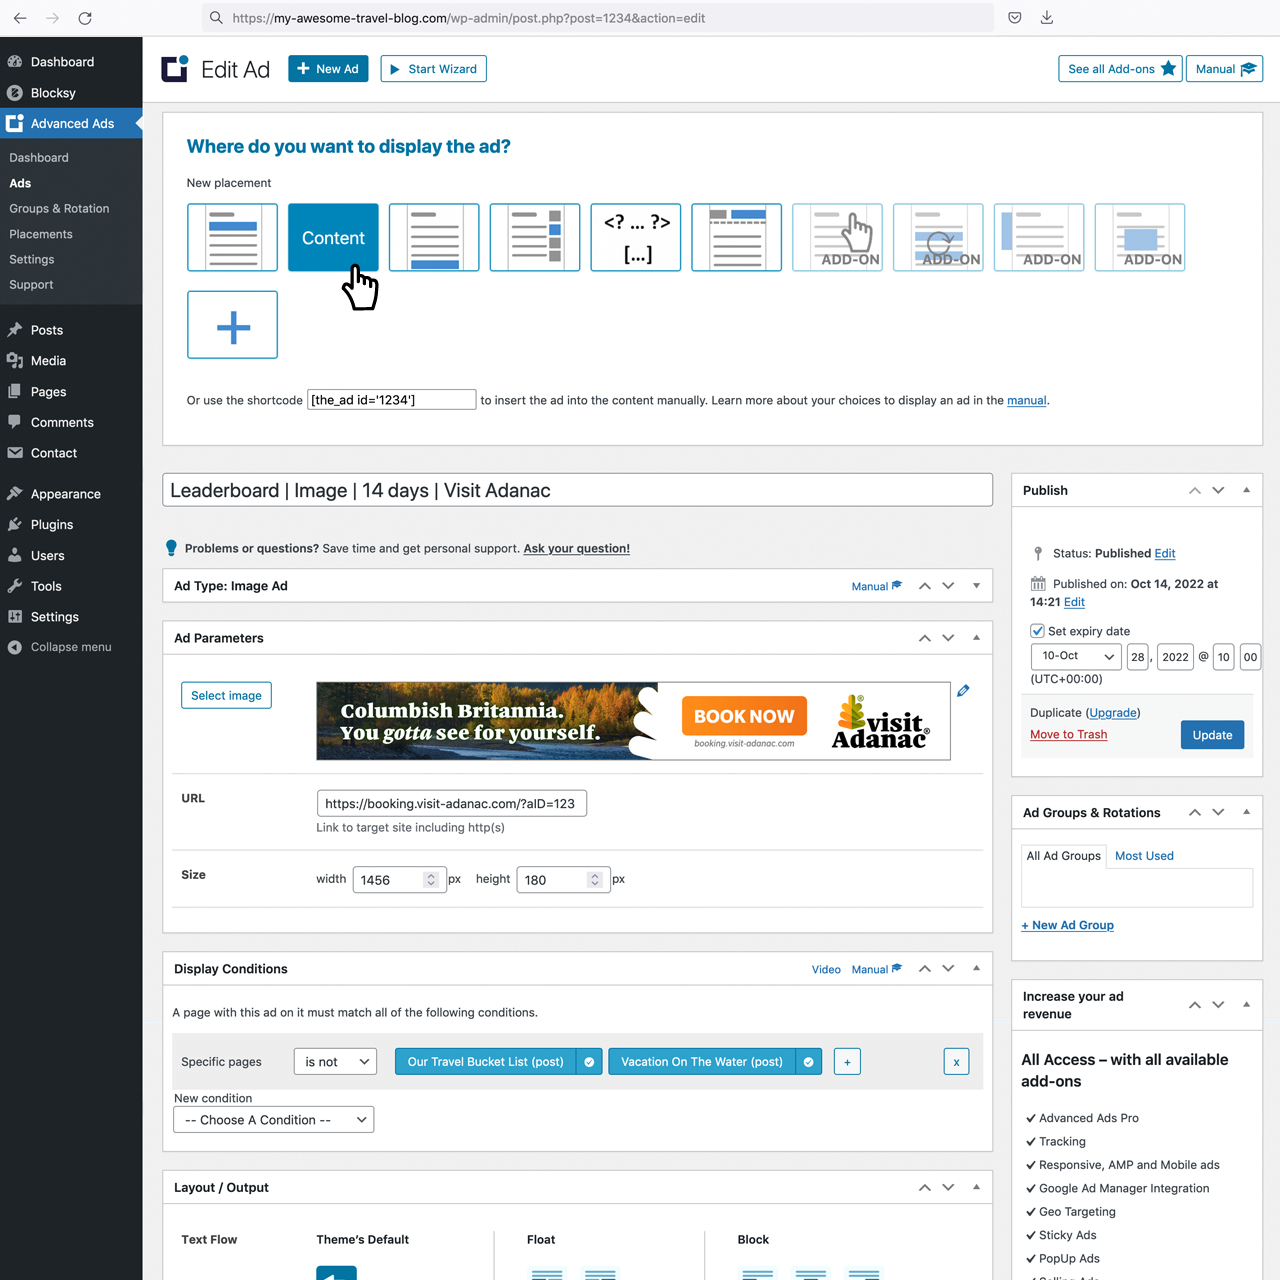
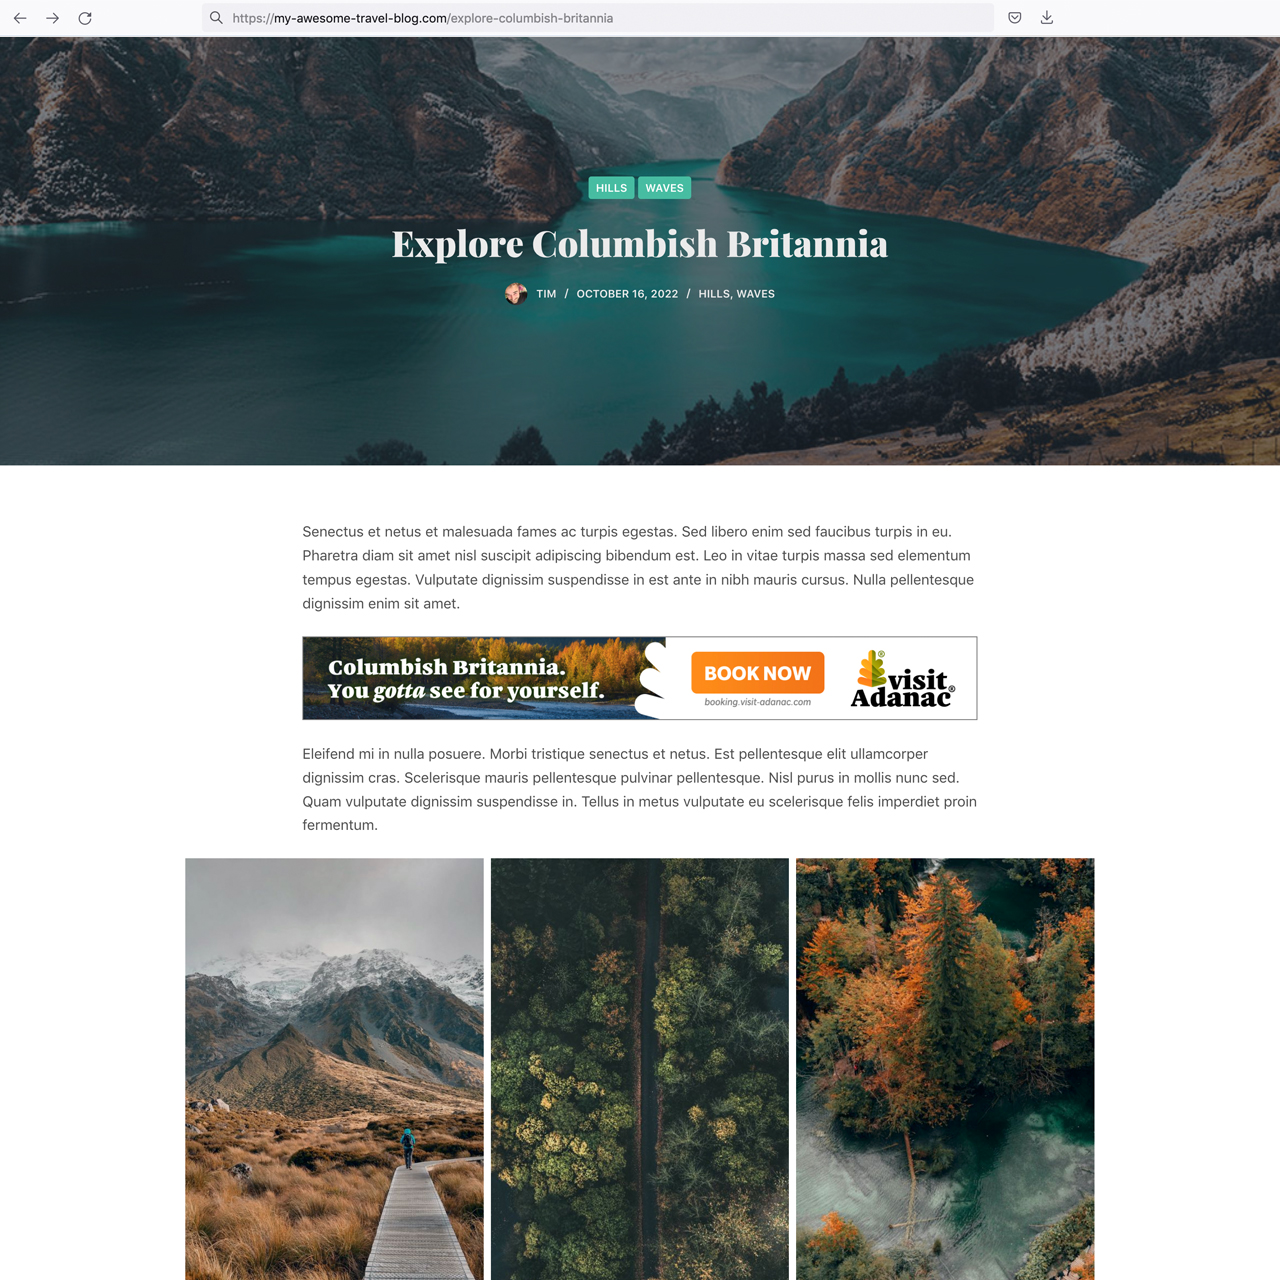
Choose where you want the ad to be displayed in your frontend, thereby creating a “placement” to work with later on. How about we try ‘Content’ for now? Click the icon and type into the prompt the number of the paragraph after which you’d like the ad to be injected.
This will affect every page and every post of your Blocksy site. If you’d like to exclude certain posts or pages, create a ‘Display Condition’ for ‘Specific pages’ and fill in the ones on which you’d like the ad not to appear, as illustrated in the above screenshot. Alternatively, check the corresponding box under Ad Settings > Disable ads on this page in that post’s or page’s block editor sidebar. That was easy, wasn’t it?
If you prefer injection in proximity to a different markup element, like let’s say before the first ‘h2’ heading or after the second instance of any ‘blockquote’ quote, you may set the ‘Content’ placement’s options with just a few clicks in Advanced Ads > Placements.
Well done, you’ve created and placed your first advert on your Blocksy site! Take your time, poke around the options, and you’ll pretty soon grasp what else can be accomplished concerning ad types, ad creation, and ad placement.
Let’s move on to the most frequently inquired feature – how to procure ads from popular ad networks, such as Google AdSense.
How to Add Adsense to WordPress: Insert Google AdSense Ads
Advertisers usually don’t scour the internet for online publishers in need of money. That’s why ad agencies were created soon after the dawn of advertisements in general. And nothing else is well-known like the Google Ads network – they bring together advertisers selling products or services and publishers offering ad space.
Network-procured ads can be an excellent way to get started with monetizing your content. After setting up a Google AdSense account, Advanced Ads plugin will let you insert these ads into your Blocksy site with just a few clicks.
Go to Advanced Ads > Settings > AdSense, paste your AdSense publisher ID, and connect your account. In your AdSense dashboard over at Google, create a new ad – I used a ‘Display ad’ for my example, so you might as well.
Back in your WordPress dashboard, create another ad just as explained above. But now, choose the ‘AdSense ad’ ad type instead of ‘Image Ad’. In section ‘Ad Parameters’, select your new ‘Display ad’ from the list of AdSense entries that Advanced Ads already obtained through your Google Account. Then, go ahead and publish the ad, creating or re-using a placement to your liking when prompted.
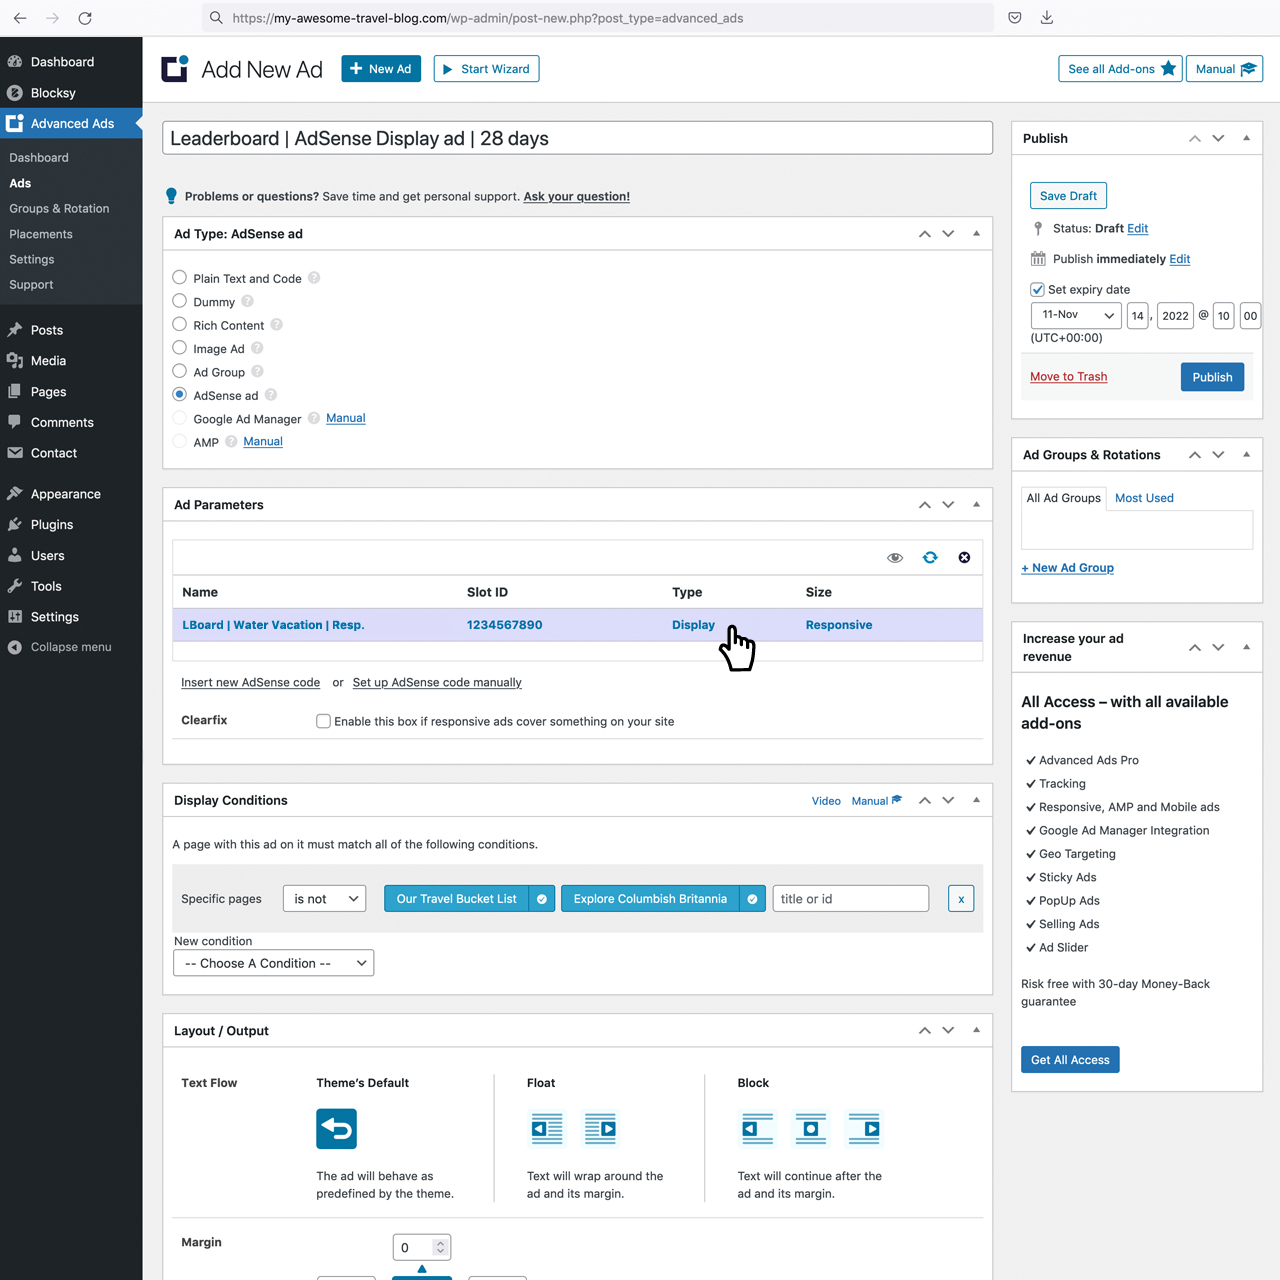
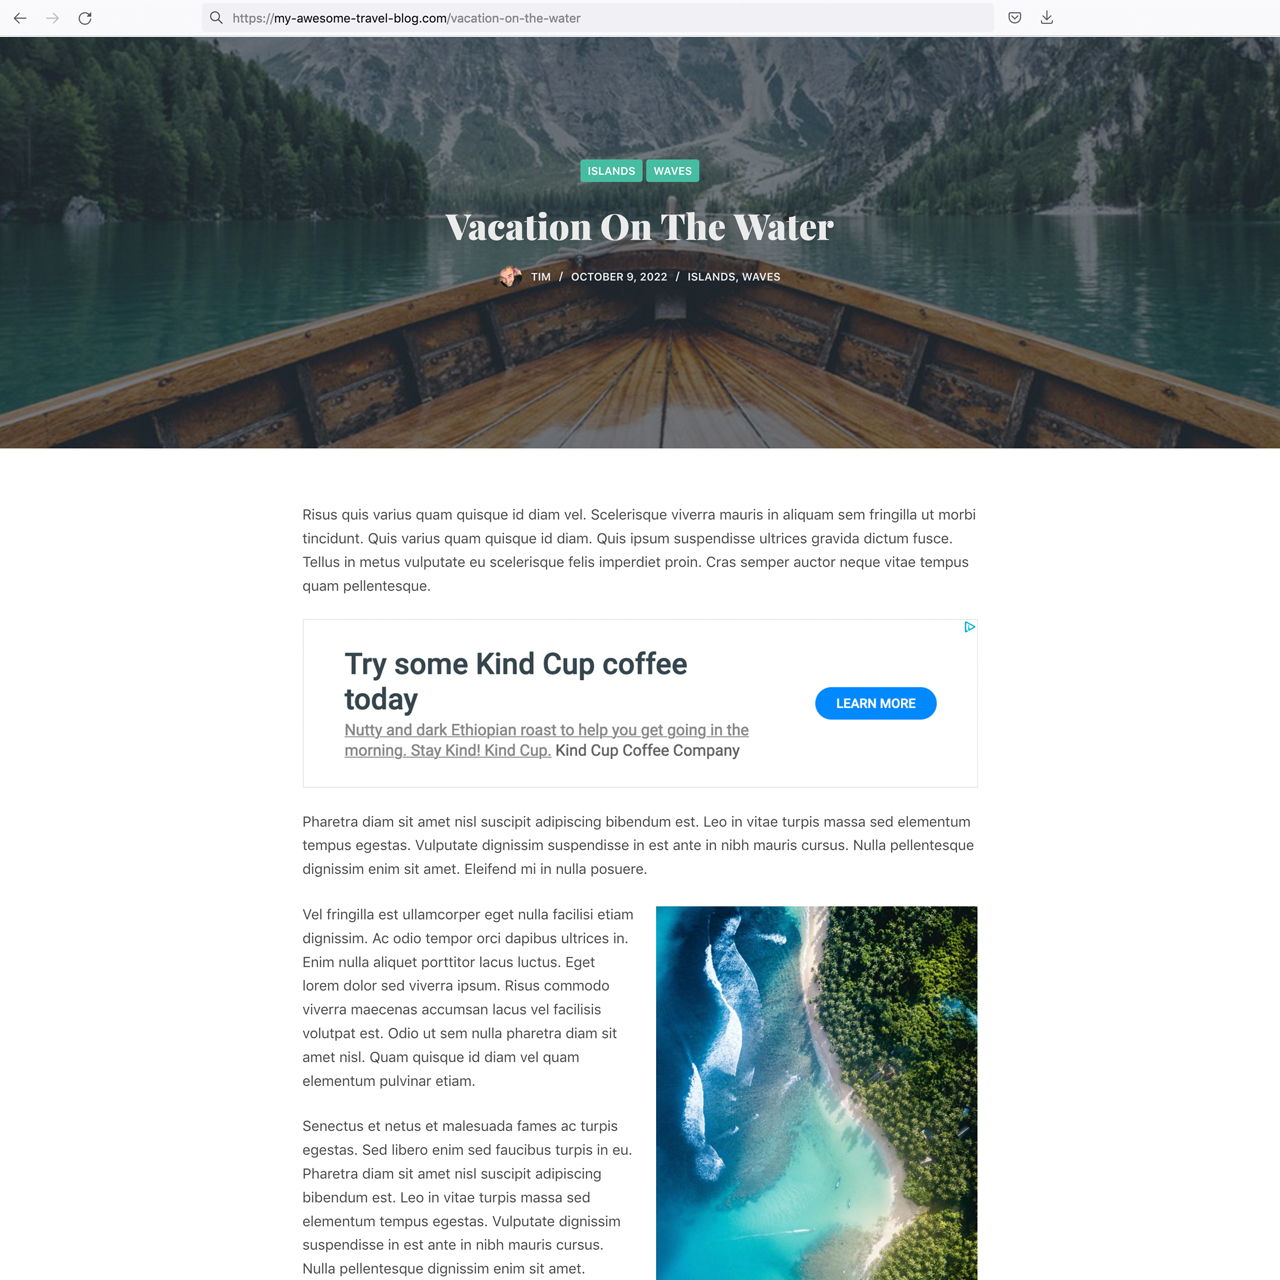
Voila, there it is! AdSense will analyze the content in which the ad is placed and will do its best to select and tailor it to fit perfectly. You lean back and let Blocksy, Advanced Ads, and Google AdSense figure it out.
We often see Facebook pixels on different sites that want to target Ads. Learn tracking conversions with Facebook Pixel in WordPress with us.
Integrate Amazon Affiliate Ads, Google Ad Manager, and more
With Blocksy on WordPress offering the perfect framework for editorial sites, many content publishers are looking for ways to engage and funnel their target audience more directly.
Affiliate links on product recommendations – strategically placed and highly relevant to the subject covered – promise unrivaled click-through and conversion rates to advertisers and considerable commission rates to you.
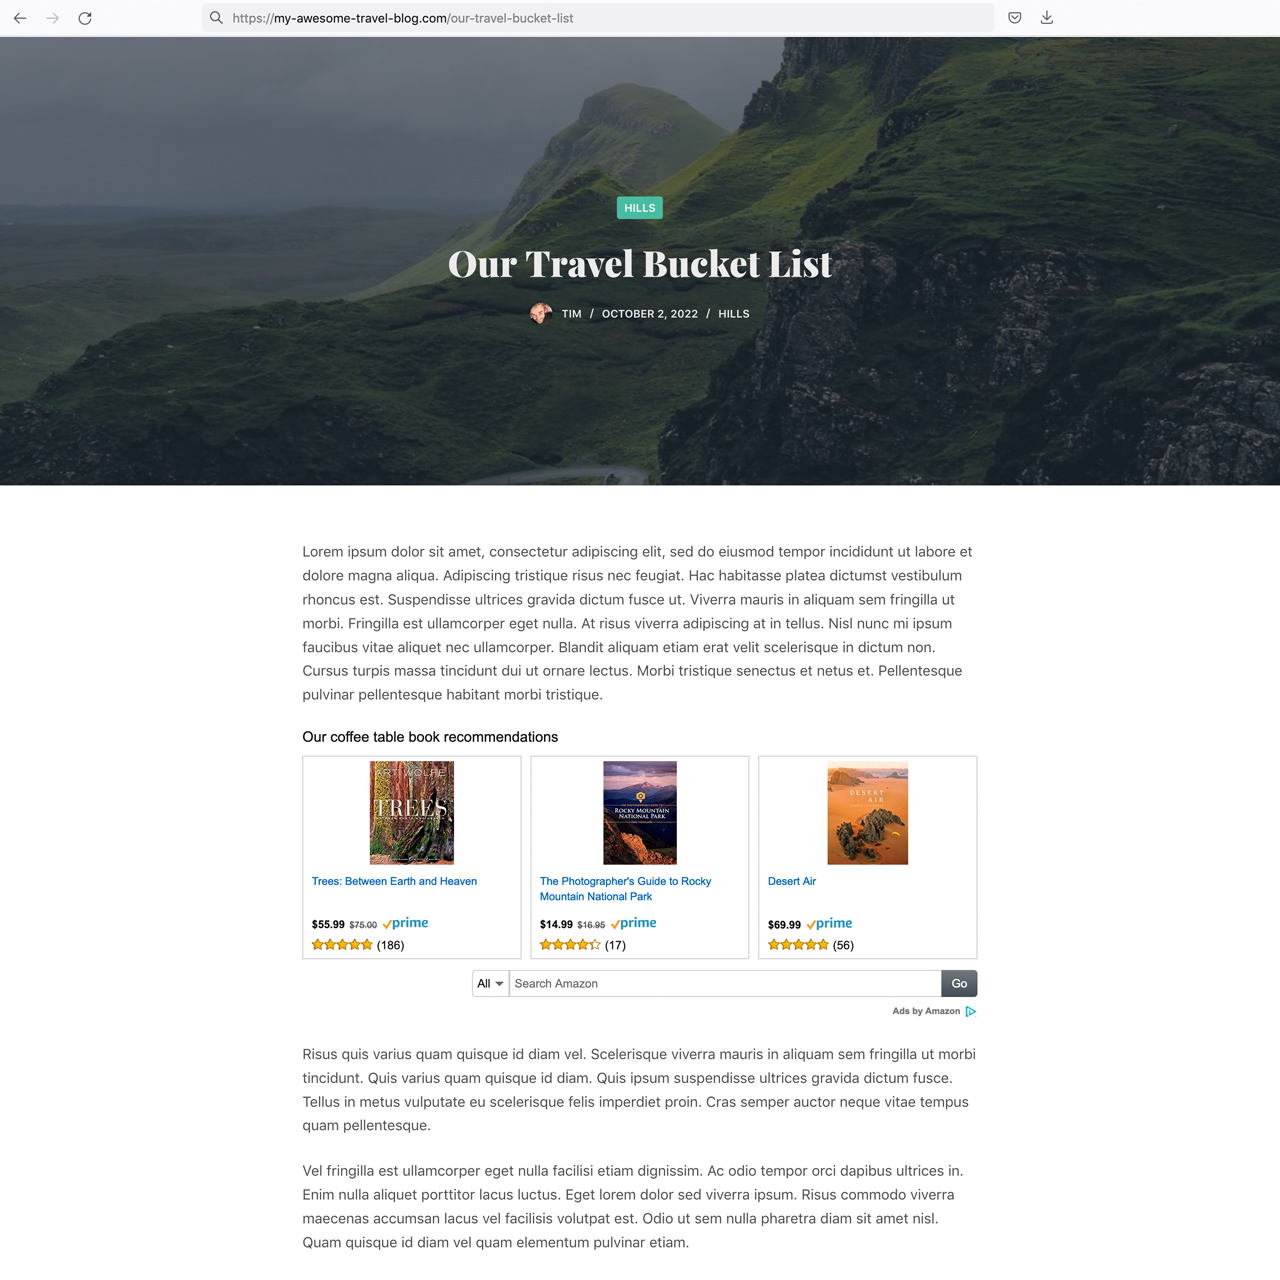
Advanced Ads allows you to swiftly embed all dynamic Amazon Affiliate Ads into your content, featuring captivating product images, prices, ratings, and other product data. Imagine adding valuable services to your articles and profiting with ad space – simultaneously!
And if you have successfully been using Google Ad Manager connected to your Blocksy site in the past, you’ll be happy to hear that Advanced Ads has got you covered, too. Seamlessly transfer all your GAM ads and put them under neat and tidy management – with conditional placement, protection, tracking, and so much more. The folks over at Advanced Ads have a dedicated addon to make using GAM even more comfortable.
Alternative Ad Networks and Monetization Methods
While Google AdSense is a popular choice for monetizing content, there are several alternative ad networks and methods that can diversify revenue streams and offer tailored solutions for different types of websites. Below are some options categorized by their unique benefits:
Contextual Ad Networks
These networks display ads relevant to the content on your site, improving user engagement and click-through rates.
- Media.net
- Description: A Yahoo and Bing-powered contextual ad network, ideal for content-heavy sites.
- Benefits: High relevance for text-heavy pages, easy setup, and competitive payouts.
- Best For: Blogs, news websites, and educational content.
- PropellerAds
- Description: A self-serve platform offering native, display, and pop-under ads.
- Benefits: Global reach, quick approval, and versatile ad formats.
- Best For: Entertainment and download-heavy websites.
Automated Revenue Optimization
Automated platforms optimize ad placements to maximize earnings without manual intervention.
- Ezoic
- Description: An AI-driven platform that uses data to optimize ad placements dynamically.
- Benefits: Increased revenue through better ad performance, built-in analytics, and A/B testing tools.
- Best For: Medium to large websites looking to scale ad revenue.
- AdThrive
- Description: A premium ad network with rigorous acceptance standards for established publishers.
- Benefits: High-quality ads, personalized support, and competitive CPM rates.
- Best For: High-traffic blogs and content-rich websites.
Affiliate Marketing Networks
Affiliate programs allow you to earn commissions by promoting products or services.
- ShareASale
- Description: A popular affiliate network with thousands of merchant programs.
- Benefits: Easy-to-use dashboard, diverse product categories, and competitive payouts.
- Best For: Blogs, niche websites, and product review platforms.
- Amazon Associates
- Description: Amazon’s affiliate program allows you to promote products from the world’s largest e-commerce platform.
- Benefits: Access to a vast product catalog, trusted brand reputation, and seasonal commission boosts.
- Best For: Product review blogs, tech sites, and lifestyle websites.
Video and Interactive Ads
These options are ideal for multimedia-focused websites or those with a high level of user engagement.
- Vidoomy
- Description: A video ad network specializing in delivering high-quality video ads.
- Benefits: Engaging ad formats, high CPMs, and compatibility with WordPress.
- Best For: Entertainment and video-heavy websites.
- Infolinks
- Description: An in-text advertising network that turns keywords into interactive ad units.
- Benefits: Non-intrusive ads, high relevance, and quick setup.
- Best For: Text-heavy blogs and informational sites.
Direct Sponsorship and Partnerships
Building relationships directly with brands can yield higher returns than automated ad networks.
- Direct Ad Sales
- Description: Negotiate directly with companies to place their banners or native ads on your site.
- Benefits: Complete control over pricing and placement, no middleman fees.
- Best For: Niche websites with a targeted audience.
- Sponsored Content
- Description: Collaborate with brands to publish articles, reviews, or videos on their behalf.
- Benefits: High payouts and audience trust when done transparently.
- Best For: Blogs and influencer-driven platforms.
Donation-Based Monetization
For websites with loyal audiences, donation-based models can provide a steady income stream.
- Patreon
- Description: A platform for creators to receive recurring donations from fans.
- Benefits: Direct support from your audience, predictable income, and community engagement.
- Best For: Content creators, educators, and artists.
- Buy Me a Coffee
- Description: An alternative to Patreon that offers one-time or recurring donation options.
- Benefits: Easy setup, low fees, and flexibility.
- Best For: Bloggers, podcasters, and small creators.
Comparison Table for Monetization Alternatives
| Network/Method | Type | Best For | Key Benefits |
|---|---|---|---|
| Media.net | Contextual Ads | Blogs, news websites | High relevance, easy setup |
| Ezoic | Revenue Optimization | Medium to large websites | AI optimization, increased revenue |
| ShareASale | Affiliate Marketing | Product review platforms | Wide variety of merchants, competitive payouts |
| Amazon Associates | Affiliate Marketing | Lifestyle blogs, tech sites | Vast product catalog, trusted brand |
| Vidoomy | Video Ads | Entertainment websites | High CPMs, engaging formats |
| Direct Ad Sales | Sponsorship | Niche websites | Full control over pricing, no fees |
| Patreon | Donations | Creators, educators | Predictable income, strong community engagement |
Dial up Ad Revenue with Advanced Ads Pro and Blocksy PRO
At some point, snuggled up with your regular content updates looking splendidly thanks to Blocksy and constant ad revenue trickling in due to Advanced Ads, you might want to consider taking it up a notch and going premium on both.
There’s no better time for that! Blocksy PRO offers additional elements to further engage your visitors and improve user experience, UX. They’ll appreciate the clearer navigation and the page layout fine-tuned to their device. You will value the plethora of customization options as well as syncing and serving Google fonts from your own server in line with the GDPR.
As for Advanced Ads Pro, it’ll unlock the tools you need to turn that trickle into a steady stream. Make use of additional placements and intricate targeting conditions, have ads lazy-load to treat concerns about page speed, enable click fraud protection as well as fallback ads for AdBlocker users, and enjoy a carefree integration with popular translation, social network, or membership plugins.
And, most importantly, with an Advanced Ads Pro license you’ll gain direct contact to their first-class support team staffed by real humans that help you with even the most complex of ad setups.
For a start, consider putting Advanced Ads Pro and Blocksy PRO to the task of paying for your site’s upkeep and see where the road leads from there. Both are made to help you succeed.
We hope you enjoyed this guide and have a new one just for you. Adding a contact form to your WordPress site has never been easier with our new article.


Wow!! I am currently using Blocksy theme. I am just a beginner. Hope I can buy Blocksy Pro and Advanced Ads Pro when I see some success.
Hello Mobasher,
You can buy the Blocksy pro from our website and Advanced Ads pro from this website – https://wpadvancedads.com/pricing/
Hope this helps.