Looking for ways to edit or create a custom WooCommerce “Thank You” page?
The primary objective of a “Thank You” page is to inform the customer that they have successfully made a purchase.
Editing or creating a new custom “Thank You” page can help with the following:
- Encourage additional purchases through strategic cross-selling
- Promote your loyalty programs, rewards, or subscription services
- Encourage customers to tell others about their purchase drawing potential customers
- Gather customer feedback and identify areas for improvement in your business
- Provide additional resources to understand how to use the purchased products or services
- Offer guidance to customers through necessary post-purchase actions, such as tracking their orders, downloading digital products, etc.
Although WooCommerce does not offer an easy way to edit the default “Thank You” page, there are a couple of methods that can help you achieve the desired results.
In this article, we will discuss the different methods that allow you to edit the WooCommerce “Thank You” page and then proceed to show you how to create a custom “Thank You” page for your store.
Let’s get started!
Table of Contents
How to Edit the WooCommerce ‘Thank You’ Page
There are a couple of ways to edit the default WooCommerce “Thank You” page. You can
- Modify the file (i.e. thankyou.php) that generates the page
- Use a plugin to create a new page and automatically redirect the default “Thank You” page URL to the new page
- Use a theme to create a new page and automatically redirect the default “Thank You” page URL to the new page
| Method | Pros | Cons | Recommended For |
|---|---|---|---|
| Editing PHP File | Full control, No extra plugins | Risky, Requires coding knowledge | Advanced developers |
| Plugin Use | No coding required, Easy setup | May slow site, Possible compatibility issues | Beginners, Non-technical users |
| Lightweight Theme | Fast, SEO-friendly, Customizable | Paid features, Requires theme switch | Store owners seeking speed |
Method 1: Modifying the thankyou.php File (Not Recommended)
WordPress websites are made of files and folders located on your hosting server. Every page on your store is generated by a dedicated file or folder.
The “Thank You for Purchasing” page is generated by the thankyou.php file.
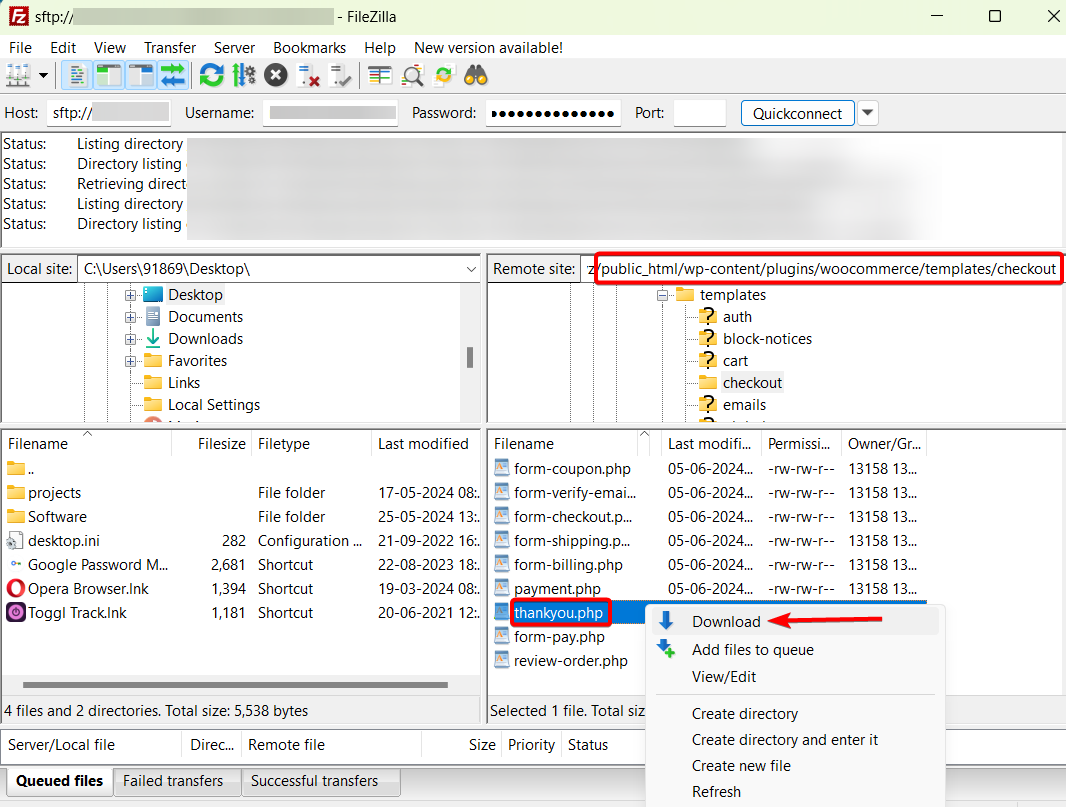
The file is located in the public_html folder which can be accessed using your hosting account or an FTP client like Filezilla (as we have done in the image below).
Once you find the public_html folder, open it and navigate to wp-content → plugins → woocommerce → templates → checkout → thankyou.php.
Next, you will need to download the page to your local computer and then modify it as per your requirements.
That’s a lot of work!
Moreover, accessing your website’s backend is risky because a single mistake (like accidentally deleting or modifying files) can break your entire store. On top of that, you need to know how to code to modify the page on your local computer.
Only developers familiar with the WooCommerce templating system, PHP, HTML, and CSS should access the thankyou.php file as they would know how to modify the page without breaking it.
You can of course hire a developer to do it for you but the subsequent WooCommerce updates will overwrite any modifications they make on the file.
That said, you can tackle this problem by using a child theme.
The developer can modify the thankyou.php file and create a copy of the file in the child theme’s directory. WooCommerce will automatically use the customized file in the child theme to display the “Thank You” page on the store.
So as we said earlier, modifying the file manually is a lot of work, Moreover, it’s expensive compared to the other methods listed below. That’s why we don’t recommend editing the thankyou.php file manually.
Method 2: Using Plugins (Pros and Cons)
There are a handful of dedicated plugins that you can use to create a new WooCommerce “Thank You” page.
After making a purchase, your customers will be automatically redirected to the custom page instead of the default “Thank You” page.
That said, adding another plugin to your website is not something we recommend as plugins are known to load assets on every page which can significantly slow down your website.
Plugins will introduce additional code, scripts, and stylesheets that need to be loaded and executed by the server. This can increase the load time of your site. Additionally, some plugins may not be optimized for performance causing the website to slow down significantly.
Method 3: Using a Lightweight Theme (Best Option)
Lightweight themes are built for speed and the ones that integrate with WooCommerce offer an array of WooCommerce-dedicated features.
While not all, some lightweight themes (like Blocksy) allow users the ability to create custom “Thank You” pages. Once the custom “Thank You” page is up and running the theme automatically replaces the old WooCommerce “Thank You” page with the new custom page.
In the next section, we are going to show you how to use a lightweight theme to create a custom WooCommerce “Thank You” page.
Step-by-Step Guide: Creating a Custom ‘Thank You’ Page with Blocksy
We are going to show you how to create a new custom “Thank You” page for your WooCommerce store using our Blocksy theme.
Blocksy is a highly customizable lightweight theme that offers a ton of WooCommerce-related features like the ability to add a floating cart, user wishlist, custom tabs, variation swatches, quick view of products, multiple custom “Thank You” pages, etc.
Here we will show you how to use Blocksy to create a new WooCommerce “Thank You” page.
Step 1: Install & Activate Blocksy
The theme has a free and a premium version.
The free theme offers a handful of features and the premium plugin offers access to advanced features like the custom “Thank You” page.
You need to purchase the premium Blocksy plugin (specifically the $99 per year plan) to proceed with this tutorial.
It’s worth noting that the premium Blocksy is a plugin and not a theme. So after purchasing the plugin, you will download and install it on your website as a plugin, not a theme.
Go ahead and download the plugin from your account page or welcome email.
After installing the Blocksy Companion (Premium) plugin, you will be asked to install and activate the free Blocksy theme as well because the plugin operates as an add-on to the theme. It cannot function without the theme.
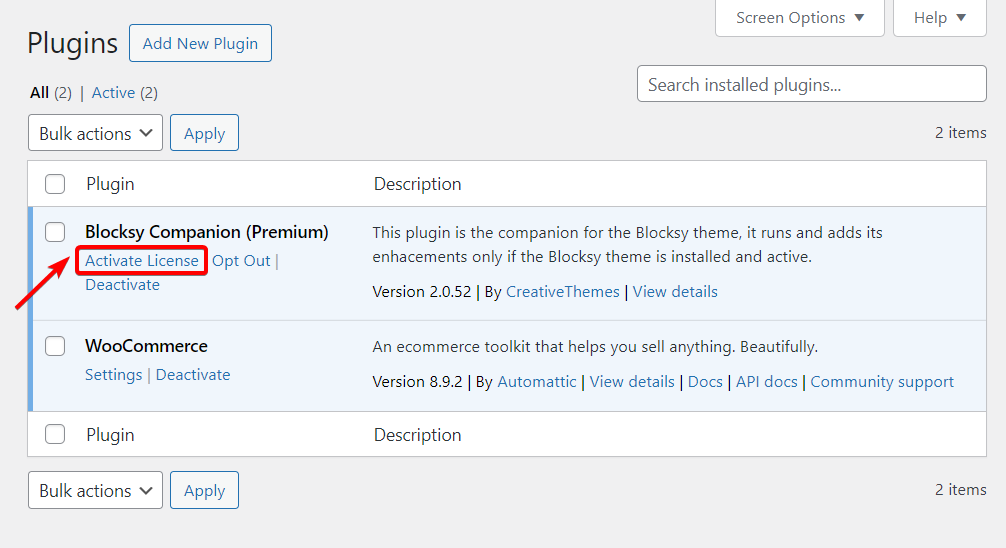
Next, be sure to copy your license key from your account page or welcome email and add it to the plugin by going to Plugins → Installed Plugins → Blocksy Companion (Premium) → Add License.
Step 2: Install a Starter Site (Optional)
Starter sites are ready-made websites that can be imported into your existing website.
Blocksy starter sites come equipped with clean professional designs and pre-built pages (like about, contact, product pages, etc) created using Gutenberg, Elementor, or Brizy.
The starter sites categorized under “e-commerce” have WooCommerce installed. We recommend importing one of these e-commerce starter websites as WooCommerce is mandatory for proceeding with the rest of the tutorial.
But if you already have the WooCommerce plugin installed on your website, skip to the next step.
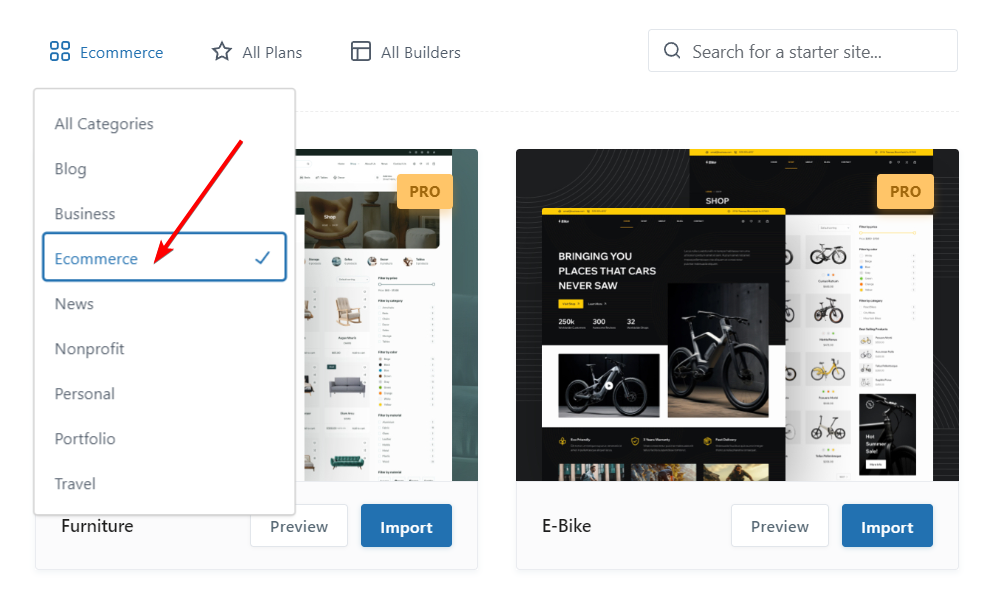
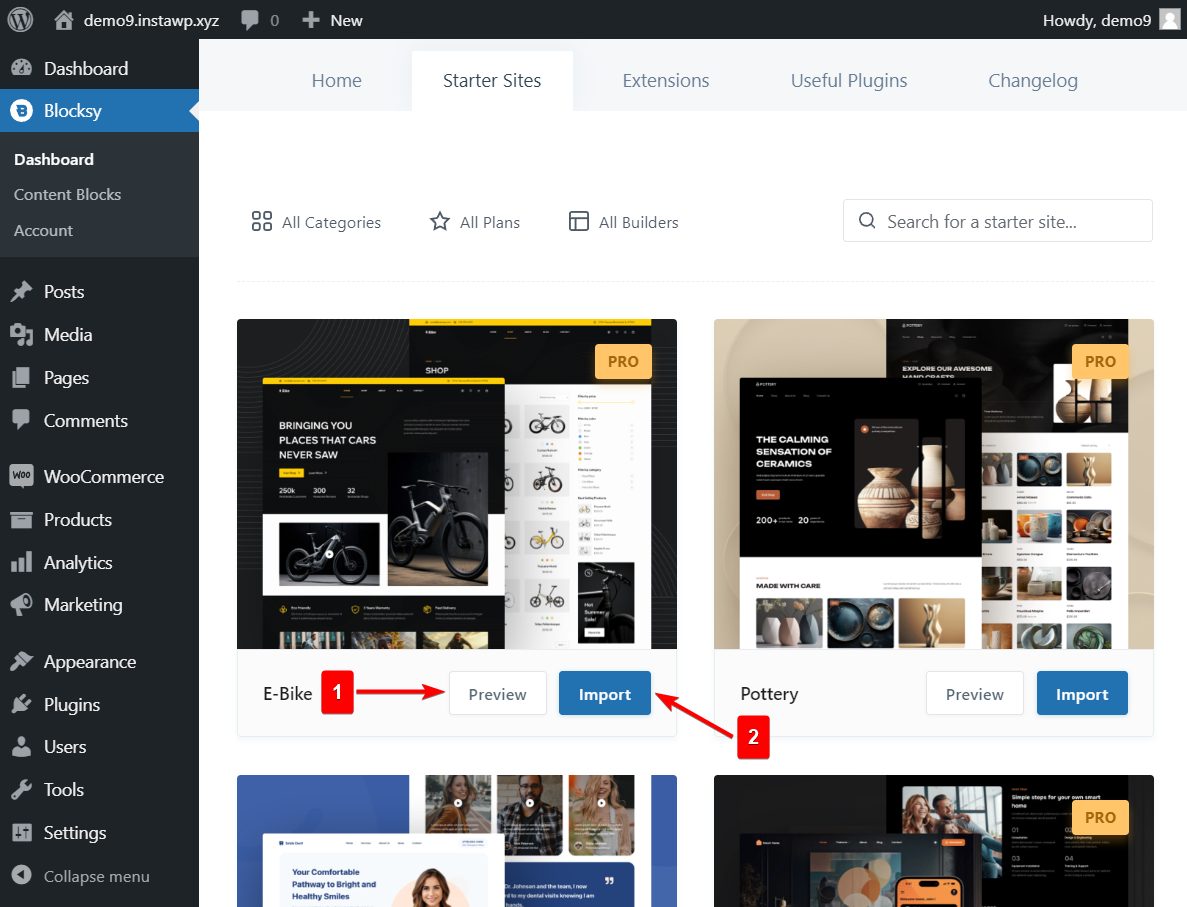
To use the starter sites you need to first preview the sites by going to Blocksy → Dashboard → Starter Sites and selecting the Preview button. Then, import a site of your choice by selecting the Import button.
That said, do take a backup of your website before installing a starter site. During the import process, a lot of content will be transferred to your website. In case things go south, like the import stopping midway, the backup will help restore the website to its previous state. After that, you can try importing the starter site again.
Step 3: Enable Custom “Thank You” Page
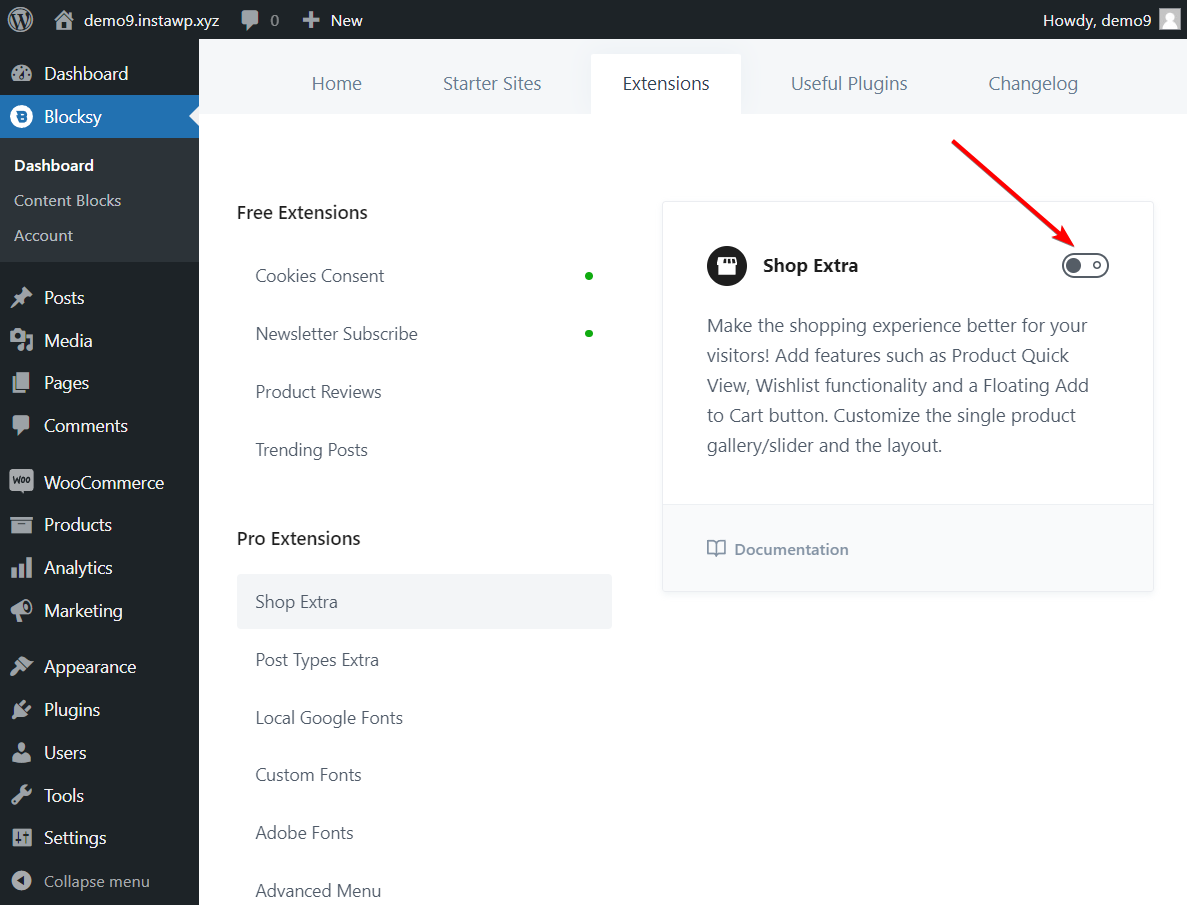
To enable the custom “Thank You” page, go to Blocksy → Dashboard → Extensions → Shop Extra and toggle it on.
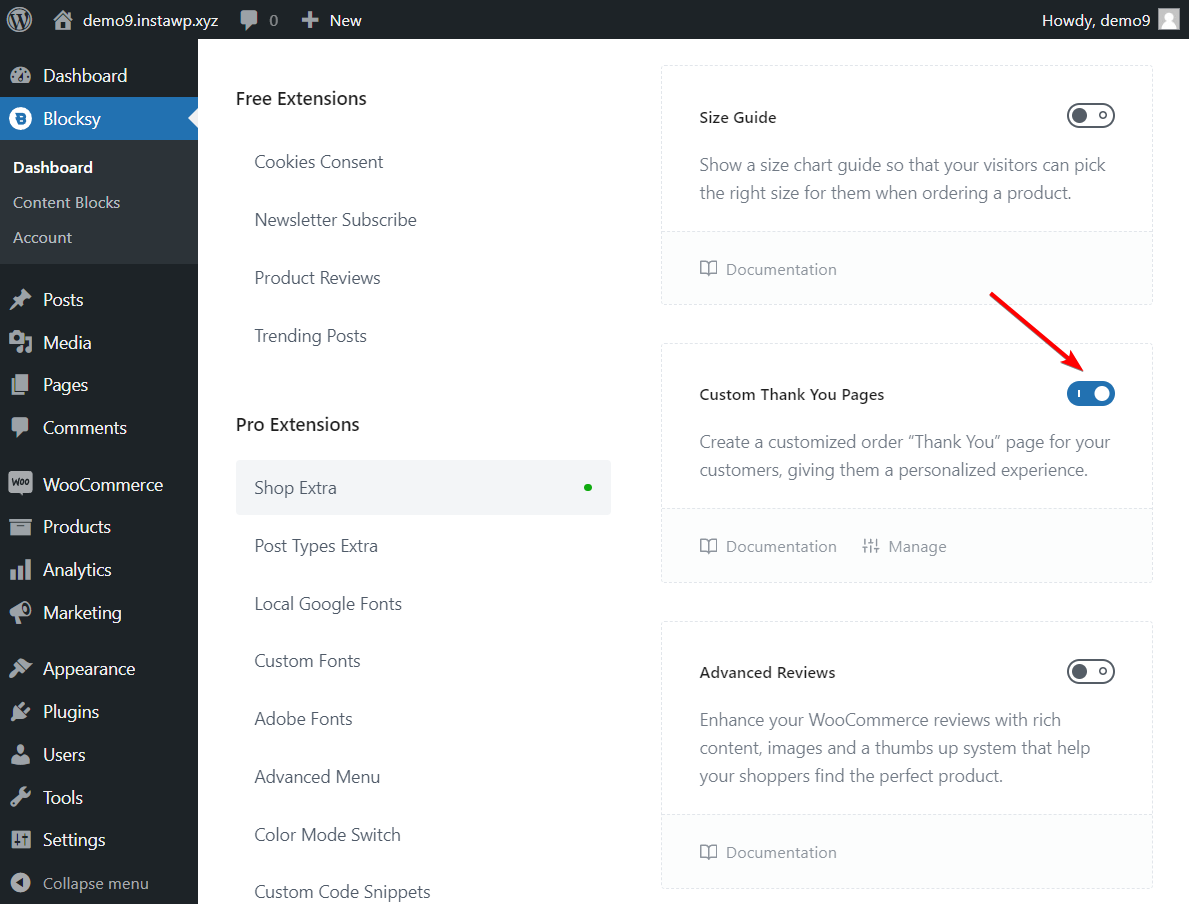
Immediately new options will appear. Scroll down to the Custom “Thank You” Page module and toggle it on.
Step 4: Create a New Thank You Page
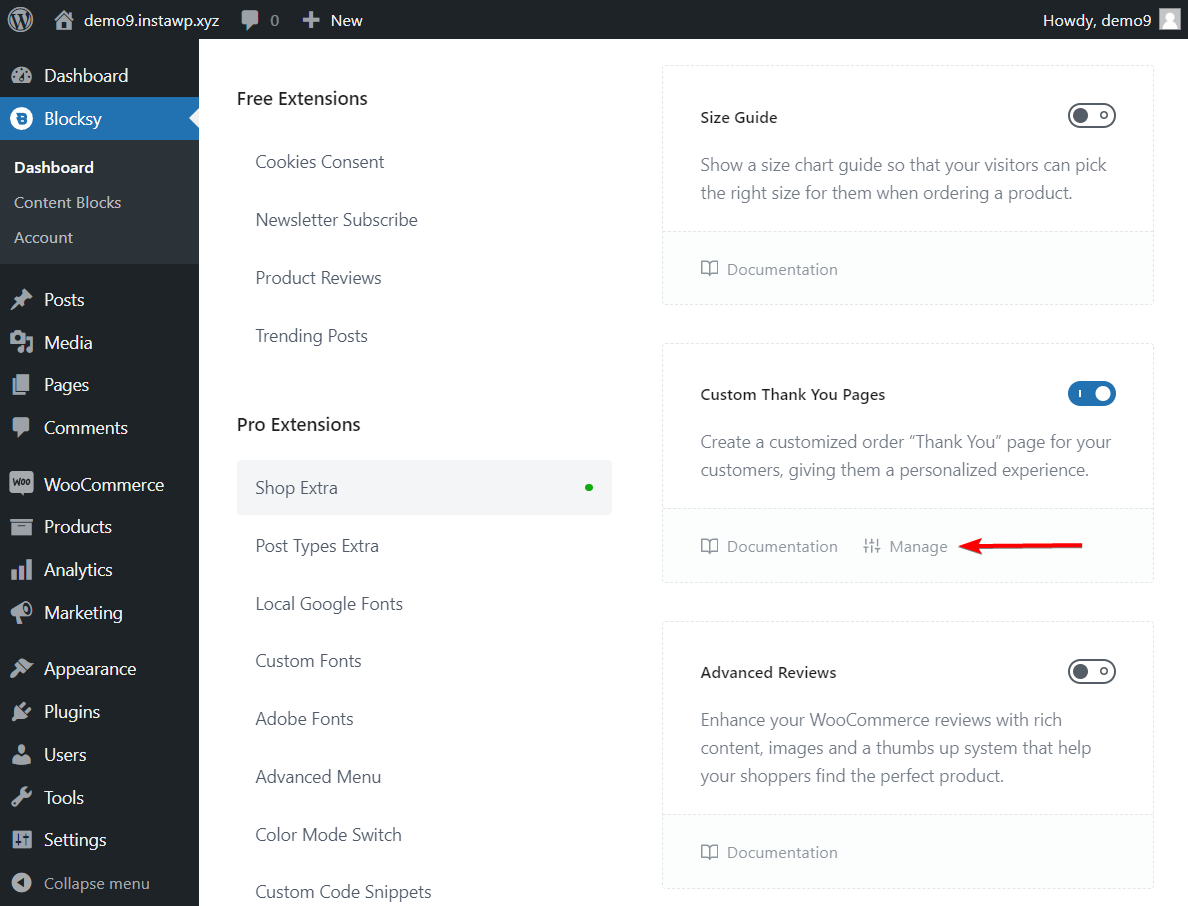
As soon as you enable the “Thank You” page, you will see a Manage option appear, select that and you will be taken to the “Thank You” Pages module dashboard.
Alternatively, you can go to Marketing → Thank You Pages to access the “Thank You” Pages module dashboard from your WordPress admin.
Next, select the Add New button and you will be taken to the Gutenberg Editor where you can create a new custom “Thank You” page from scratch.
Here’s one we created on our demo site offering incentives to drive more purchases:

When the page is ready, go to the top bar and select the “B” icon which stands for Blocksy Page Settings. A sidebar will appear with Shipping Methods and Product Categories.
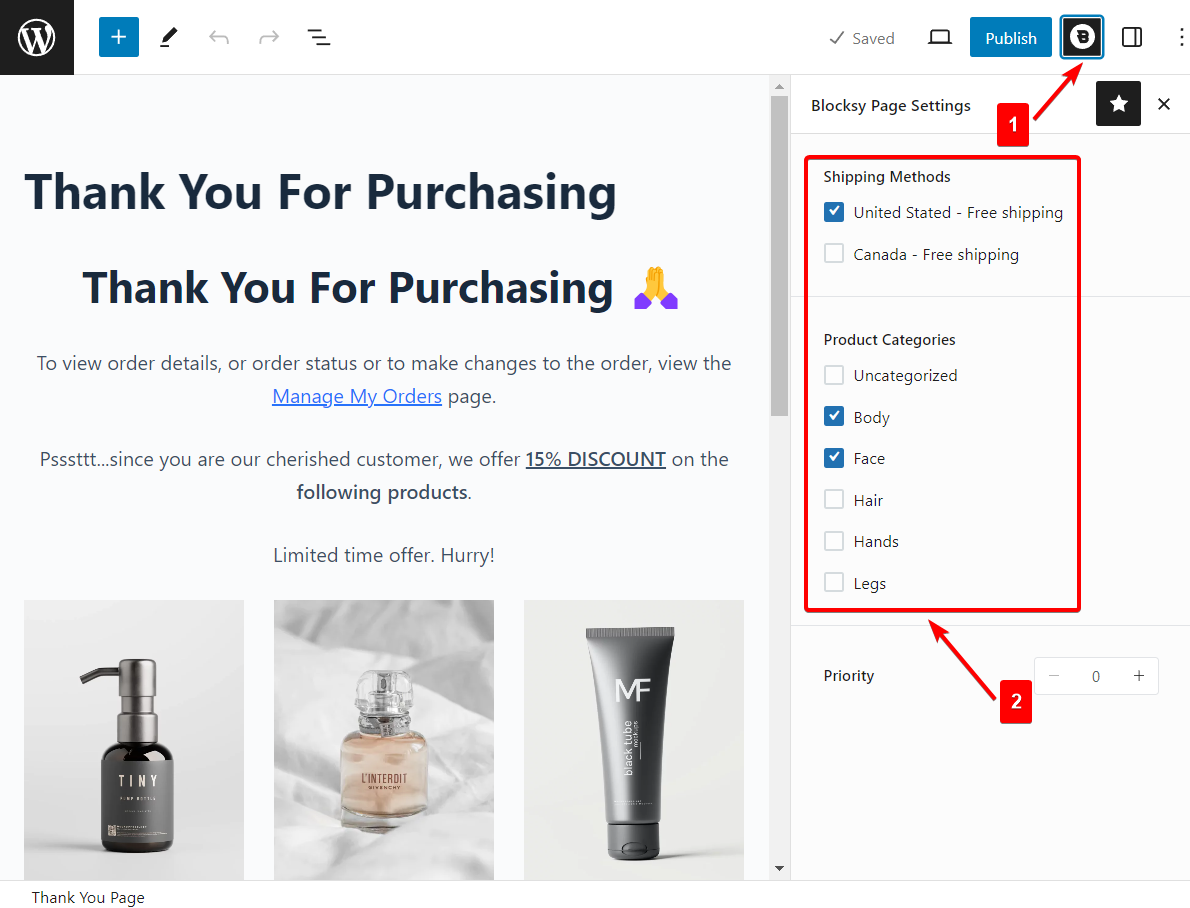
These options allow you to choose which purchases will trigger the new custom “Thank You” page.
For instance, on our demo site, we want the custom “Thank You” page to appear only when the products are being shipped to the US because we want to offer a 15% discount to only US customers. If we wanted to extend the discount to all customers, we would select all the shipping methods.
Using the Shipping Methods and Product Categories, you can create multiple “Thank You” pages and assign them different triggers.
When the new custom “Thank You” page is ready, be sure to hit the Publish button to make it live.
The plugin will automatically replace the default WooCommerce “Thank You” page with the one you just created.
FAQs
1. How to edit the WooCommerce “Thank You” page URL?
The default WooCommerce “Thank You” page looks like this – https://example.com/order-received/
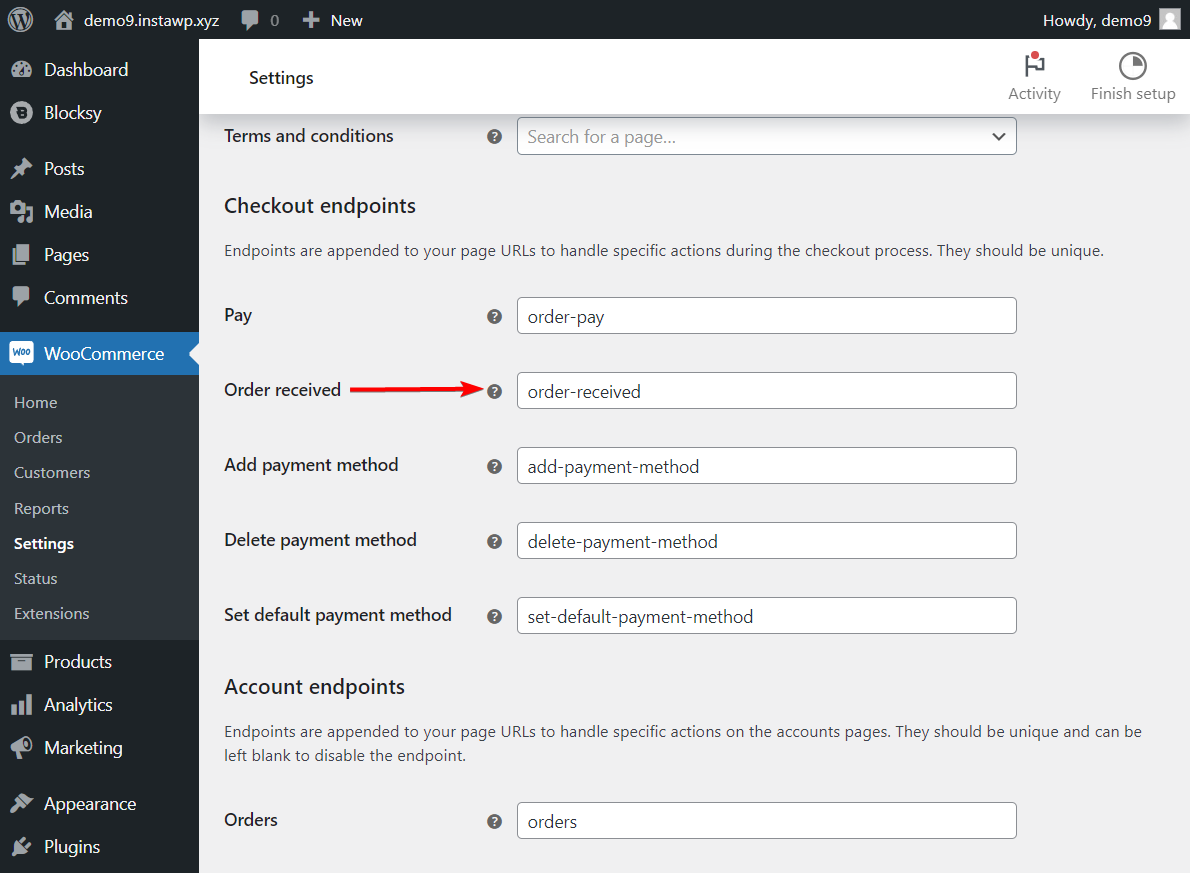
To edit the default URL, you need to go to WooCommerce → Settings → Advanced → Page Setup → Checkout Endpoints → Order Received → order-received.
To modify the URL, just replace order-received with your URL. There’s no need to add the domain name, for example – https://example.com/. Just replace the old slug order-received/ with the new one, let’s say thank-you/.
2. How to view the WooCommerce Thank You page?
To view the “Thank You” page, you need to place a test order on your WooCommerce store as if you were a customer.
We recommend setting up a cash on delivery (COD) payment system so that you don’t have to buy your own products to view the “Thank You” page.
Since COD is a global setting, it’s best to put your website in test mode when setting up COD payments.
Alternatively, you can use a plugin that allows setting up COD payment for individual products. Then proceed to apply the COD on a product and place an order for that product.
After completing the checkout process and placing the order successfully, you will be automatically redirected to the “Thank You” page.
3. How to redirect the WooCommerce “Thank You” page?
To redirect the WooCommerce “Thank You” page, you need to go to WooCommerce → Settings → Advanced → Page Setup → Checkout Endpoints → Order Received → order-received and replace the order-received with your new WooCommerce “Thank You” page URL, let’s say something like thank-you/.
Needless to say, you need to have a new “Thank You” page ready before redirection. Test the redirection on different browsers. If it’s leading to errors, then use a redirection plugin to remove the error and apply the redirection properly.
4. How to fix WooCommerce Thank You page not showing
Are customers encountering a blank page instead of a “Thank You” page? Or are they seeing an error or being redirected to the home page?
Such issues can occur due to reasons like plugins or themes conflict, incorrect URLs, server misconfigurations, etc. You need to first know the exact cause of the error and then proceed with relevant solutions.
We recommend enabling WooCommerce’s debugging mode by adding define('WP_DEBUG', true); and define('WP_DEBUG_LOG', true); to your wp-config.php file, preferably using a debug plugin.
This will generate log files that may help you identify the root cause of the issue. Once you know the cause, a simple Google search will reveal how to implement a solution.
If you require more assistance, then seek help from the WooCommerce forum or reach out to your hosting provider. We have another guide that may help you understand how to export and import customers in WooCommerce.
Conclusion
Although the WooCommerce “Thank You” page is primarily used to inform customers that the purchase was successful, it can also be used to promote and encourage more engagement and sales.
There are three ways to modify the “Thank You” page. You can edit the thankyou.php file manually, or use a plugin, or theme instead.
Modifying the file is risky because it requires accessing the backend, and knowing how to code, and it can break the website if done incorrectly. Using a plugin can slow down the site due to additional code and scripts.
However, using a lightweight theme, such as Blocksy, allows the creation of custom “Thank You” pages without the risk of breaking or bogging down your WooCommerce store.
Once the page is created, you can choose whether you want the custom page to appear for all your products or for only a handful of products.
That’s it for this one, folks. If you have any questions about custom “Thank You” page WooCommerce, let us know in the comments below.