
If you run a WordPress site, building an email list is one of the smartest moves you can make. But many beginners aren’t sure where to start.
WordPress doesn’t include built-in tools for list building, and with so many plugins, email services, and marketing tactics available, the options can feel overwhelming.
The good news is that creating a subscriber list doesn’t require advanced tech skills or expensive software. With the right setup, you can start collecting emails in minutes and grow your list steadily over time.
An email list also gives you a reliable way to connect with your audience directly, bypassing algorithms and platform restrictions that can limit your reach.
In this guide, we’ll cover the essentials, from choosing an email marketing service to adding opt-in forms and using your theme’s features to improve signups. We’ll also show how Blocksy’s built-in newsletter support can help you launch faster and keep your setup lightweight.
Whether you’re starting from scratch or refreshing your strategy, you’ll have a clear path to grow your audience and turn casual visitors into loyal subscribers.
Table of Contents
Why Build an Email List
An email list is one of the most valuable assets you can create for your website. Unlike social media followers, your subscribers are contacts you own. You are not dependent on changing algorithms, ad costs, or the risk of losing access to your audience.
Email is a direct and reliable communication channel. When someone joins your list, they are permitting you to reach them with updates, offers, and useful content. This makes it easier to nurture relationships, drive traffic back to your site, and increase conversions.
Some key benefits of building an email list include:
- You can send messages straight to their inbox without relying on third-party platforms.
- Email often has better open and click-through rates than social posts or ads.
- Segment subscribers by interests, location, or past behavior to make your messages more relevant.
- Welcome emails, reminders, and follow-ups can run on autopilot, saving you time.
- Consistent, valuable emails build trust and encourage repeat visits.
Another advantage is flexibility. Your email list can serve multiple purposes, from promoting new blog posts to launching products or inviting people to events. You control how you use it, and you can adapt your strategy as your business or audience grows.
Whether you are a blogger, store owner, or service provider, a well-maintained email list supports long-term growth and gives you a dependable way to stay connected.
Email List Building Plugins and Services (What to Use When)
WordPress does not send marketing emails on its own. To build and manage an email list, you need two main things:
- An email marketing service to store subscriber information and send campaigns.
- A form or plugin to collect emails on your site and connect them to your chosen service.
Here are some approaches to consider.
1. Newsletter Plugins

Plugins like MailPoet and Newsletter let you send emails directly from your WordPress dashboard. This is convenient because you can manage your subscriber list, create campaigns, and send them without switching platforms. They are suitable for small websites or those just starting because they reduce the need for multiple tools. However, their automation features can be limited. Since they rely on your hosting server for email delivery, there’s a higher chance of emails landing in spam folders unless you configure an SMTP service.
If you decide to explore the Newsletter plugin, you can take it a step further by setting up and sending campaigns without leaving WordPress. Our guide on how to send email campaigns with the WordPress Newsletter plugin walks you through the entire process, from creating your first email to delivering it to your subscribers.
2. Dedicated Email Services

Services such as Mailchimp, ConvertKit, Brevo, and ActiveCampaign handle email delivery externally, which improves reliability. They also provide more advanced tools such as visual automation builders, detailed analytics, and customizable templates.
For example, ConvertKit focuses on creators and offers tagging and automation based on subscriber behavior, while ActiveCampaign excels at advanced segmentation for e-commerce and service-based businesses. These services often have free tiers for smaller lists, making them accessible when you are just starting out, with room to scale as your needs grow.
3. Form & Popup Plugins
Tools like WPForms, Mailchimp for WordPress (MC4WP), and OptinMonster allow you to design opt-in forms and display them in different formats, including popups, slide-ins, and floating bars. Many of these plugins offer display conditions, so you can show forms at specific times, for example, when a visitor scrolls halfway down a page or is about to exit the site. This level of targeting can significantly improve sign-up rates.
4. Landing Page Builders
If you plan to promote a lead magnet or run a specific campaign, dedicated landing pages are often more effective than generic site forms. Builders like SeedProd and Thrive Architect make it easy to create standalone signup pages without distractions. You can use these pages in ads, social posts, or guest blog links to drive focused traffic.
5. WordPress Themes With Built-in Email Capture

Some WordPress themes, such as Blocksy, include built-in features for adding and styling subscription forms without requiring additional plugins. These themes often integrate directly with popular email marketing services, so you can connect your list provider and start collecting signups right from your header, footer, or designated widget areas.
The advantage is that you can maintain consistent branding across your site while ensuring that forms load quickly and work seamlessly with your design. For site owners who prefer minimal plugin use, choosing a theme with native email capture functionality can simplify setup and improve performance.
In the next section, we’ll show you how to add a subscription form using Blocksy.
How to Add Signup Forms to Your WordPress Site (Using Blocksy)
If you’re using Blocksy (our product), you don’t need to hunt for a separate form plugin just to capture email subscribers. The theme has its own Newsletter Subscribe feature, making it easy to add attractive opt-in forms that match your site’s design.
- Free version: You get the core Newsletter Subscribe feature, which integrates with popular email marketing tools and lets you place opt-in forms using Gutenberg blocks or widget areas.
- Pro version: Adds more flexibility with extra display types like pop-ups, floating bars, and slide-ins, plus more layout and styling controls so your form blends seamlessly with your brand.
Install & Activate Blocksy
First, you’ll need the Blocksy theme running on your site. In your WordPress dashboard, go to Appearance → Themes. Search for Blocksy in the theme directory, then click Install and Activate.
Once active, you can import a Starter Site from Blocksy → Starter Sites. These prebuilt designs often include newsletter sections you can adapt instead of building from scratch. This is optional, though.
Installing the theme is a one-time step, but it ensures the newsletter module integrates perfectly with your site’s design system.
Enable the Newsletter Subscribe Feature
The newsletter feature isn’t on by default, so you’ll need to activate it. Go to Blocksy → Dashboard → Extensions → Newsletter Subscribe, toggle the switch to Enable.
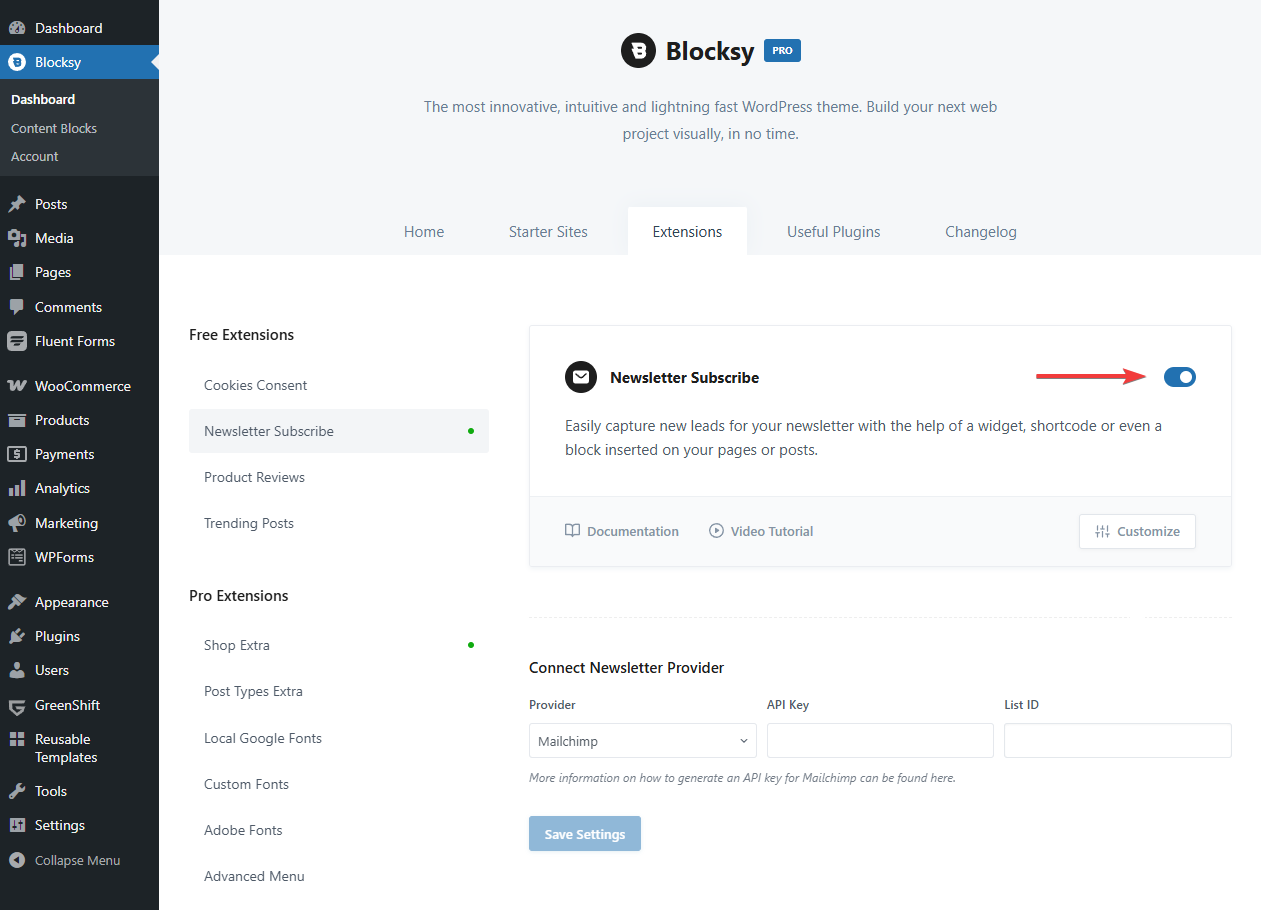
In the settings that appear, choose your email service provider (like Mailchimp, MailerLite, or ConvertKit) and connect it using the required API key or credentials.
This link between your site and your email platform ensures that every subscriber from your form goes directly into your email list without manual export/import.
Add Signup Forms With Gutenberg or Shortcode
Once enabled, you can drop newsletter forms anywhere in your content. Edit a post or page in the Gutenberg editor, click the + icon to add a block, then search for Newsletter Subscribe.
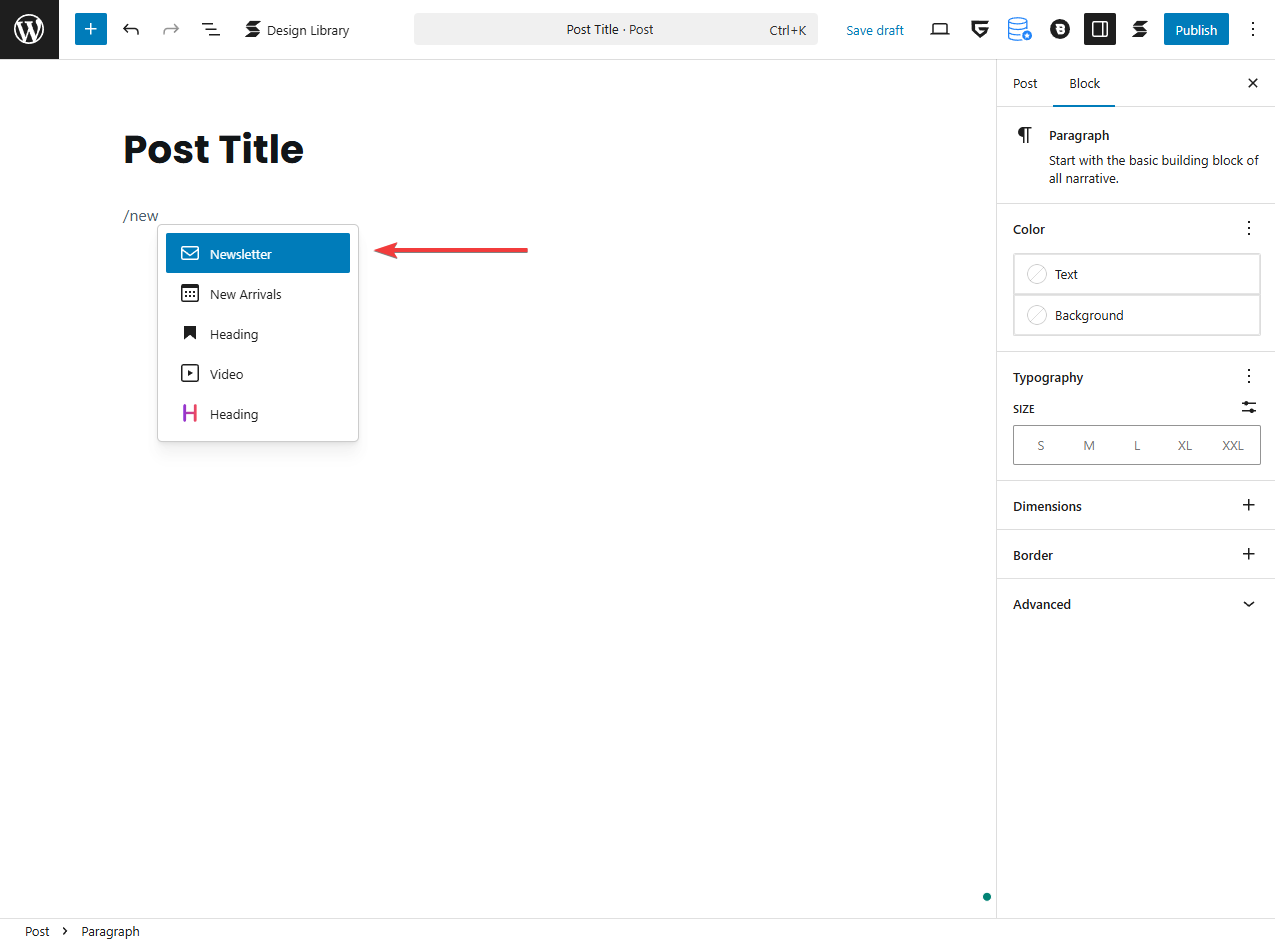
Insert it where it makes sense – after your blog content, midway through a long article, or on a dedicated signup page. Use Blocksy’s styling controls (colors, spacing, typography) so it blends naturally with your design.
This method is perfect if you want forms inside your content rather than only in fixed site locations.
Use Blocksy’s Widgets, Modules, or Shortcodes for Site-Wide Placement
For forms that appear consistently across your site, like in the footer, sidebar, or header, you can use the widget/module approach. Go to Appearance → Widgets (for sidebar/footer) or Customizer → Single Posts → Subscribe Form.
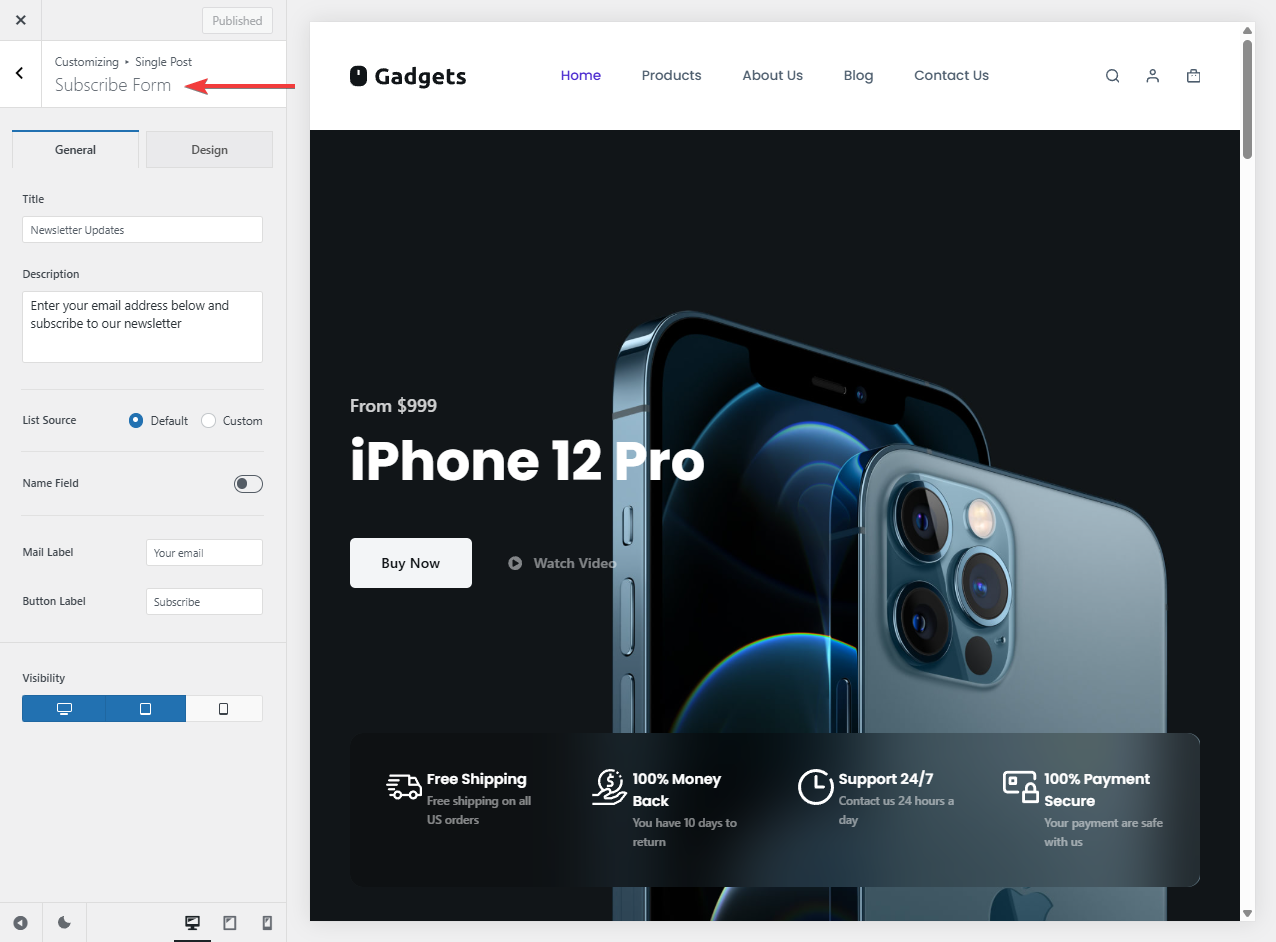
Add the Newsletter Subscribe widget/module to your desired section. Configure the title, description, and styling. You can also use the [blocksy_newsletter_subscribe] shortcode to place the form directly inside a post or page.
This is ideal if you want visitors to see a signup option no matter which page they land on.
Need assistance? Check the following resources:
Best Practices to Grow Your Email List Faster
Once your signup forms are ready, focus on small but impactful changes that can boost sign-up rates and grow your audience faster.
- Choose High-Visibility Locations: Place forms where visitors are most likely to see them. Popular spots include the homepage, footer, sidebar, and end of blog posts. You can also use a sticky bar or slide-in form to stay visible as people scroll. For special promotions, add a form to the top of every page.
- Offer Something Valuable: Give visitors a reason to subscribe. This could be a free guide, an email mini-course, a discount code, or exclusive content. Keep it relevant to your audience’s needs so it feels like a genuine benefit.
- Use Persuasive Calls-to-Action: Replace generic labels like Subscribe with action-focused text such as Get the Free Guide or Join Weekly Tips. Keep it short, clear, and benefit-driven. Test variations to see what performs best.
- Keep Your List Clean: Enable double opt-in so subscribers confirm their email address before joining. This improves list quality, boosts engagement, and helps your emails reach the inbox.
- Segment Your Audience: Even simple segmentation can improve relevance. Group by interest, category, or behavior so each subscriber gets content they are more likely to engage with.
- Test and Refine: A/B test form designs, placements, and offers. Use analytics to track performance and repeat what works best. Over time, even small improvements in conversion rates can lead to significant list growth, so keep testing regularly.
By putting these best practices into action, you’ll not only attract more subscribers but also keep them engaged for the long term, setting a strong foundation for your email marketing efforts.
Conclusion
Building an email list with WordPress is a straightforward process once you know the right steps. By combining an email marketing service with well-placed signup forms, you can start collecting subscribers and communicating with them regularly.
Over time, your list becomes a direct line to your audience, helping you promote content, sell products, and build lasting relationships.
Whether you choose a simple newsletter plugin or a full-featured email platform, the key is to focus on making it easy for visitors to join your list.
Consistency matters just as much as setup. Providing value in every message will keep subscribers engaged and prevent list fatigue.
Start small, test different approaches, and refine your strategy as you grow. A well-maintained email list will become one of your most reliable tools for building and sustaining your online presence for years to come.