Thinking about starting a blog but not sure where to begin? You’re in the right place!
Whether you want to share your passion, build a personal brand, or create a pathway to earning income online, self-hosted WordPress gives you the freedom and flexibility you need. Unlike restrictive platforms, WordPress puts you in full control of your content, design, and monetization options.
In this step-by-step guide, we’ll show you how to launch your WordPress blog – no technical expertise required. Here’s what you’ll learn:
- How to choose and register the perfect domain name.
- Set up reliable, affordable web hosting.
- Install and configure WordPress with just a few clicks.
- Select and customize a beautiful, responsive theme.
- Create essential pages and write your first blog posts.
- Add basic security to protect your site.
- Handle simple maintenance to keep your blog running smoothly.
These many steps might seem overwhelming at first, but don’t worry, we’ll guide you through each step in a beginner-friendly way.
Starting a self-hosted website does require a small investment (typically $50–$150 for your first year), but the independence and growth potential make it a smart choice. All the tools and tips in this guide are chosen specifically for beginners and budget-conscious creators.
Let’s get started!
How Much Does Launching a WordPress Blog Cost?
While starting a WordPress blog does require some investment, the good news is that you can launch a professional-looking website without making a hole in your pocket. Here’s a breakdown of what you can expect to spend —
| TOOLS | DETAILS | ESTIMATED COST |
|---|---|---|
| Domain Name & SSL | Typically $10-15/year (or free with host for the first year). | Typically $10-15/year (or free with host for the first year). |
| Web Host Plans | Shared hosting is best for beginners. Upgrade later as traffic grows. | $3–5/month (Budget)$6–10/month (Mid-range)$15+/month (Premium). |
| WordPress | WordPress core is free and open-source, powering 40%+ of the web. | Free. |
| Theme | Free themes available, but limited. Freemium themes like Blocksy offer pro features later for design flexibility and professional results. | Free to start, $49+/year for Pro versions. |
| Plugins | Many must-have plugins are free. Freemium model lets you upgrade as your needs grow. | Mostly freemiums; free to start, then upgrade to Pro versions. |
i. Domain Name & SSL Certificate
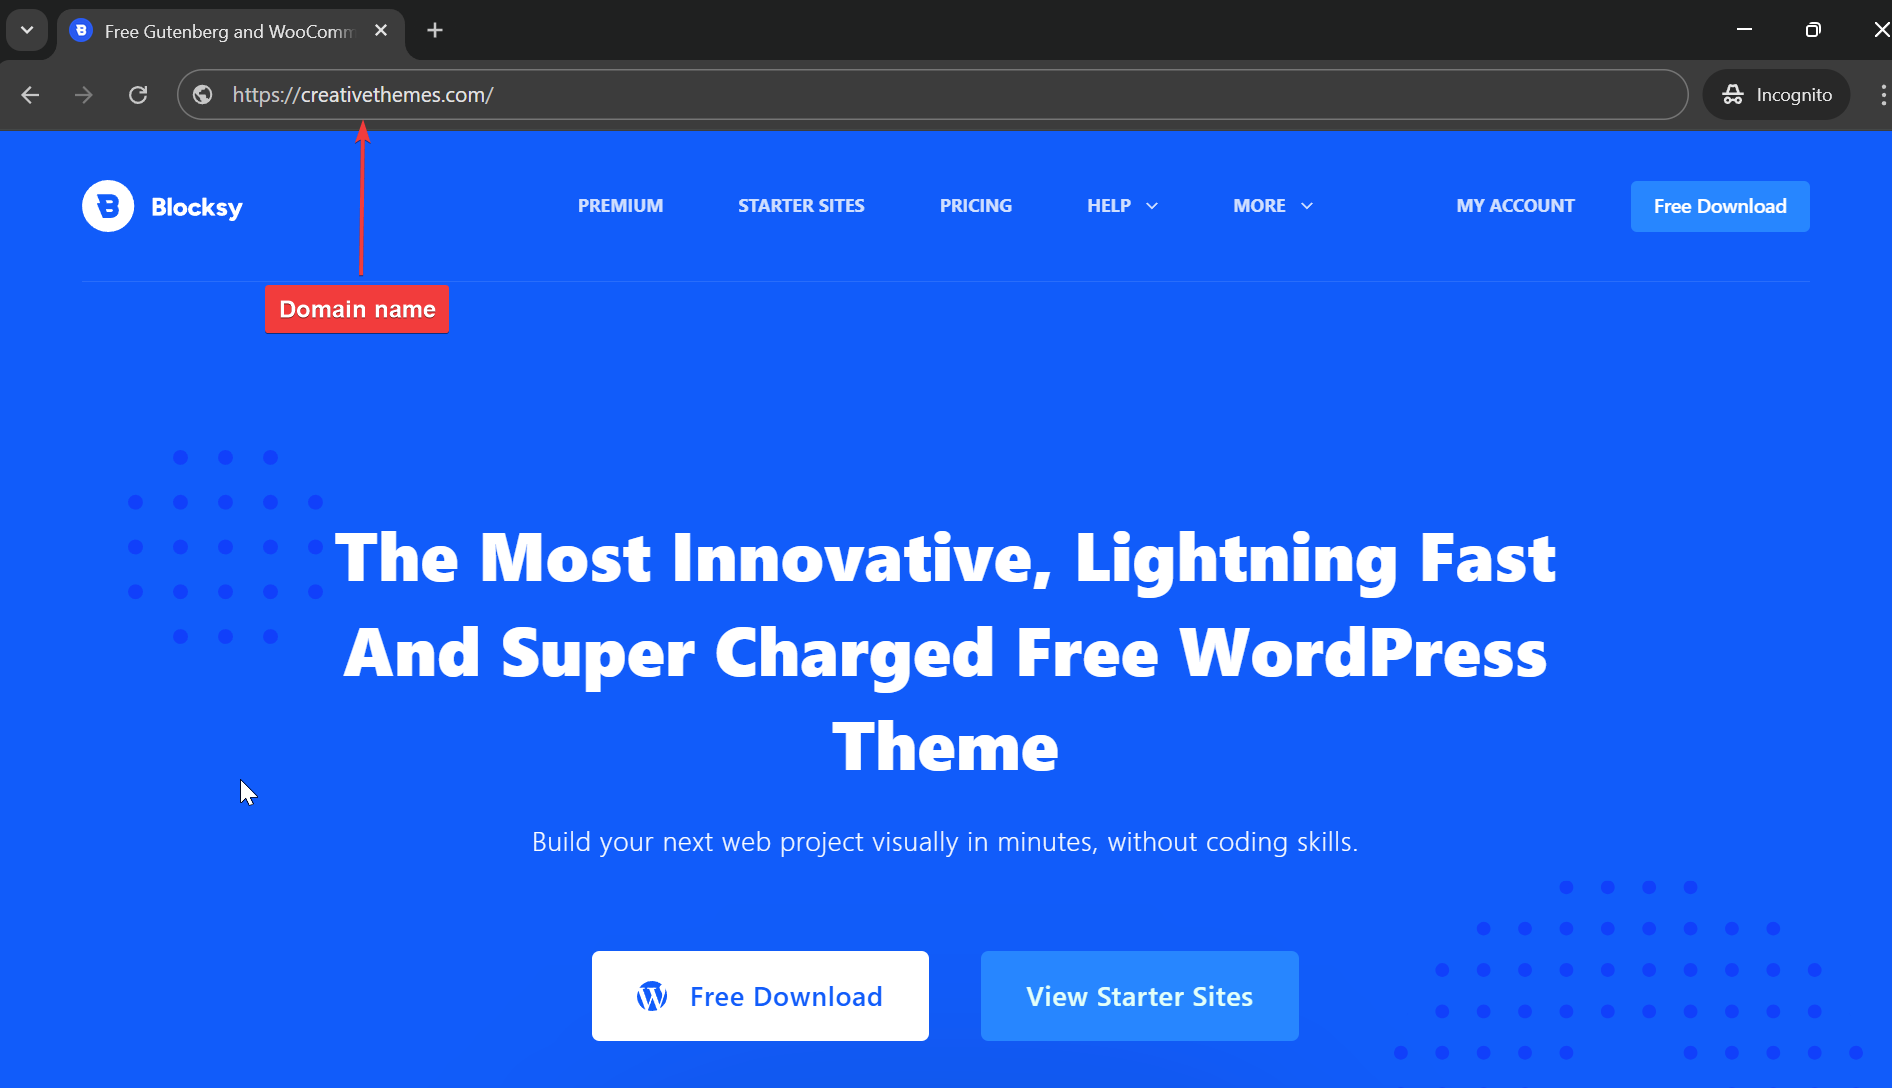
Your domain name is your blog’s unique web address (like ours is creativethemes.com). It’s the first impression your visitors will get, so choose something memorable, brand-able, and easy to spell.
Avoid numbers, hyphens, or confusing spellings, they can make your site harder to find or remember.
Take your time brainstorming a name that reflects your site’s topic or your personal brand, it’s worth getting right from the start.
Most domain registrars charge around $10-15 annual for a standard “.com” domain. However, many web hosting providers include a free domain name for the first year when you purchase a hosting plan, which is a great way to cut initial costs.
ii. Web Hosting
Web hosting is where your website files live, it’s what makes your blog accessible on the internet.
If you’re just getting started, shared hosting is the most affordable and beginner-friendly option. You share server space with other websites, which helps keep the cost low.
Here’s a breakdown of typical hosting tiers and examples:
- Budget Hosting: Providers like Hostinger and Bluehost offer shared hosting plans starting around $2.99 to $5 per month for entry-level plans, ideal for brand-new websites with low traffic.
- Mid-Range Hosting: Providers like SiteGround and NameHero offer plans typically in the range of $4 to $15 per month depending on the plan and commitment length.
- Premium Hosting: Providers like Kinsta and WP Engine are premium managed WordPress hosts with prices starting significantly higher, around $30 to $77+ per month.
Start with a reliable shared hosting plan, most new websites won’t need more than that. As your traffic grows or you begin monetizing, you can always upgrade to a more robust hosting plan for better performance and scalability.
For a detailed breakdown on how to choose the right plan for your budget, check out our WordPress Hosting Cost guide.
iii. WordPress
One of the biggest advantages of WordPress is that the core software is completely free!
This open-source platform powers over 40% of all websites on the internet and gives you access to professional-grade website capabilities without any license fees.
iv. Themes
WordPress comes with several basic free themes, but these often come with limitations. Many free themes offer minimal customization options, limited support (or only forum-based support), and may not provide the professional look you’re aiming for.
A better option for most businesses is to choose a “freemium” theme (like our theme – Blocksy) that offers a robust free version with the option to upgrade later to access advanced features like extra templates, premium support, or specialized functionality.
This approach allows you to launch quickly with a professional design while keeping initial costs low. As your blog audience grows and your needs become more specific, you can invest in premium features that directly support your goals.
v. Plugins
The WordPress plugin ecosystem offers powerful tools to extend your website’s functionality, with most essential features available for free. Here are some must-have plugins for new website owners:
- SEO: Yoast SEO and Rank Math both offer comprehensive free versions that help optimize your content for search engines.
- Security: Wordfence Security and Sucuri Security provide robust protection with their free versions, including malware scanning and login security.
- Forms: WPForms Lite and Forminator Forms offer drag-and-drop form builders that are perfect for contact forms and simple lead generation. The free versions support unlimited basic forms.
- Caching & Performance: WP Super Cache and LiteSpeed Cache can significantly improve your site’s load times, which is critical for SEO and user experience.
- Backup: UpdraftPlus and BackWPup backup your website regularly as a way to protect your content from crashes, hacking, or accidental deletions.
Most of these are freemium plugins. They allow you to start your WordPress website at no cost, then strategically upgrade only the tools that directly contribute to your site’s growth when the time is right.
How to Start a WordPress Blog Quickly
With an understanding of what it costs to start a WordPress blog, you’re ready to dive into the actual setup process.
In this step-by-step guide, we’ll walk you through everything from securing your domain name to publishing your first post. The entire process is designed to be straightforward even if you’ve never built a website before.
Step 1: Get a Domain Name & Hosting Provider
As we said earlier, your domain name is your blog’s online address, it should be memorable, relevant to your content, and easy to type.
Look for a .com extension when possible, as it’s the most recognized.
For hosting, choose a provider that offers one-click WordPress installation, free SSL certificate, 24/7 customer support, and good uptime guarantees. Popular beginner-friendly options include Bluehost, and Hostinger. Most offer package deals with a free domain for your first year, making it easy to get started with everything in one place.
For a detailed comparison of providers, see our guide to the Best WordPress Hosting Services.
Step 2: Install an SSL Certificate
Before installing WordPress, it’s important to secure your website with an SSL certificate.
SSL (Secure Sockets Layer) encrypts data transferred between your site and its visitors, not only for protecting sensitive information but also for building trust and improving your site’s SEO.

Most reputable hosting providers include a free SSL certificate with their hosting plans, usually valid for the first year.
We will demonstrate how to install the SSL certificate using NameCheap (that’s the hosting we have access to right now):
- Log into your hosting dashboard and go to cPanel.
- Look for Namecheap SSL.
- Select your domain.
- And activate the SSL.
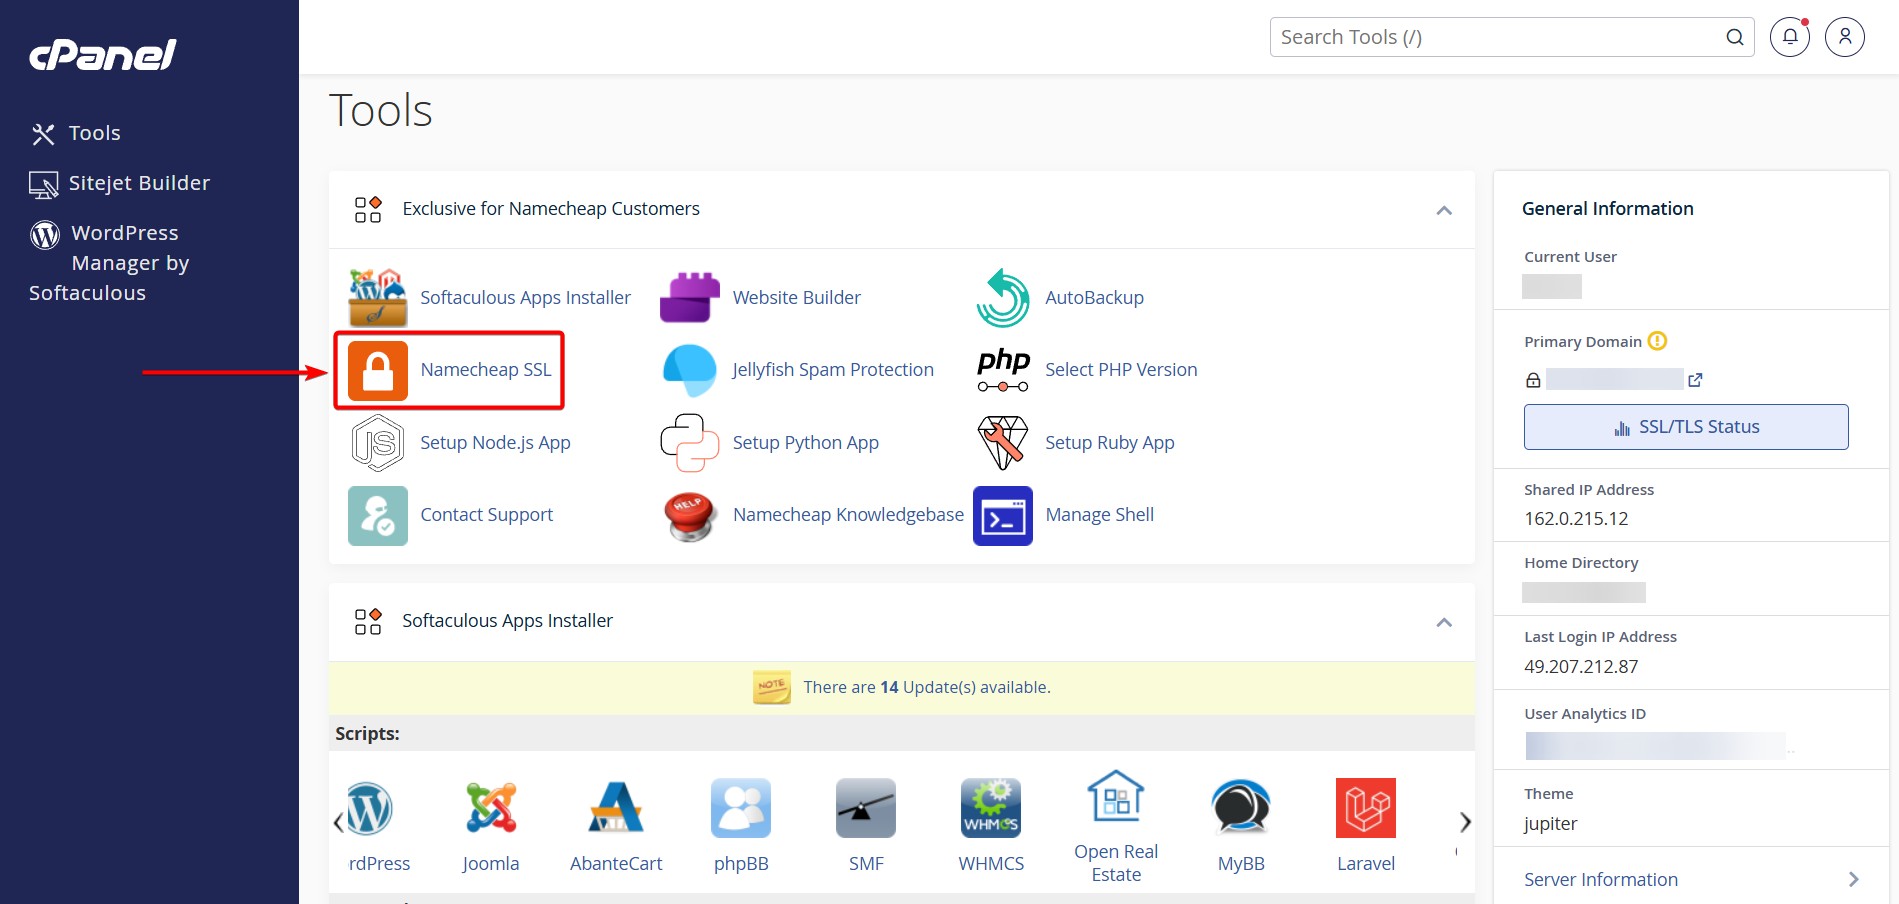
Once the SSL is activated, your domain will be accessible via https://, indicating that your site is secure. If you don’t see the option, consult your host’s knowledge base or reach out to their support via live chat.
Step 3: Install WordPress Using Softaculous
With your domain and SSL set up, you’re now ready to install WordPress, the software that will power your website.
Most hosting companies offer a one-click installer tool like Softaculous, which makes installing WordPress fast and beginner-friendly. Here’s how to do it:
- In your hosting dashboard go to cPanel, choose Softaculous.
- When you are inside the tool, click on WordPress.
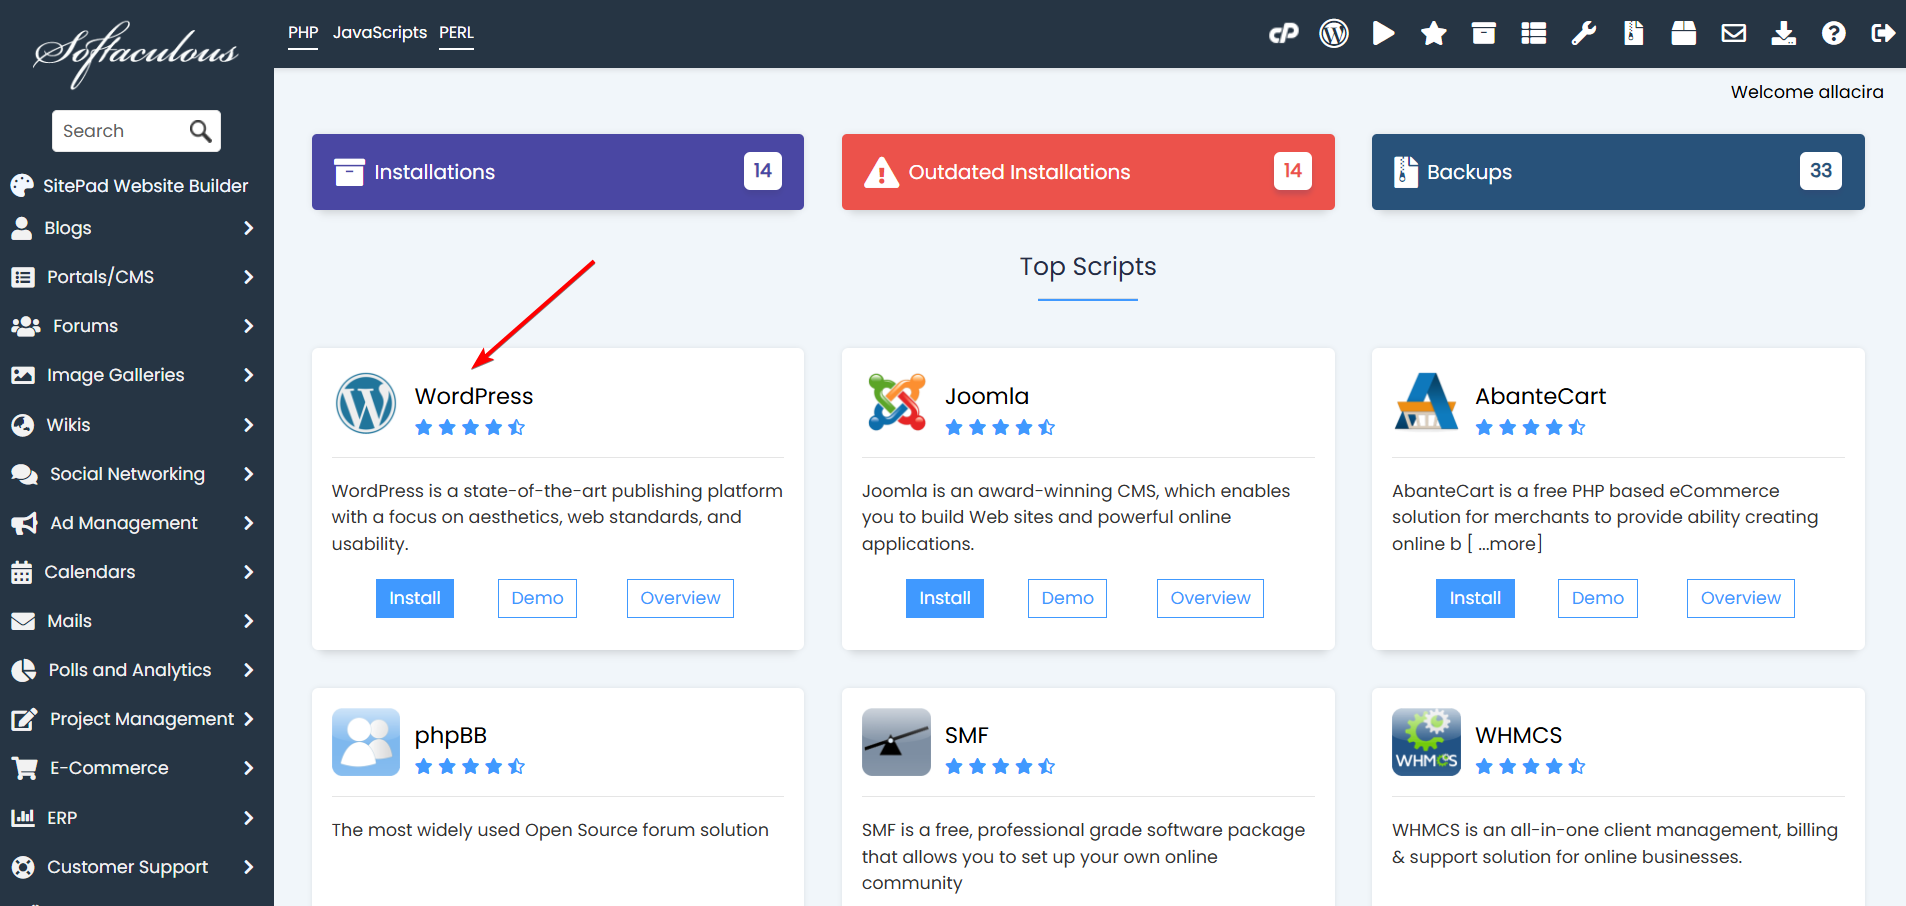
- Next, select https:// as the protocol (to use your newly installed SSL).
- Choose your domain from the dropdown menu.
- Fill in your site name, admin username, password, and email.
- Click Install.
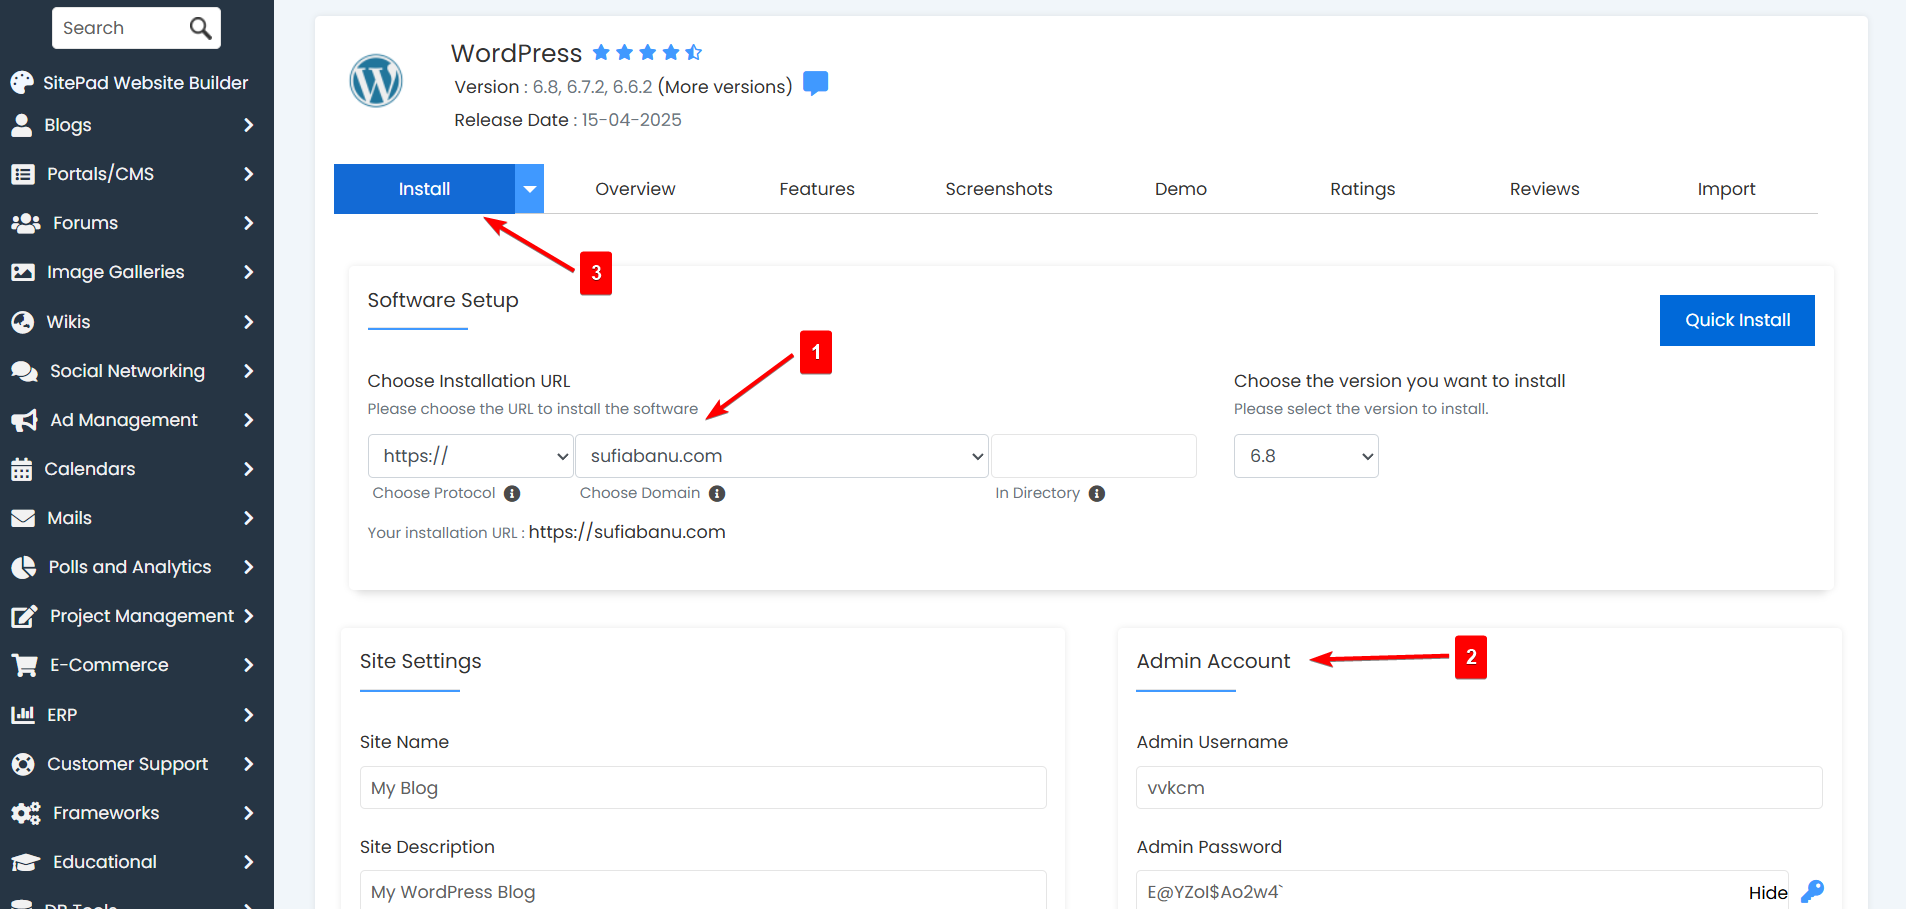
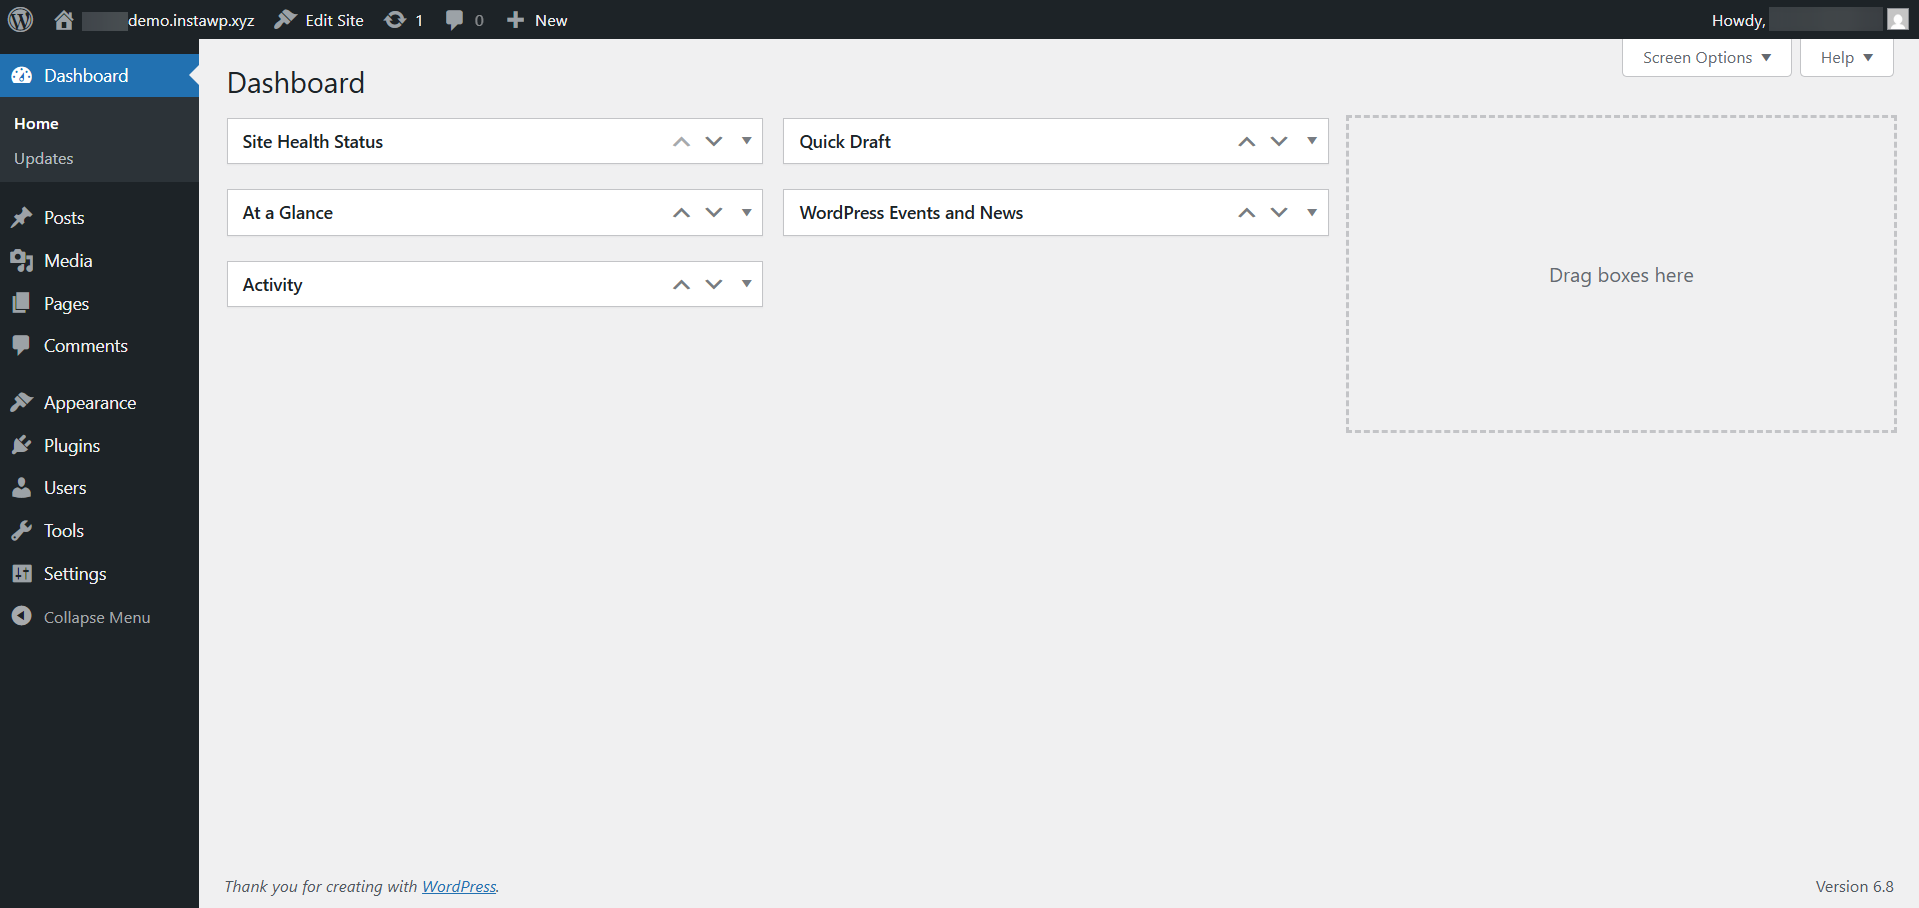
The installation usually completes in under a minute. Once it’s done, you can log into your website at https://yourdomain.com/wp-admin/. It will take you to your WordPress dashboard from where you can customize your theme, create pages, write blog posts, and install plugins.
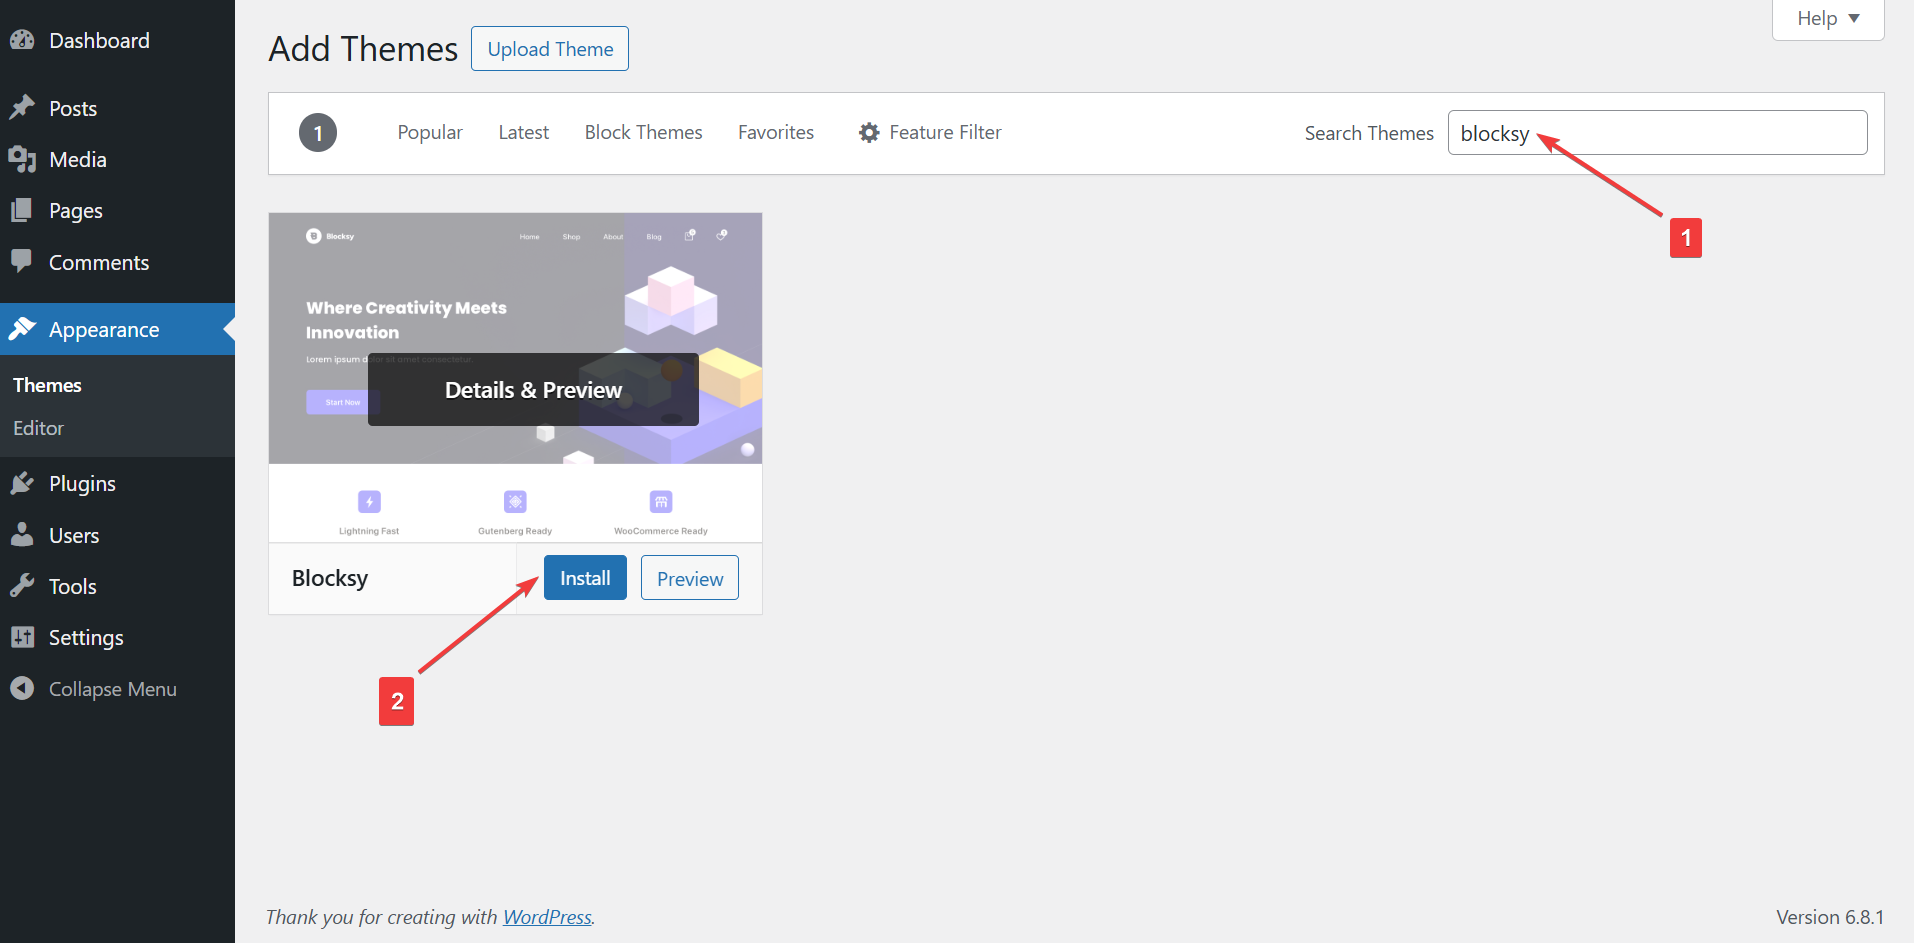
Step 4: Install & Activate a Fast Theme
Now that WordPress is installed, the next step is to choose a fast, lightweight theme that sets the foundation for your website’s design and performance.
A good theme should not only look professional but also load quickly and work well on mobile devices. Speed is especially important for SEO and user experience, slower websites tend to rank lower and lose visitors.
We recommend our theme Blocksy as it is one of the best lightweight, flexible, and beginner-friendly themes available today. It’s fast, beautifully designed, and easy to customize.
You’re free to use any theme you like but we’ll demonstrate using Blocksy so you can see how the installation and setup process works.
The free Blocksy theme offers limited ready-made starter sites that are perfect for launching your blog, though access to the full library of premium designs requires a Blocksy Pro license. It’s worth noting that while the free version of Blocksy is already powerful, installing the pro licence unlocks extra tools, advanced header/footer options, custom widgets, and much more.
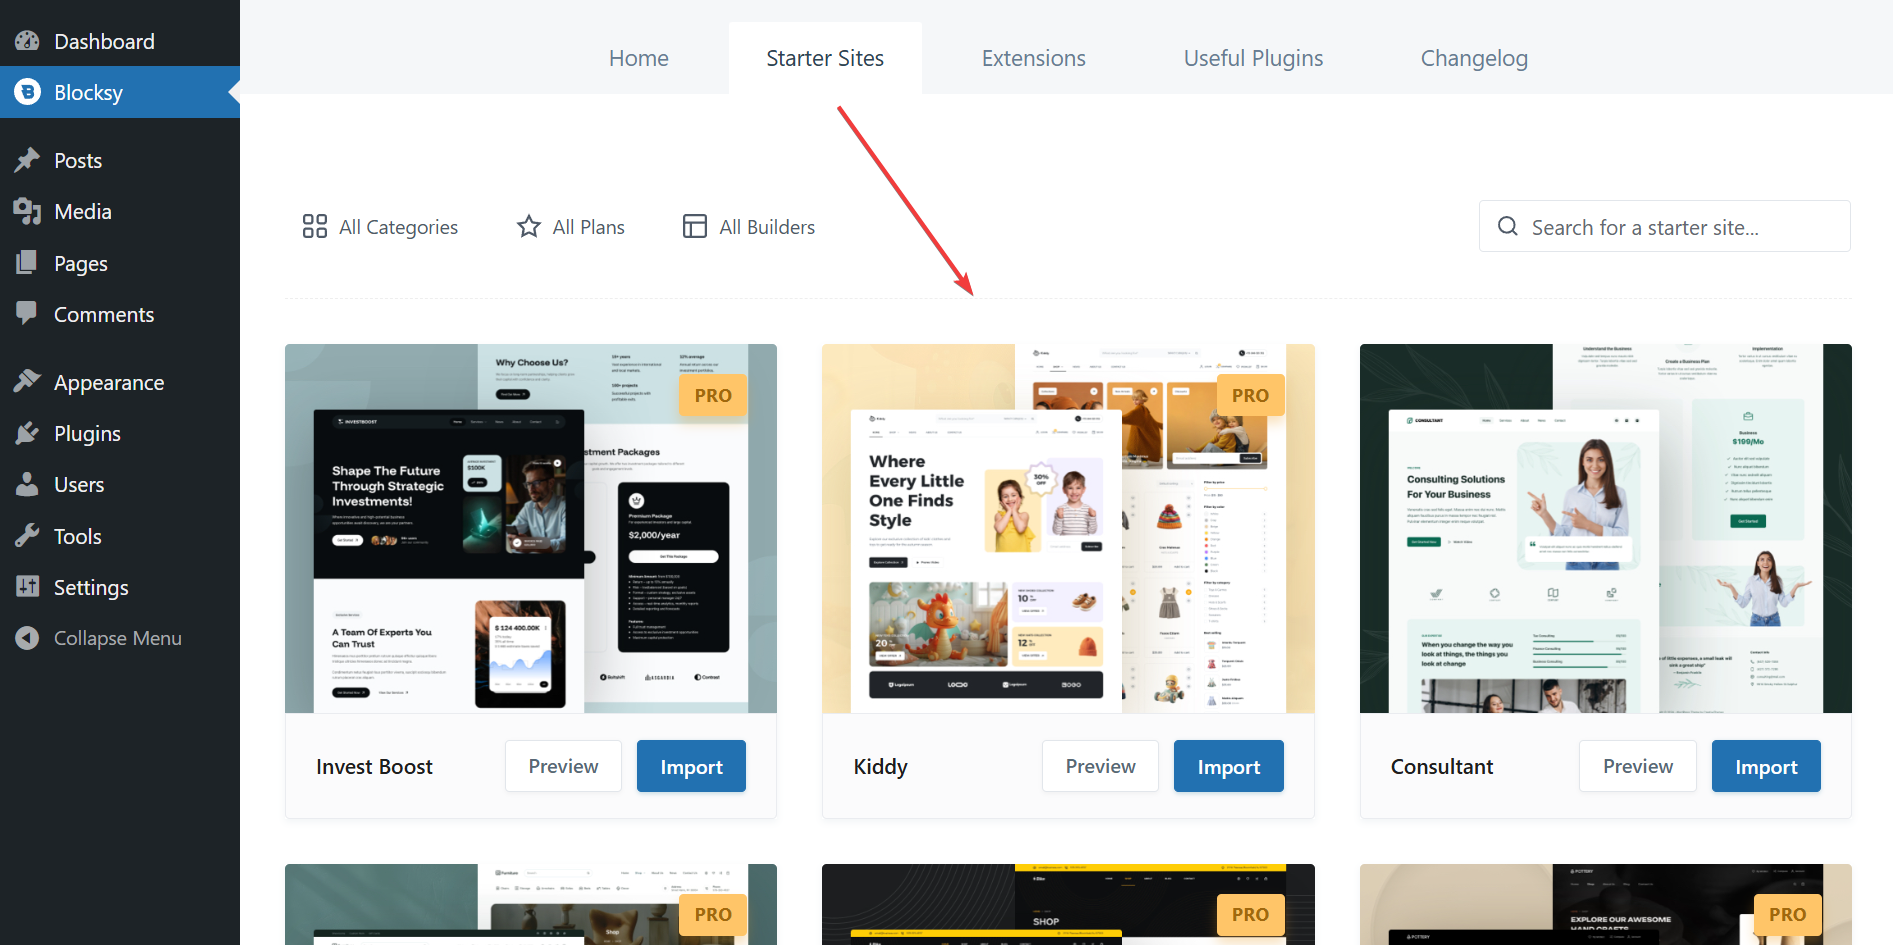
To install the theme, go to Appearance → Themes → Add Theme, search for Blocksy and hit the Install button.
To install a free starter site, install the Blocksy Companion plugin.
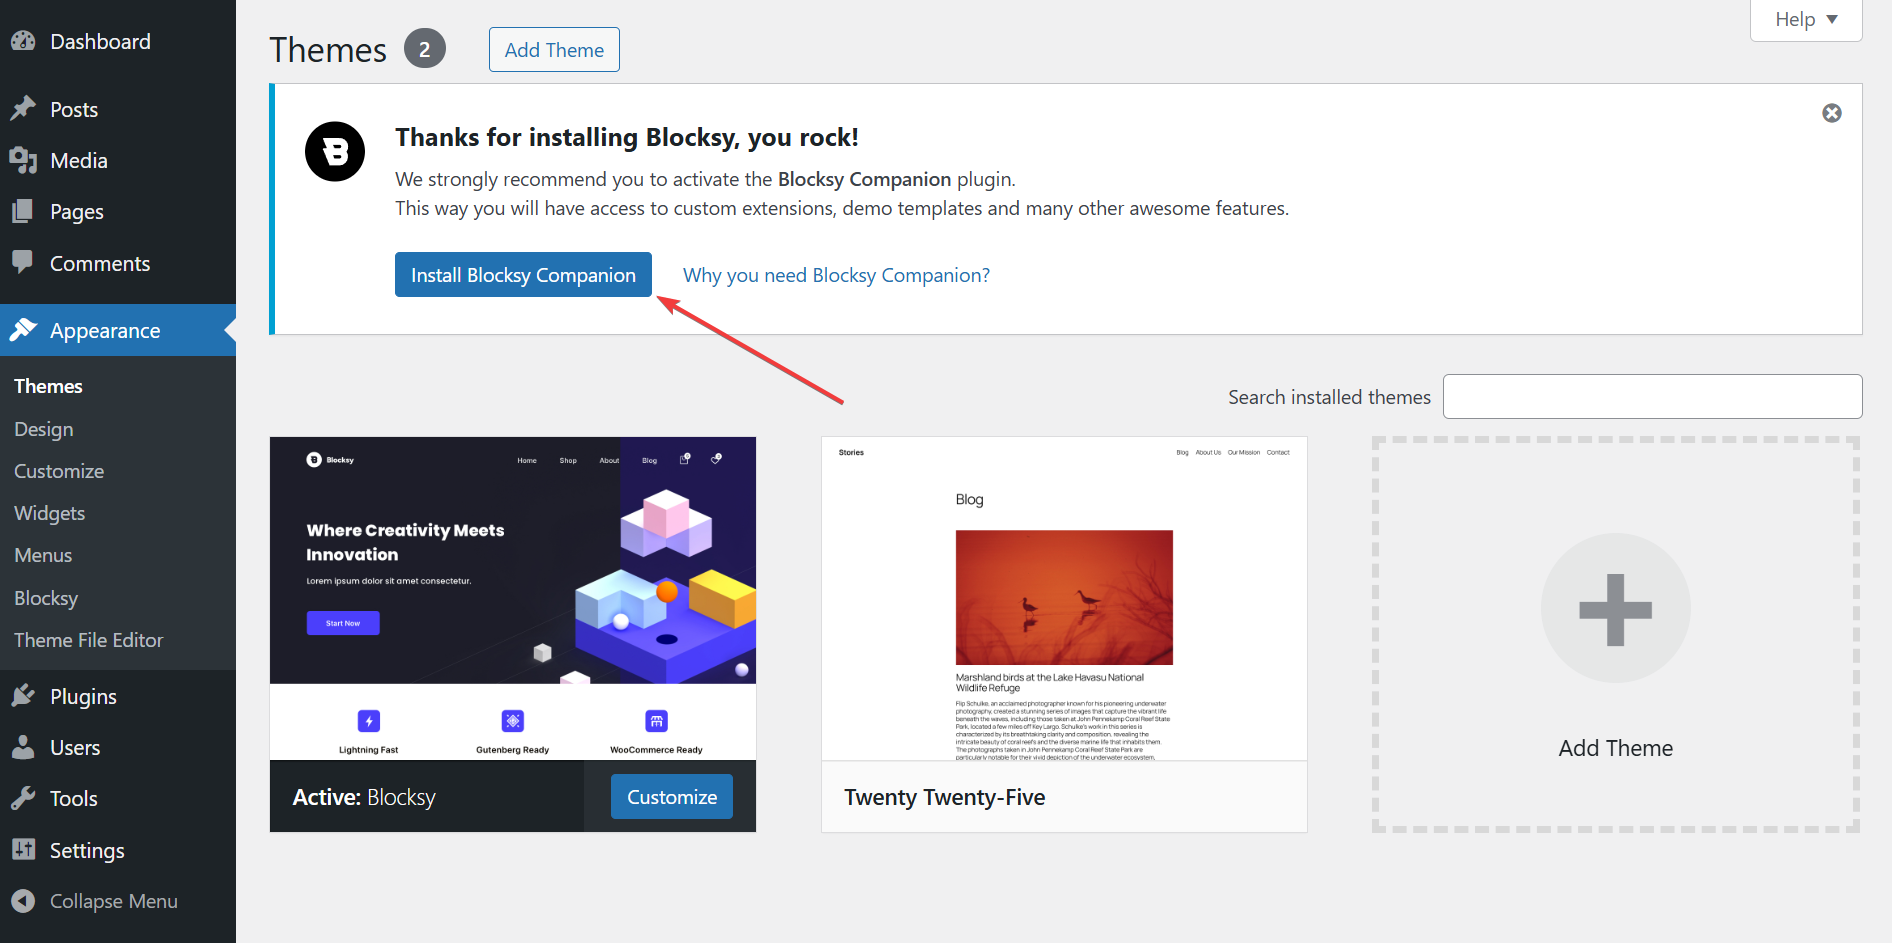
Now, go to Blocksy, select Starter Sites and browse the starter sites and pick your favourite. Then hit the Import button.
That’s it. You now have a professional WordPress website up and running.
Need help? Check out this help doc: Downloading a Starter Site
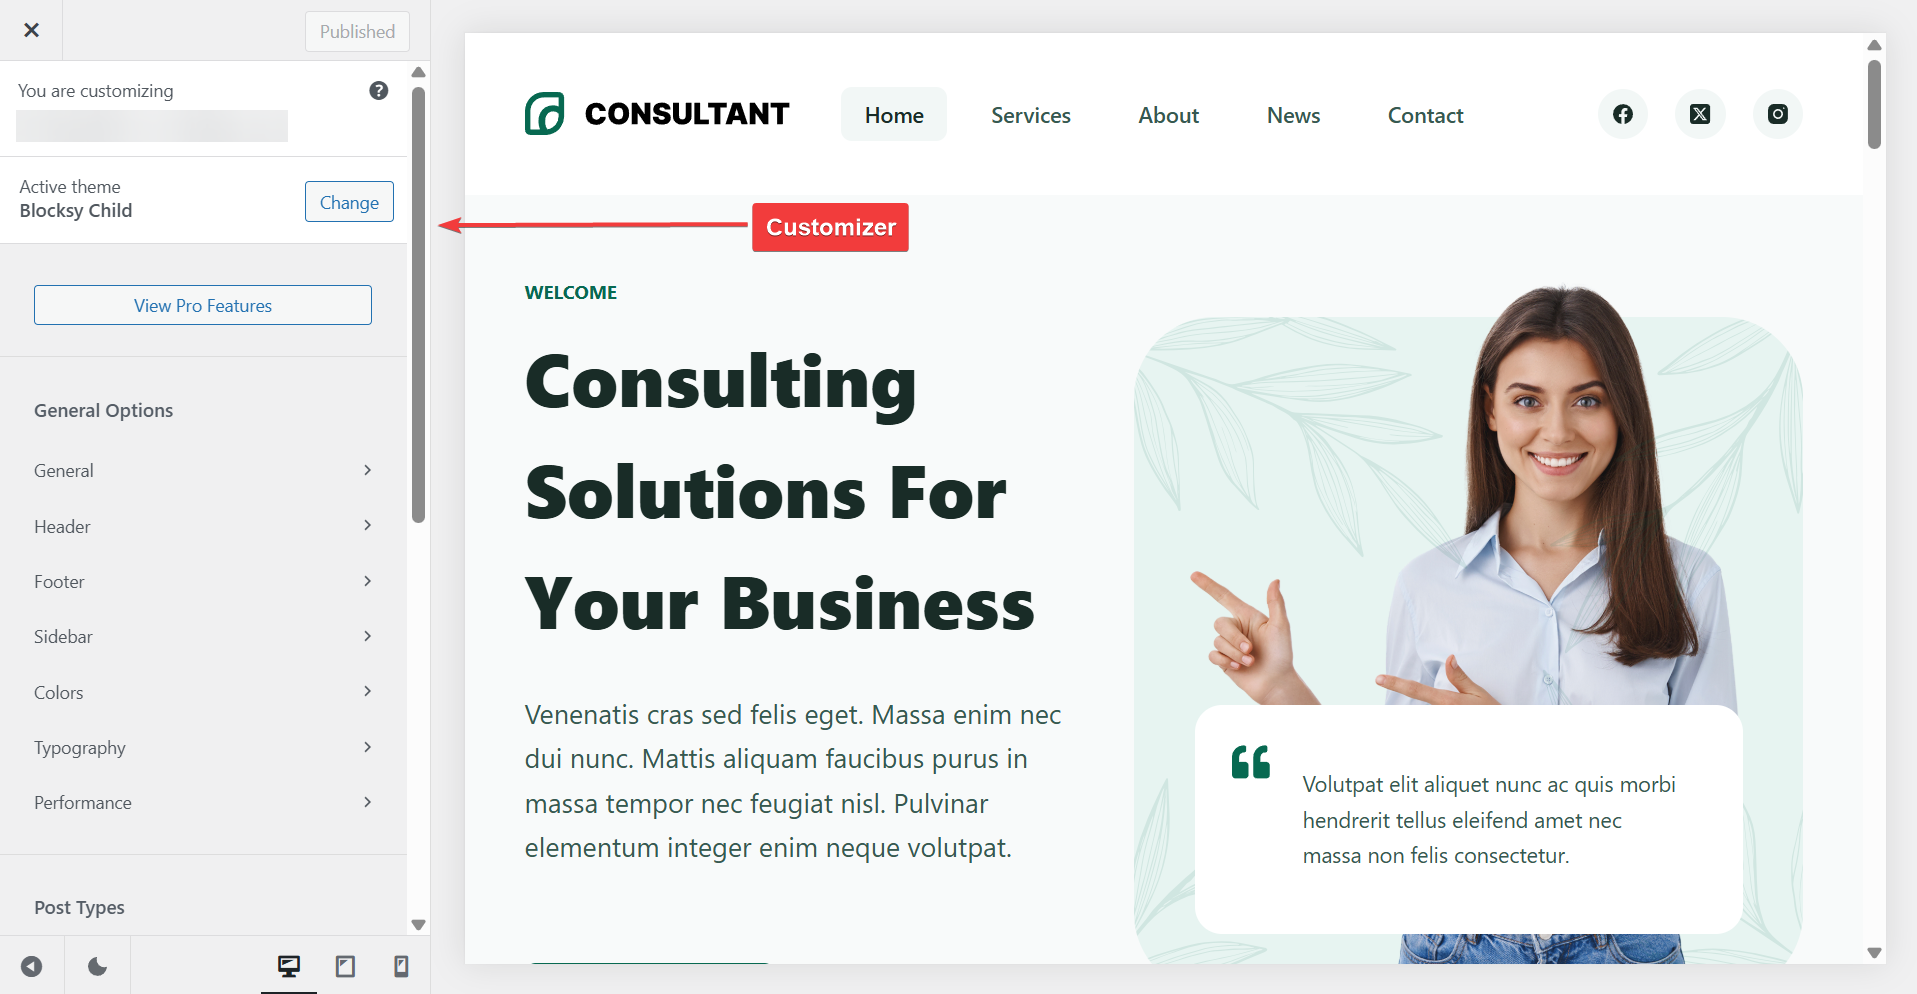
Step 5: Customize Your Site’s Design
With your theme active, it’s time to make your blog look uniquely yours.
Head to Appearance → Customize to launch the WordPress Customizer. Here, you can tweak your site’s colors, fonts, logo, header layout, and more, all with a live preview.
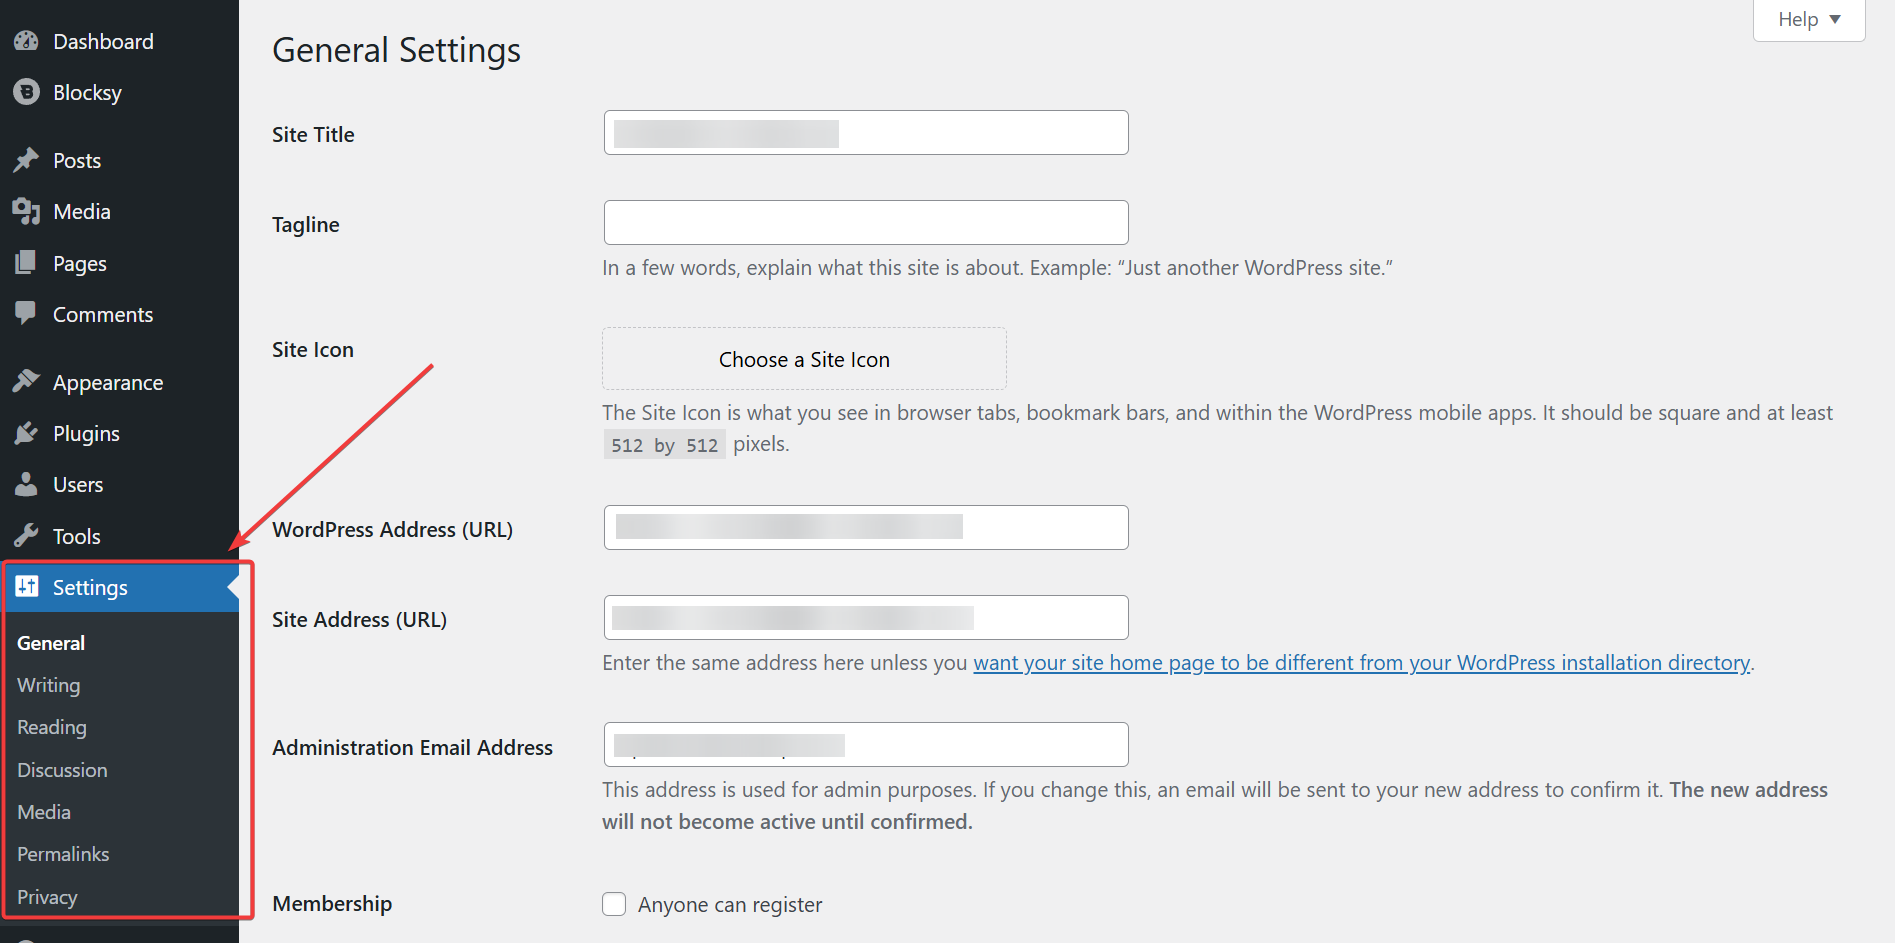
Step 6: Configure WordPress Settings
Configuring core WordPress settings ensures your blog is optimized for clarity, usability, and future growth.
- Head to Settings → General to update your site’s title and tagline.
- Then, go to Reading to choose whether your homepage shows a static page or your latest posts.
- Under Permalinks, select the Post name structure for cleaner URLs.
- You can also disable comments on pages to reduce spam.
These quick tweaks help set the foundation for a professional, well-structured blog that’s easier to manage and more user-friendly from day one.
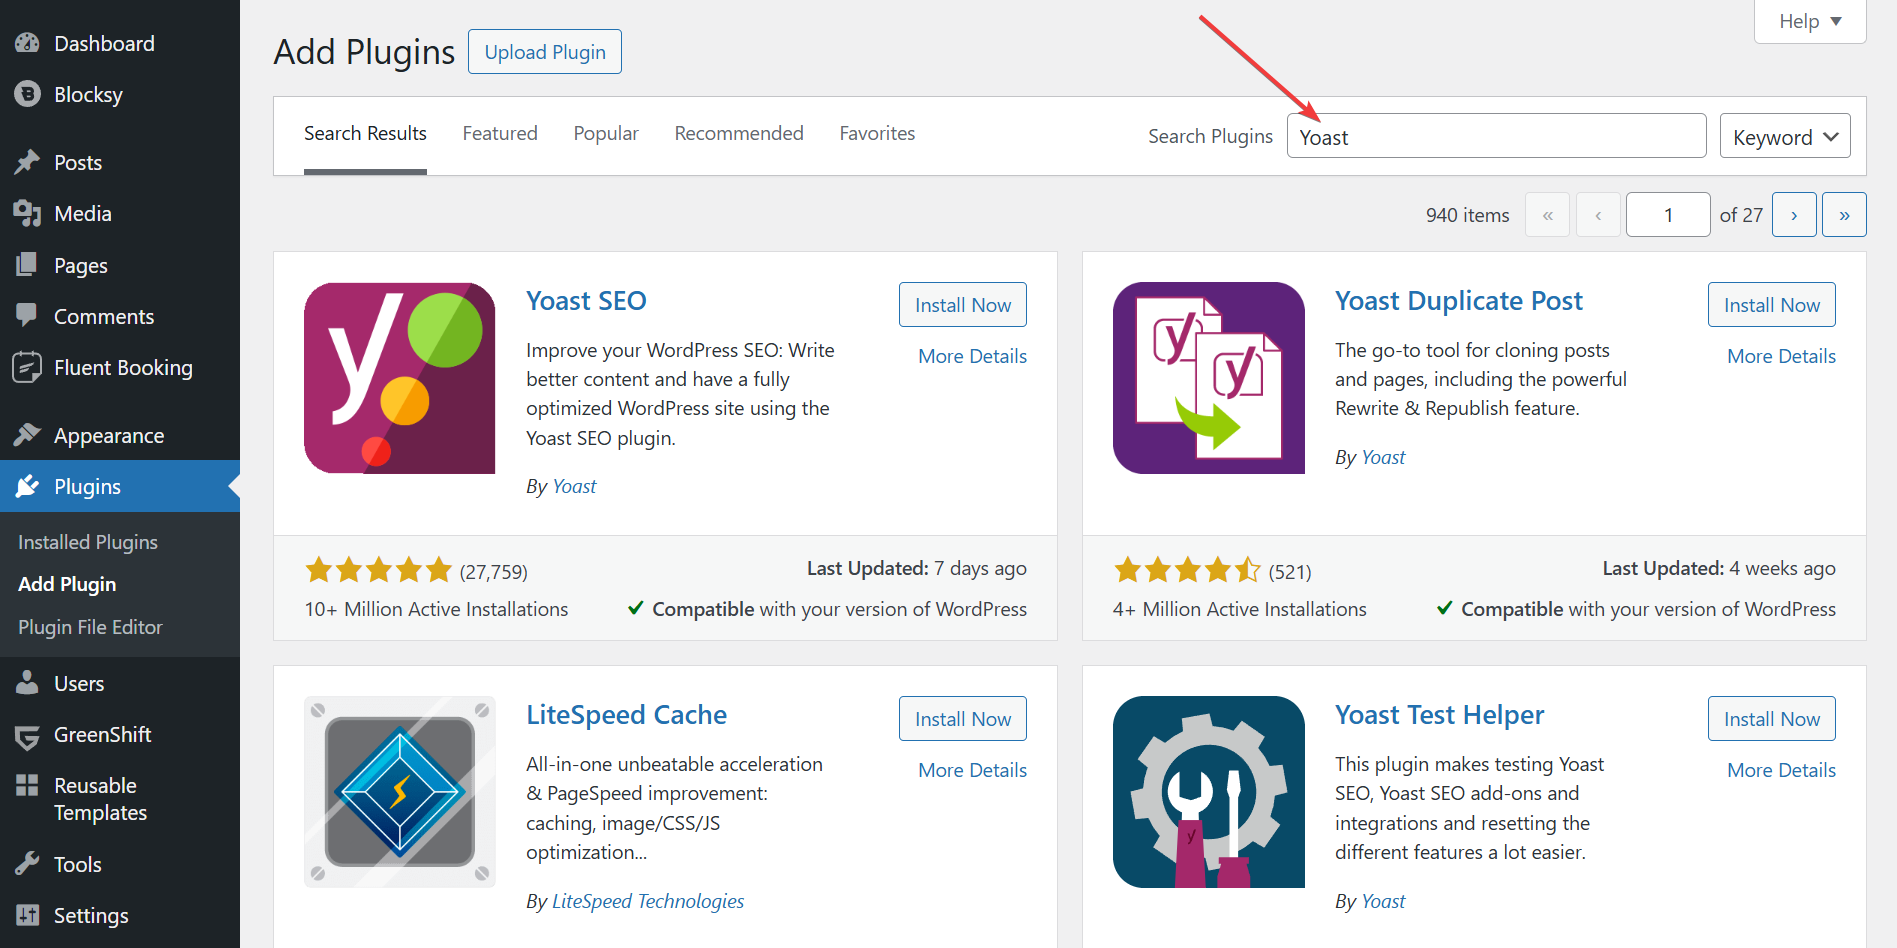
Step 7: Install Essential Plugins
Earlier, we covered essential plugins in the cost breakdown, now it’s time to install them. Plugins add powerful features to your blog like SEO, security, backups, and contact forms.
Go to Plugins → Add New and search for tools like Yoast SEO, WPForms, and UpdraftPlus. Install and activate each with a click. Most plugins have a free version with enough features to start, and you can upgrade later as your blog grows or your needs become more advanced.
Step 8: Write Essential Pages & Publish Your First Blog Post
To write your first post, go to Posts → Add New in your WordPress dashboard.
Give your post a catchy title and start writing in the content area using the block editor. You can add images, headings, lists, and more using simple drag-and-drop blocks. When you’re happy with the content, click Publish to make it live.
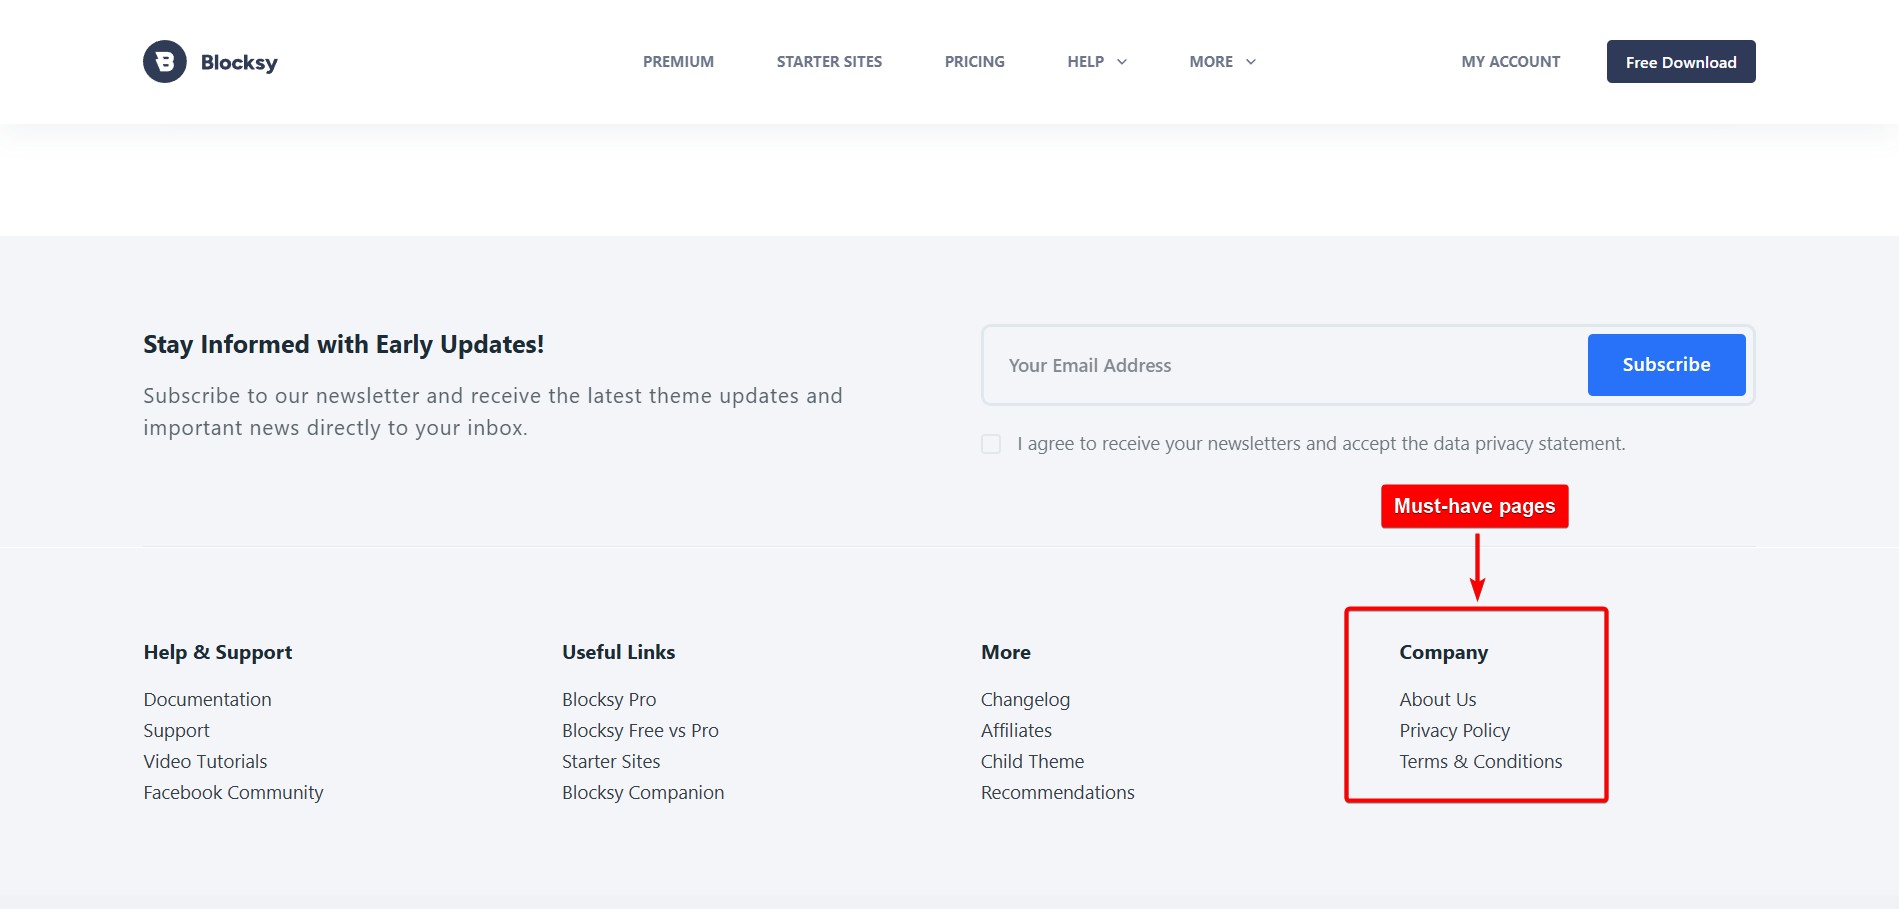
Next, create must-have pages like About, Contact, and Privacy Policy by going to Pages → Add Page. You can use online generators for privacy policy, terms and conditions, and use AI chatbots to write first drafts for about and contact pages.
Step 9: Optimize Your Site’s Performance
Start by installing a caching plugin like LiteSpeed Cache or WP Super Cache to improve load times. Compress your images using tools like Smush or ShortPixel and limit the number of active plugins to avoid bloat.
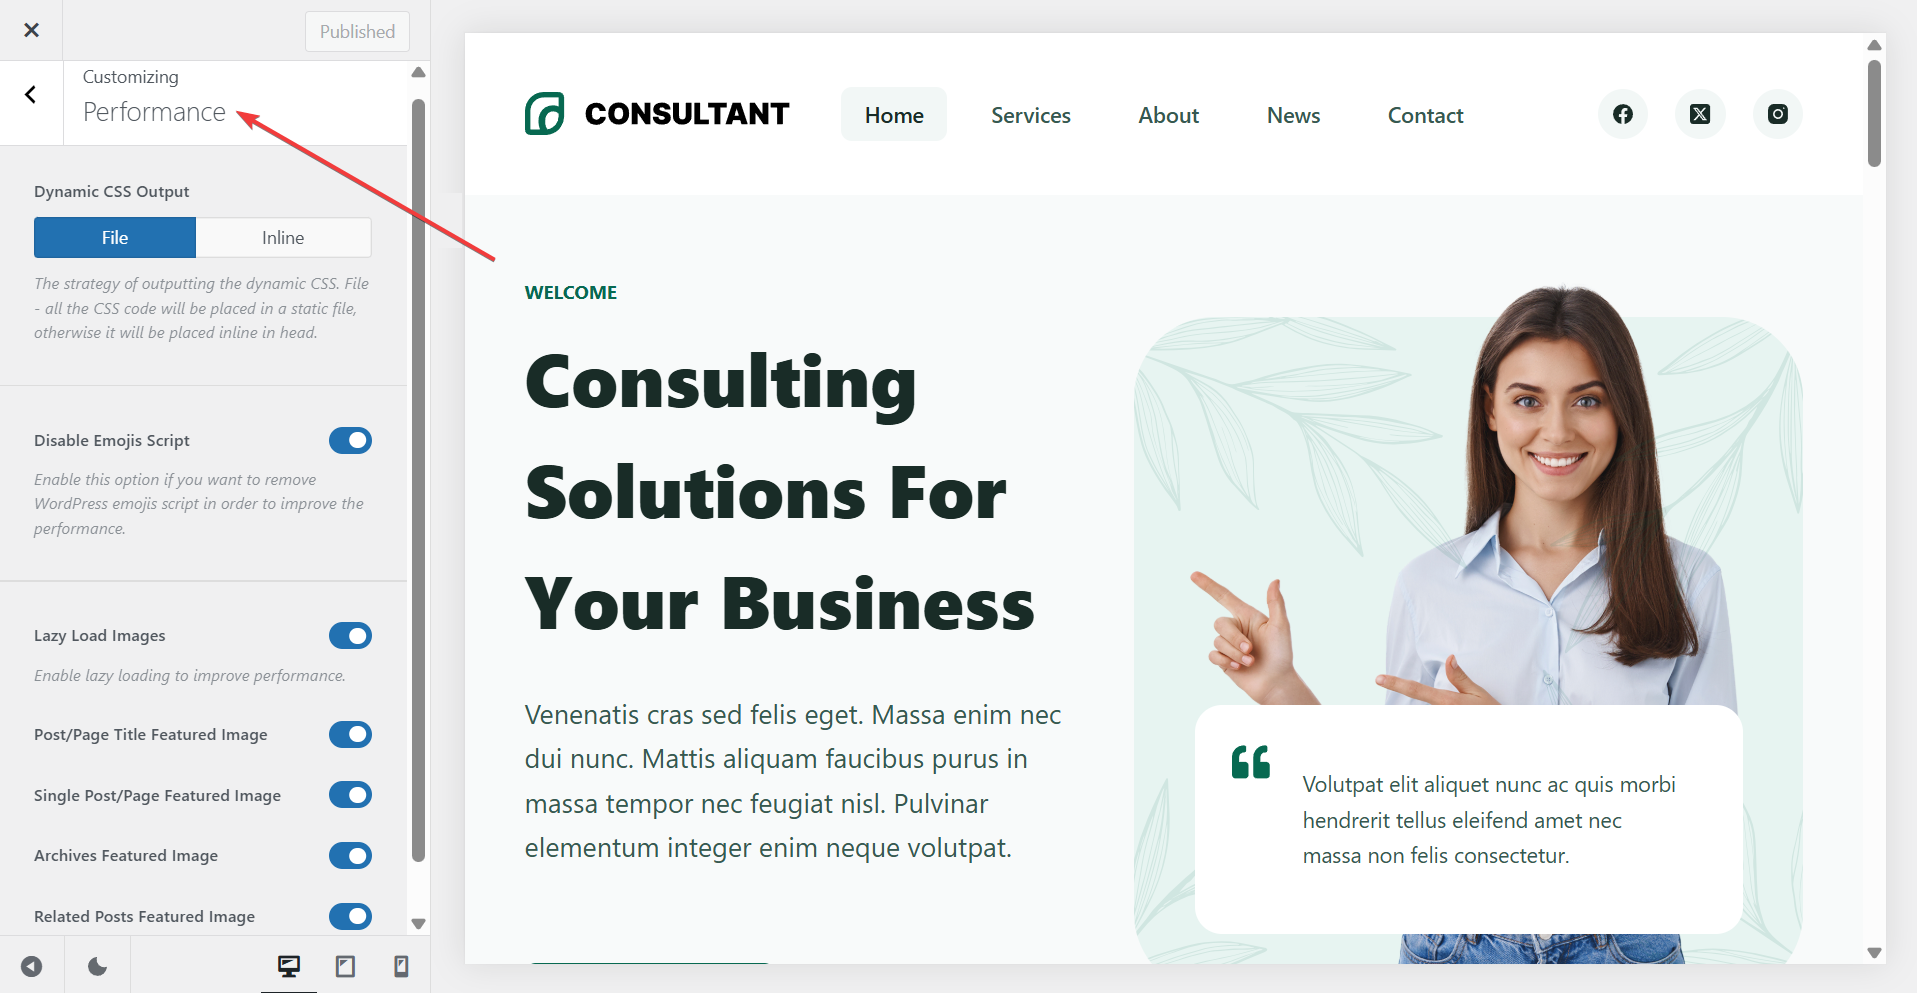
Blocksy, our theme, comes with built-in performance features to help you out.
- Head to the Performance settings panel to enable Dynamic CSS Output in “File” mode. This boosts caching efficiency.
- Turn off unnecessary emoji scripts, enable local Gravatar caching to speed up comments, and take advantage of lazy loading to load images only when needed.
Finally, test your site speed using PageSpeed Insights or GTmetrix and follow the recommendations to fix any major issues.
Read more: How to Clear Cache & Avoid Over-Optimizing Websites
Step 10: Launch & Promote Your Website
🎉 Congrats – you just launched your blog!
Share your site on social media, tell friends and family, and join blogging communities. Promotion helps bring your first visitors and kick starts your blog’s growth.
How to Maintain Your WordPress Blog
Regular maintenance keeps your WordPress website secure, fast, and running smoothly.
- Start by updating your themes, plugins, and WordPress core whenever new versions are available. This helps patch security vulnerabilities and ensures compatibility.
- Backup your website weekly (or more often if you post frequently).
- Monitor site performance and broken links with tools like Google Search Console and Google Analytics.
- Periodically clean up spam comments and unused plugins or media files.
- Finally, check your forms and key site features to ensure everything works as expected.
A well-maintained site offers a better experience for both you and your visitors.
FAQs
How to start blogging in WordPress?
To start blogging in WordPress, purchase a domain and hosting, then install WordPress on your hosting account. Choose a theme, customize your blog’s design, install essential plugins, and write your pages and first post. Once published, promote your blog through social media or newsletters to grow your audience.
Is it free to start a blog on WordPress?
Yes, you can start a blog for free on WordPress.com with a subdomain, but it has limitations like your web address will look like this: https://yoursite.wordpress.com. For a professional blog with proper website address, full control and monetization options, it’s best to use self-hosted WordPress.org, which requires buying a domain and hosting.
Do WordPress bloggers get paid?
Yes, WordPress bloggers can earn money through various methods like affiliate marketing, sponsored posts, digital product sales, or ad revenue. However, income depends on niche, traffic, content quality, and promotion strategies. Consistency, audience trust, and smart monetization choices are key to building a successful and profitable blog.
Conclusion
Starting a WordPress blog is one of the most affordable and rewarding ways to share your voice online or build a personal brand. With just a small upfront investment, you can create a professional-looking website tailored to your goals. From choosing a domain and theme to writing posts and growing your audience, each step brings you closer to your blogging vision.
The best part? You don’t need to be a tech expert. With beginner-friendly tools like Blocksy and WordPress, anyone can build and grow a blog.
So take the leap, your blogging journey starts today!