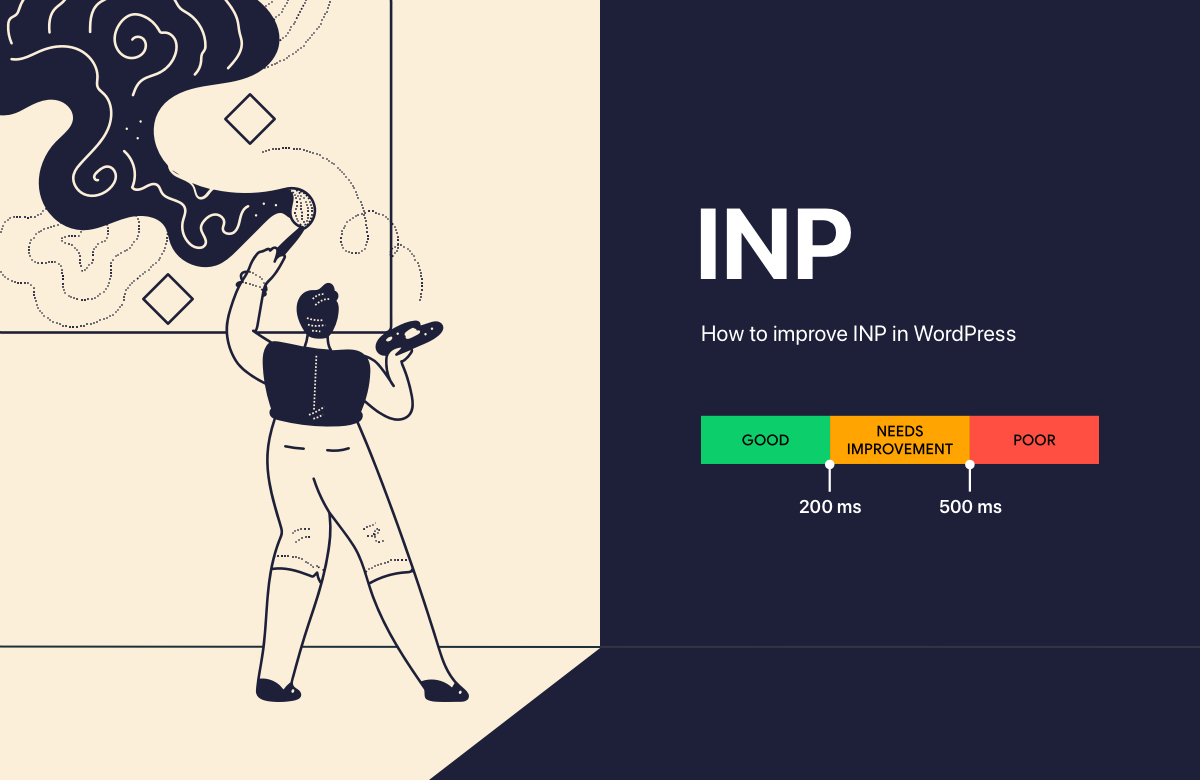
Interaction to Next Paint (INP) is a pending Core Web Vital that measures the responsiveness of a web page throughout its entire lifecycle. It will replace First Input Delay (FID) in March 2024 in Google’s Page Experience Report. As Core Web Vitals are ranking signals, your INP scores will impact your SEO results once Interaction to Next Paint becomes a stable metric.
On a WordPress site, your Interaction to Next Paint results mainly depend on your theme, plugins, and hosting provider. In this article, we’ll look into how you can make the most out of these tools and what other actions you can take to improve Interaction to Next Paint in WordPress.
Table of Contents
How Interaction to Next Paint Is Calculated
In theory, Interaction to Next Paint estimates how fast a web page responds to user actions by providing visual feedback (i.e. showing the next paint on the screen).
In practice, on most web pages, the Interaction to Next Paint score is the delay time of the slowest interaction that occurs over the lifetime of that page*.
* The INP score is, in fact, the 98th percentile of all interaction delays (note that there will always be a delay before the browser updates the screen), which technically means the slowest interaction on most web pages. The reason for this calculation method is to exclude anomalies on large and busy pages that need to process multiple interactions.
Like other Web Vitals, Interaction to Next Paint is evaluated on a traffic light scale where the page needs to respond to (almost*) every user interaction within 200 milliseconds to get the ‘good’ (green) score. To prevent getting the ‘poor’ (red) score, the visual feedback shouldn’t take longer than 500 milliseconds:

Interactions Included in vs Excluded from Interaction to Next Paint
While Interaction to Next Paint measures how fast your website processes user actions, it doesn’t include everything your visitors do while they’re on your site.
The comparison table below shows the interaction types included in the calculation of INP:
| Included in Interaction to Next Paint | Not included in Interaction to Next Paint |
|---|---|
| Clicking | Hovering |
| Tapping (on touchscreens) | Scrolling |
| Key pressing |
Note: If no interaction takes place on a page, no INP score will be reported.
The Three Phases of Interaction to Next Paint
Interaction to Next Paint is made up of three subsequent phases:
- Input delay – The page prepares for processing the interaction (e.g. completes other tasks, downloads resources, etc.).
- Processing time – The page processes the event callbacks (i.e. calculates the response it will show to the user).
- Presentation delay – The page paints the visual update to the screen.
To reduce Interaction to Next Paint, you need to make all three phases as short as possible. Below, we’ll go through the most useful WordPress-specific recommendations for each phase.
Read Next: How to Improve Cumulative Layout Shift in WordPress
Phase 1: How to Reduce Input Delay in WordPress
On a WordPress site, input delay depends on your theme and plugins that publish content to the frontend of your site (e.g. form, eCommerce, review, and other plugins). This is because they include the WordPress templates (e.g. header, footer, sidebar, etc.) and other content elements the core WordPress software uses to put together the web page.
So first and foremost, you need to choose a performance-optimized WordPress theme that minimizes input delays and makes sure that your site can start processing user actions fast.
If you use any content plugins, it’s also recommended that you check if they apply at least some of the performance optimization techniques below.
1.1. Shorten the Critical Rendering Path
As render-blocking resources block the main thread of the browser (which is responsible for rendering the web page), they make the critical rendering path longer, which increases input delays.
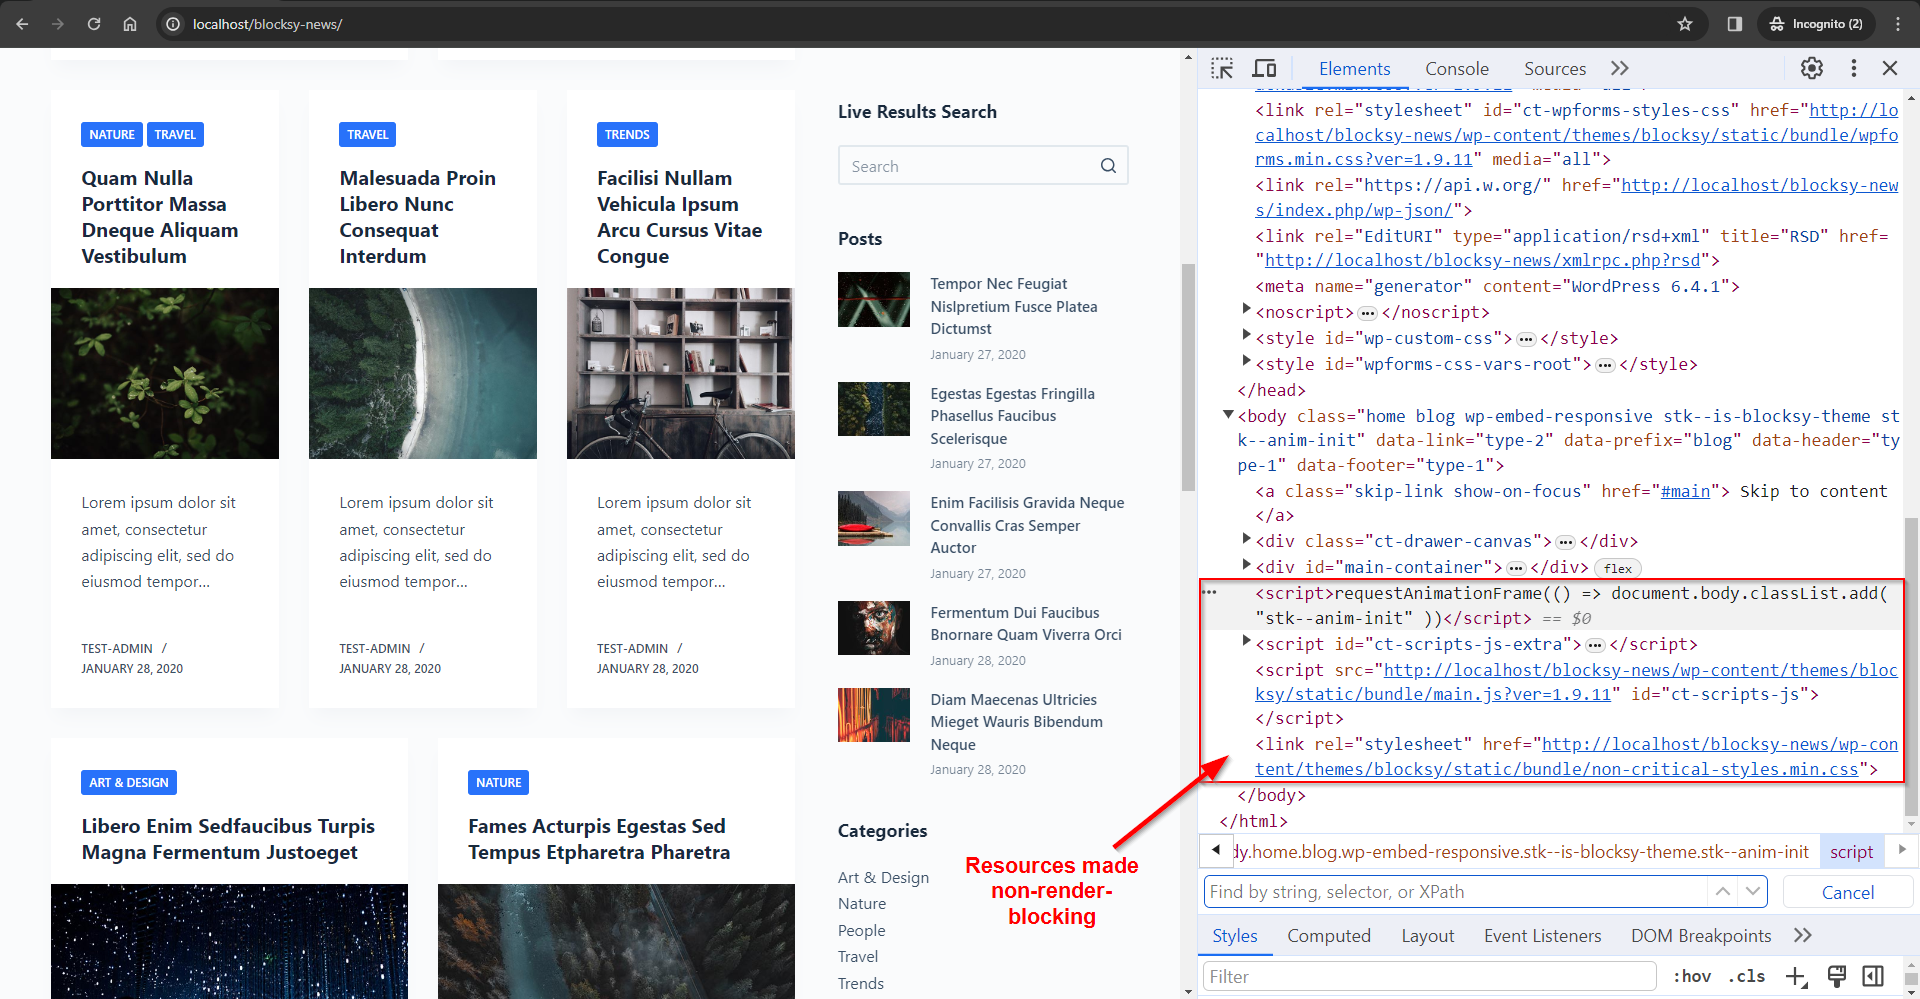
While it’s not possible to make all resources non-render-blocking (e.g. the critical CSS must run before the page is rendered), your theme should move as many resources as safely possible out of the critical rendering path. For the best results, it should defer non-essential scripts and non-critical CSS to reduce input delay — here’s how our free Blocksy theme implements this technique:
1.2. Don’t Load Anything That’s Not Needed on the Page
To reduce input delays, your WordPress theme and content plugins should also remove all the unused CSS and JavaScript from each page. Fewer resources mean that the browser can start processing the user action sooner.
Blocksy, for example, uses the code splitting functionality of the Webpack module bundler to optimize resource loading on a page-by-page basis. It only adds the CSS and JavaScript that are needed on the respective page, bundles the files when possible, then minifies each bundle.
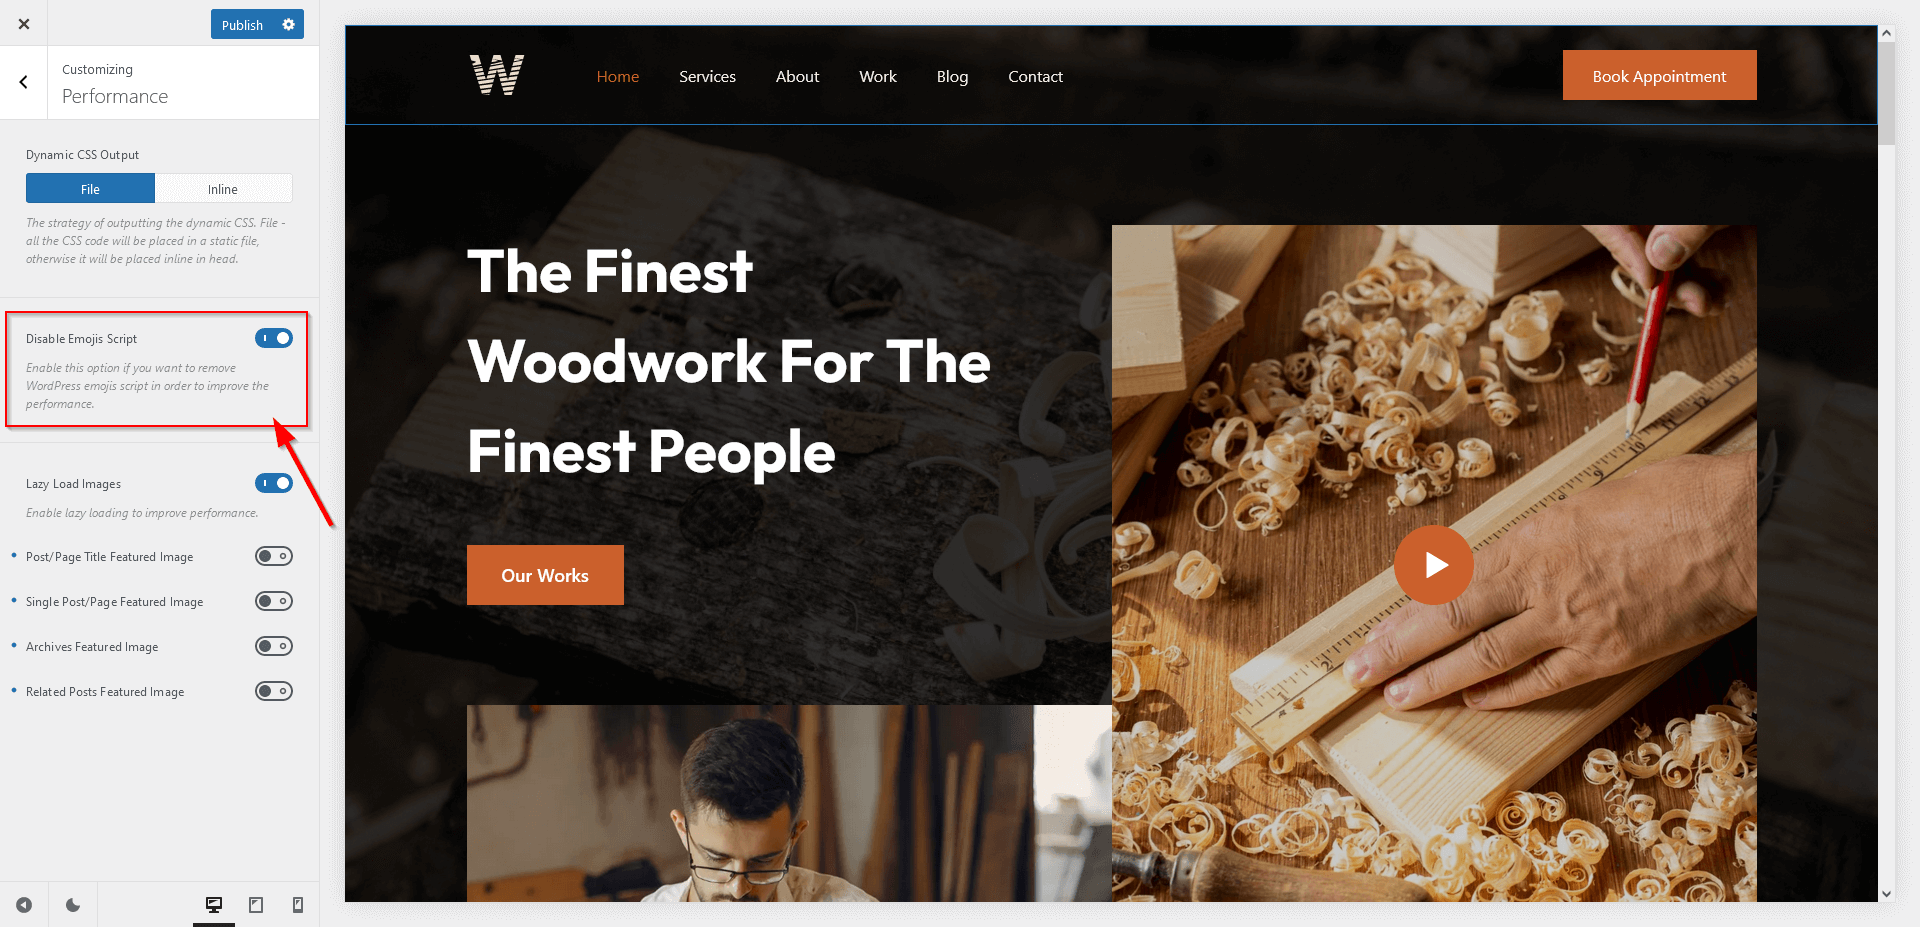
To remove even more unnecessary resources, also look out for theme-specific performance features, e.g. with Blocksy, you can remove the emoji script added by WordPress to each page (you can enable the option from the General Options > Performance panel in the Customizer):
1.3. Load Web Fonts Locally
Fonts can be one of the largest resources that the browser needs to download before it can start rendering the page. If they are hosted on a third-party server, the browser also needs to make external network requests.
For example, to download Google Fonts, it needs to connect to two external servers (https://fonts.gstatic.com for the font files and https://fonts.googleapis.com for the belonging CSS file) — which can also pose a privacy risk if you need to comply with data protection laws such as GDPR.
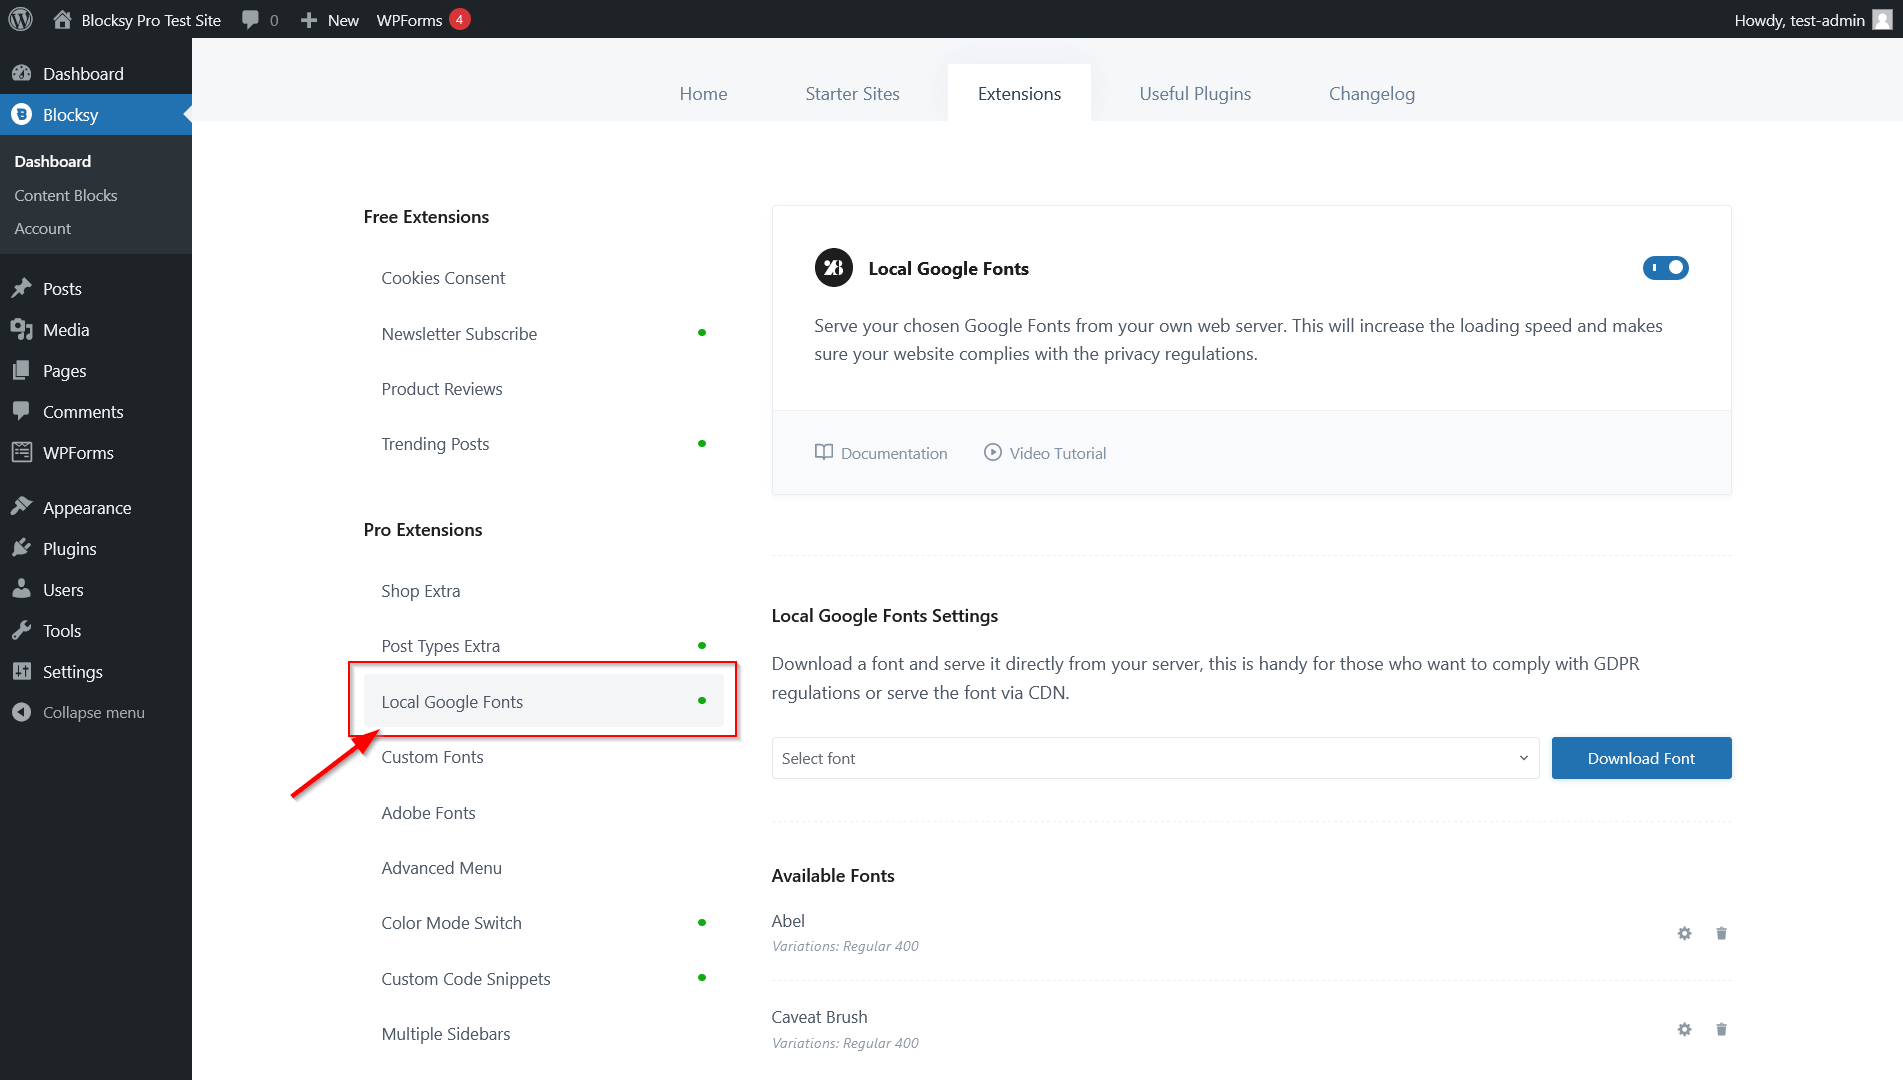
And while Google Fonts downloads the fonts from a globally distributed CDN, which is a performance benefit, you still need to make the external requests, which takes extra time. Overall, you can reduce input delay if you choose a WordPress theme that allows you to self-host Google Fonts from your own server (or CDN):
1.4. Enable GZIP or Brotli Compression
GZIP is a compression algorithm that reduces the sizes of your HTML, CSS, and JavaScript files so that your server can transfer them faster to the user’s browser.
Brotli is an alternative to GZIP. It uses a higher compression ratio, so your files will be smaller, however, it’s supported by (slightly) fewer browsers (see current browser support for GZIP vs Brotli).
There are two ways to add GZIP or Brotli compression to your WordPress site:
- You can install a caching plugin, such as WP Super Cache or W3 Total Cache, that includes this functionality.
- You can use a CDN (content delivery network) that adds either GZIP or Brotli compression to your website (e.g. Cloudflare uses Brotli). CDNs also come with other performance benefits because they cache your static content (images, scripts, and sometimes the entire HTML page) on a network of globally distributed servers so each user can be served from the closest location. You can add a CDN to your WordPress site:
- either by using a CDN plugin, such as the integration plugin of KeyCDN or Bunny CDN
- or signing up for a managed WordPress hosting service, most of which cache static content (sometimes the full page) to a CDN. For example, Kinsta and Rocket.net automatically integrate with Cloudflare’s CDN, which means that these hosts add Brotli compression to your WordPress site by default.
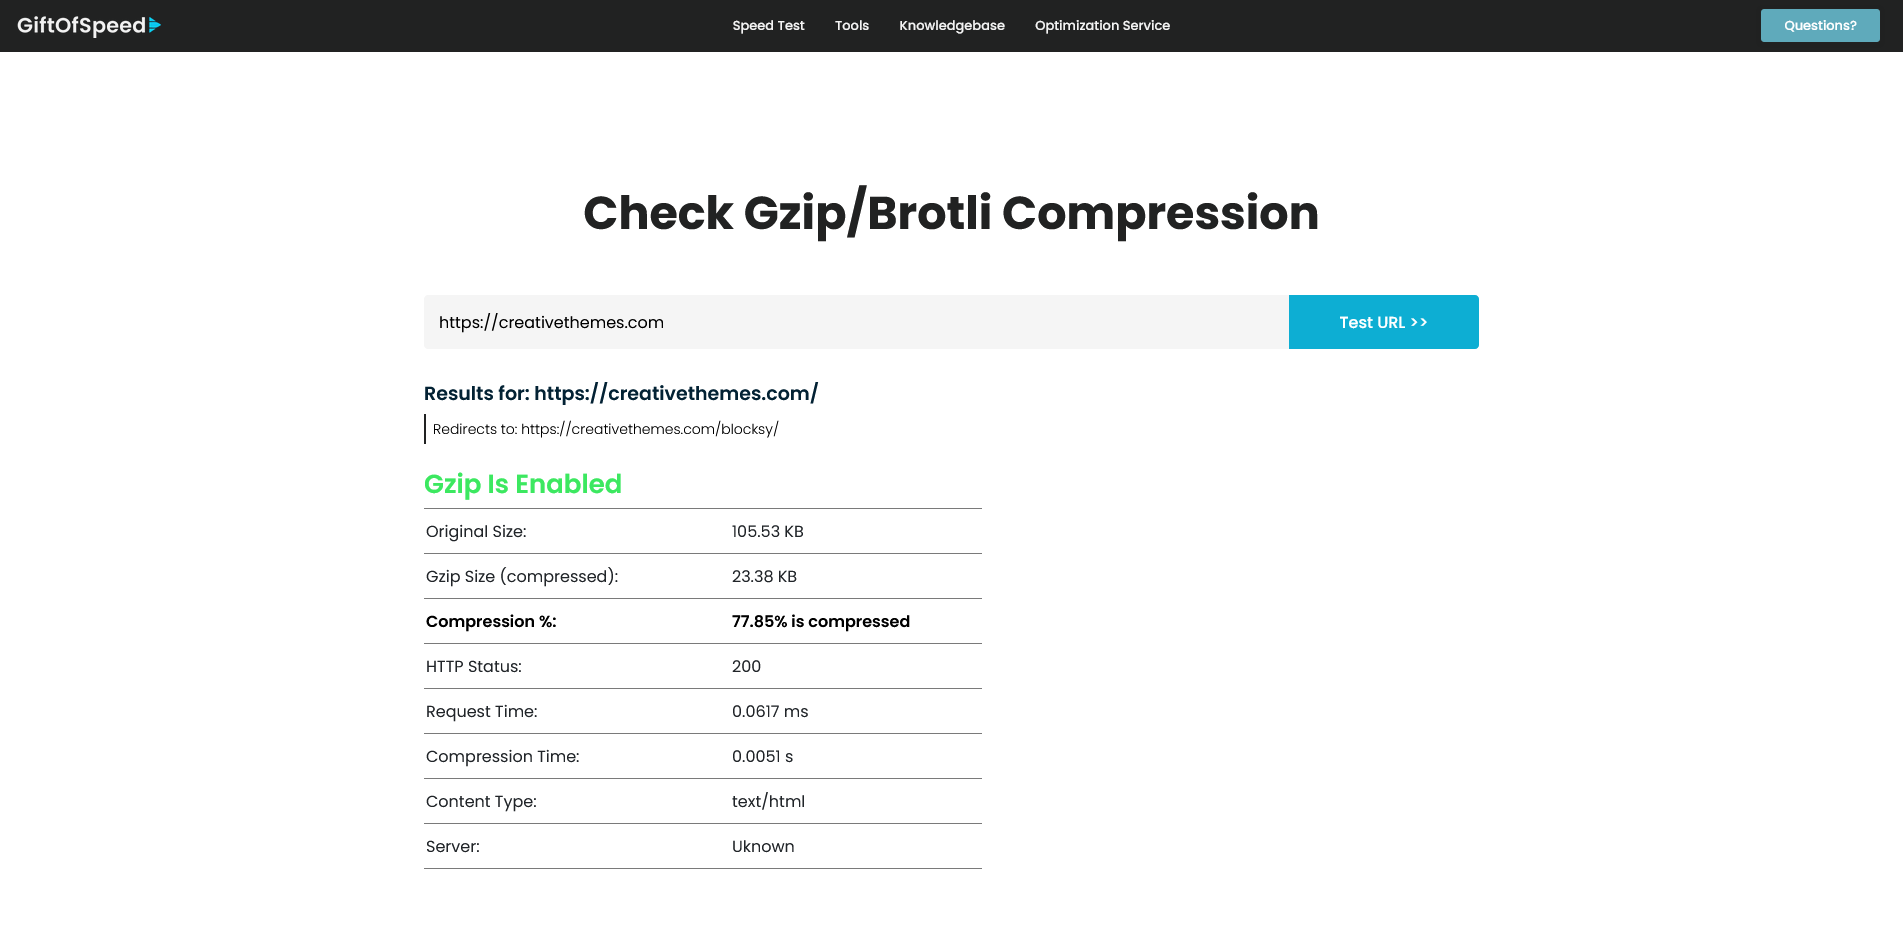
However, before doing anything, check if GZIP/Brotli compression is already enabled on your site (e.g. your host might have already added it) using a testing tool such as GiftOfSpeed’s GZIP/Brotli compression tester:
Phase 2: How to Speed Up Processing Time in WordPress
In WordPress, most (but not all*) interactions are processed on the server. Thus, to optimize the second phase of Interaction to Next Paint on your WordPress website, you’ll need to focus on server-side code.
* Some examples of interactions processed on the client (i.e. in the user’s browser) are JavaScript functionalities such as sliders, image lightboxes, etc.
2.1. Audit Your WordPress Plugins
As a rule of thumb for any WordPress performance optimization, you should use as few plugins as possible because:
- Each plugin adds its own performance overhead.
- There can be conflicts between your various plugins and/or between one or more plugins and your theme.
- Each plugin is coded by a different developer, which means that they are not necessarily of the same quality performance-wise.
To reduce processing time on your WordPress site, audit your plugins by answering the following questions, then remove the ones that you don’t need that much or that you can replace with your theme’s functionalities:
- Do you need them all? Do all of the plugins activated on your site add value to your users or you as the site owner?
- Do you have any deactivated plugins? If yes, consider removing them as they still add bloat to your database.
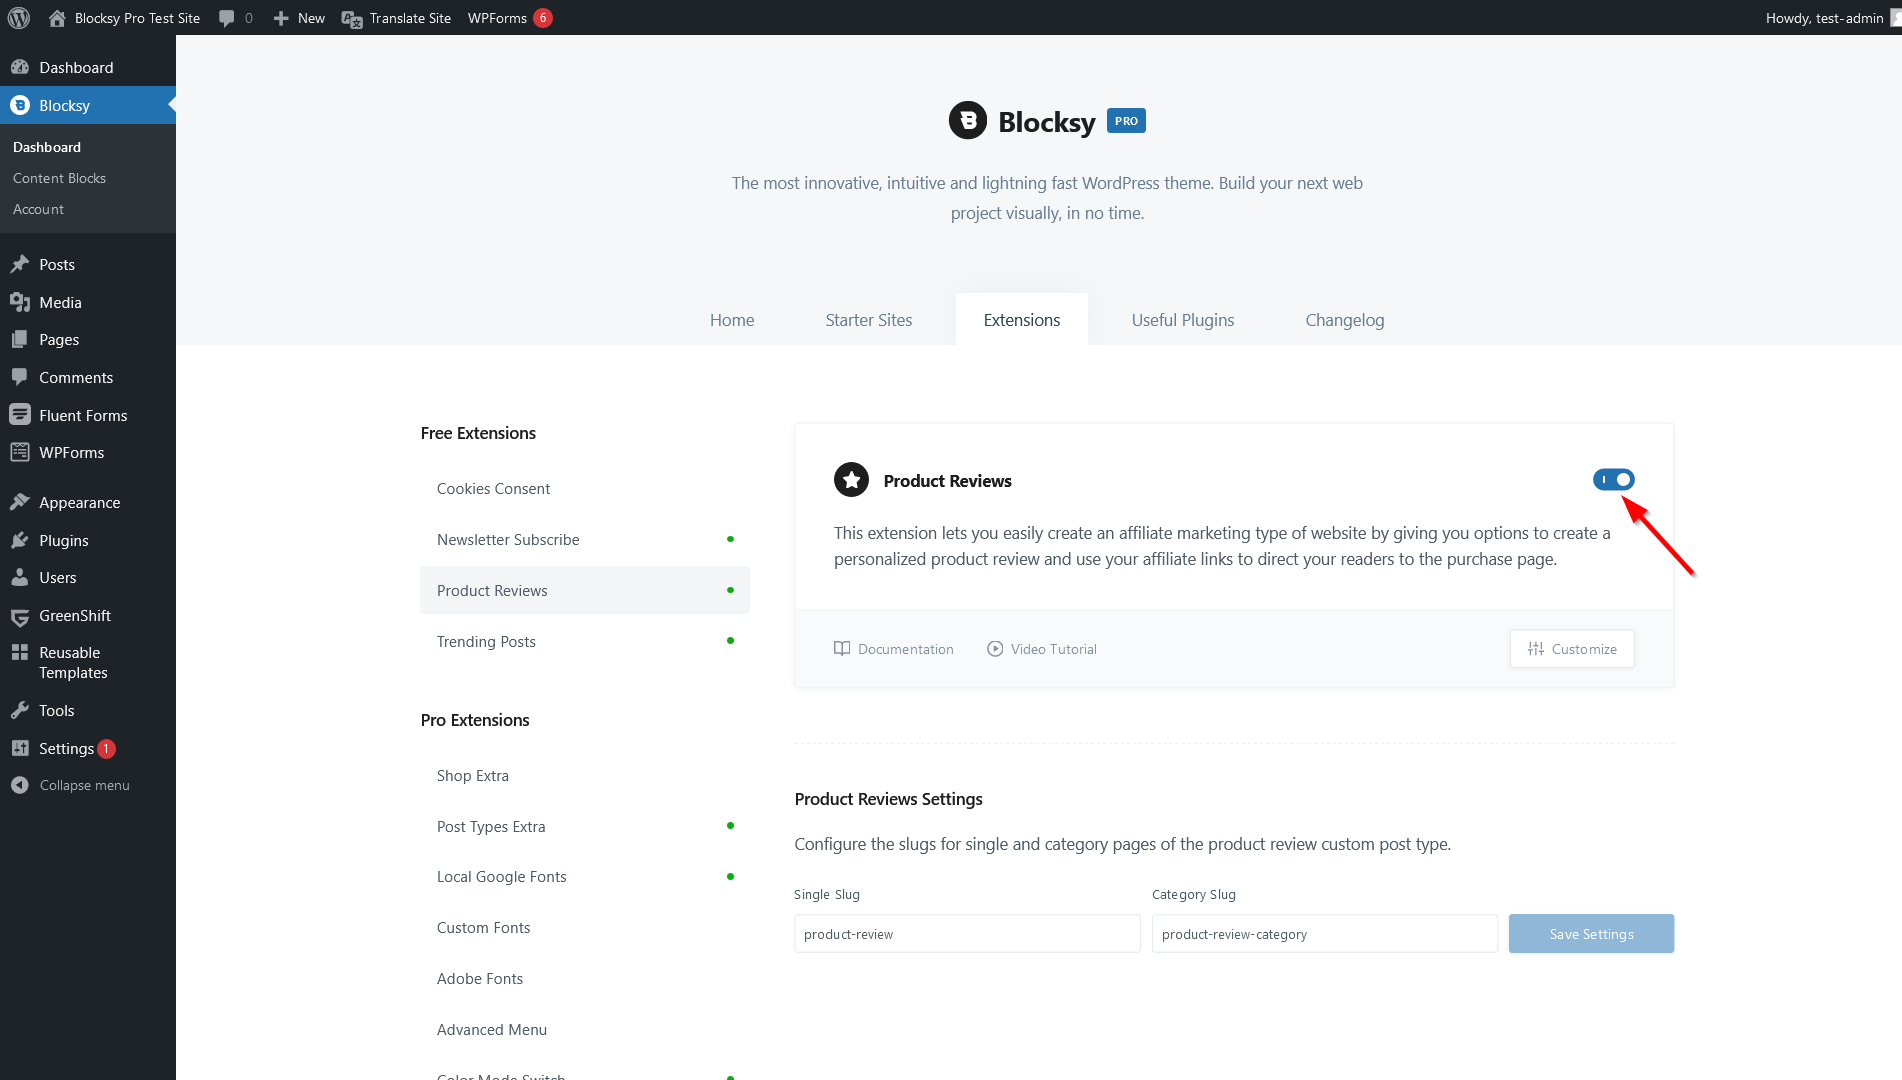
- Do they add any functionalities that your theme or web host also covers? For example, if you use Blocksy, you don’t need to install separate plugins for functionalities such as cookie consent and product reviews. Or, some managed WordPress hosts offer OS-level security and speed optimizations, in which case, you don’t need to install a security or caching plugin — some even outright ban their usage.
- Does your theme support the plugins you use? In most cases, it’s better to choose a plugin that your theme integrates with, as it can reduce overall processing time.
2.2. Use the Latest Versions of WordPress, PHP, and MySQL
To make processing time as short as possible, always keep your backend software up to date. On a WordPress site, this means:
- MySQL (or MariaDB, which is an open-source fork of MySQL) – The SQL database management software; you can update it from your hosting account (some WordPress hosts also offer automatic database updates).
- PHP – The programming language that runs the WordPress software; you can update it from your hosting account (some hosts update PHP automatically on the server).
- WordPress – The PHP framework and content management system that includes the admin area and is responsible for the core dynamic functionality of your website; you can either update it from the Dashboard > Updates menu in your WordPress admin area or enable automatic updates from the same page.
- Your WordPress theme and all of your plugins – Whenever a new update is available for them, it shows up on the Dashboard > Updates page where you can update them.
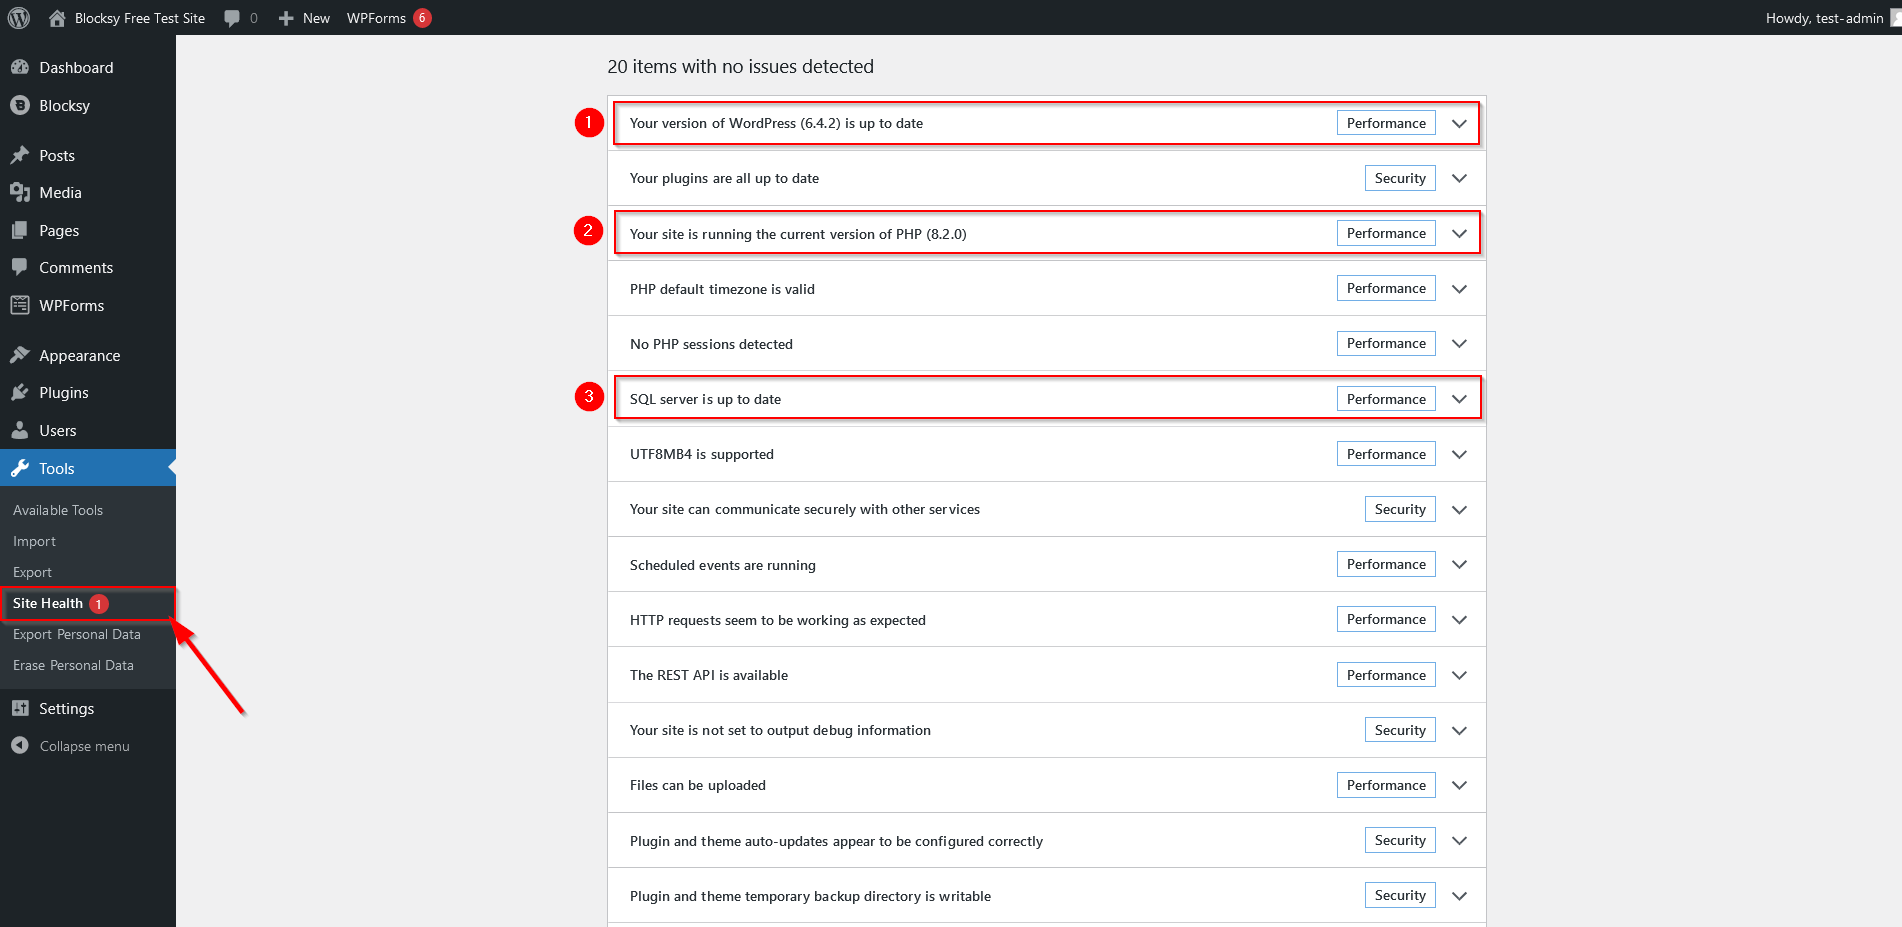
You can check the current status of your backend software from the Tools > Site Health menu in your WordPress admin area:
2.3. Optimize PHP Code
To reduce processing time on a WordPress site, make sure that your theme and plugins don’t only optimize frontend code (discussed in the ‘Don’t Load Anything That’s Not Needed on the Page’ section above), but also the backend PHP code that runs on your server.
There are various PHP optimization strategies, from code-level implementations to architectural decisions, but to really understand how well your theme and plugins are optimized on the backend, you’ll need to look into the code. Obviously, this is only an option for users with relevant programming knowledge, but there are still a few things you can look out for, such as:
- Do your theme and plugins implement a modular architecture? For example, can you turn off the features you don’t want to use?
- Do the developers focus on performance? For example, do they mention any PHP optimization techniques they use on their website/social channels?
- When was the backend code refactored most recently? This usually happens when a new major version is released.
Phase 3: How to Reduce Presentation Delay in WordPress
Reducing presentation delay is the last phase of optimizing Interaction to Next Paint — this is when the browser recalculates the layout to display the changes on the screen.
The most important task in this phase is to reduce the DOM size (in very layman’s terms, the number of content elements, such as text, images, sidebars, menu items, etc., on the page; DOM stands for Document Object Model).
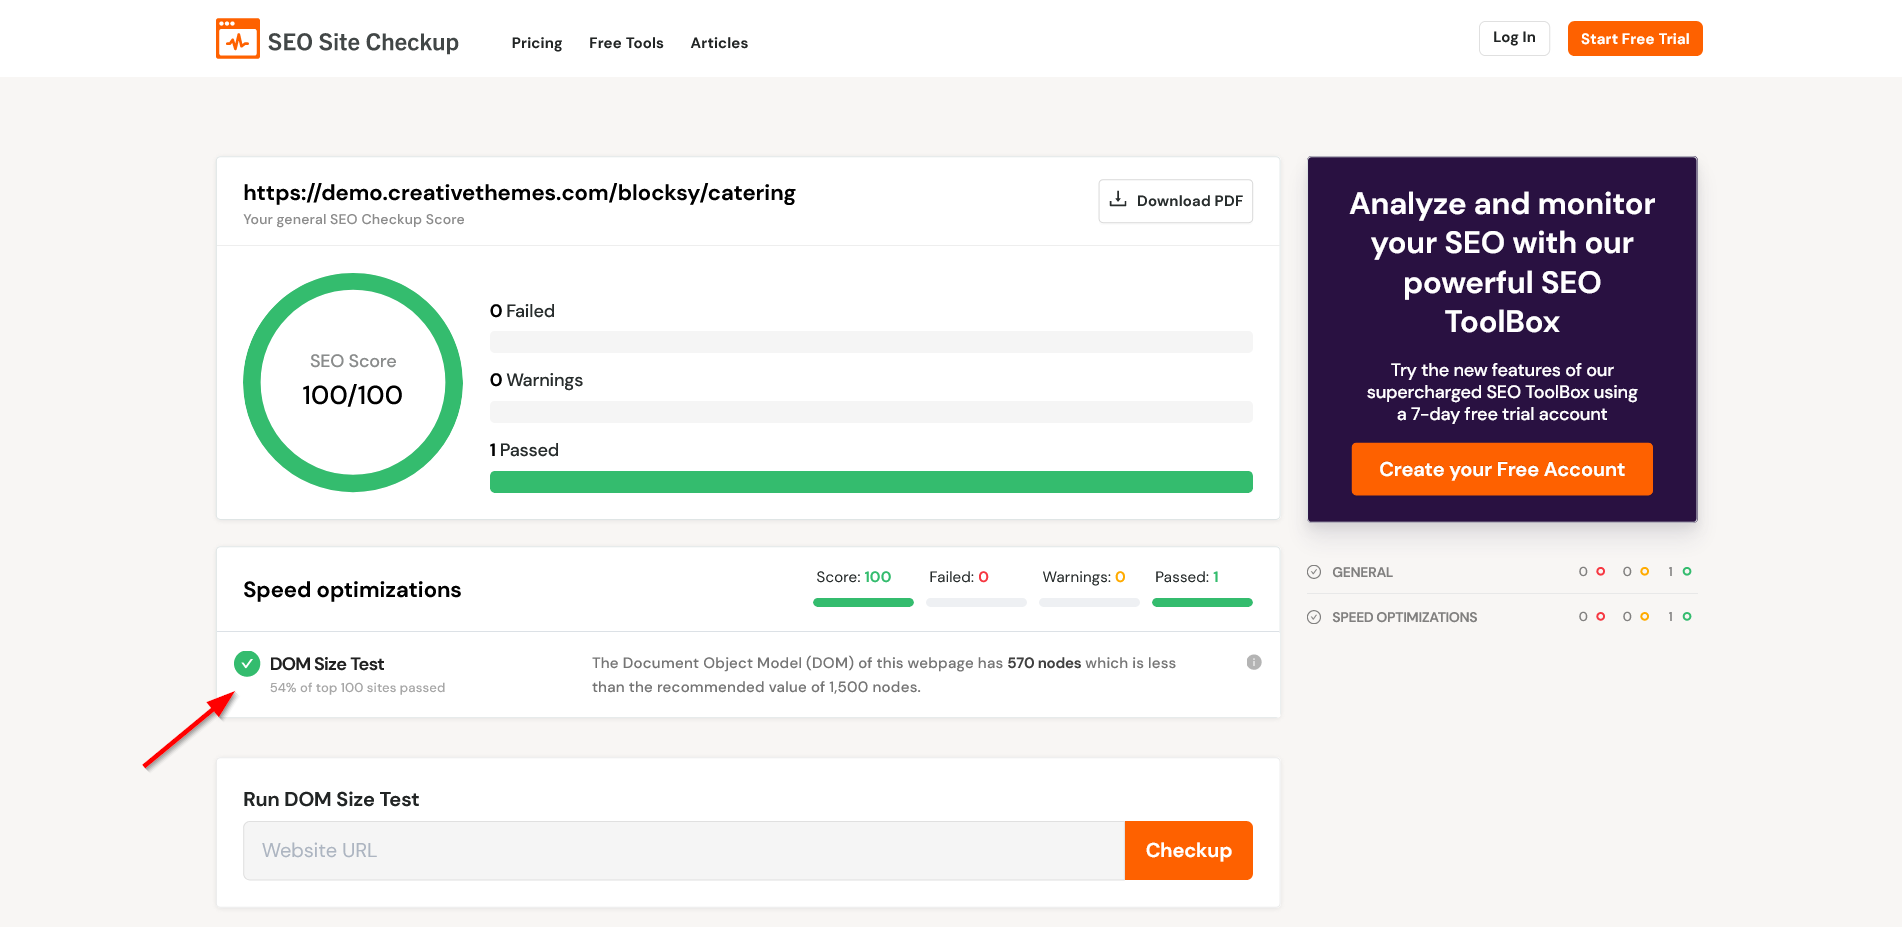
Below, we’ll see how you can do that on a WordPress site without having to write any code. Before getting started with optimizing your DOM size, you can also run a DOM size test (DOM size is checked on a page-by-page basis, so it’ll be different for every URL on your site):
3.1. Break Up Long Pages
To reduce the DOM size, make sure that your pages are not very long.
If it makes sense from a content perspective, break up your longer pages, such as landing pages or long articles, into multiple ones. It’s also a good idea to show fewer widgets and other complementary elements on longer pages.
3.2. Show Content Elements Conditionally
As sometimes it’s not feasible to break up long pages, you can also remove other elements, such as the sidebar or featured image, on a page-by-page basis.
While WordPress doesn’t include such functionality by default, you can use a theme or plugin that offers this feature.
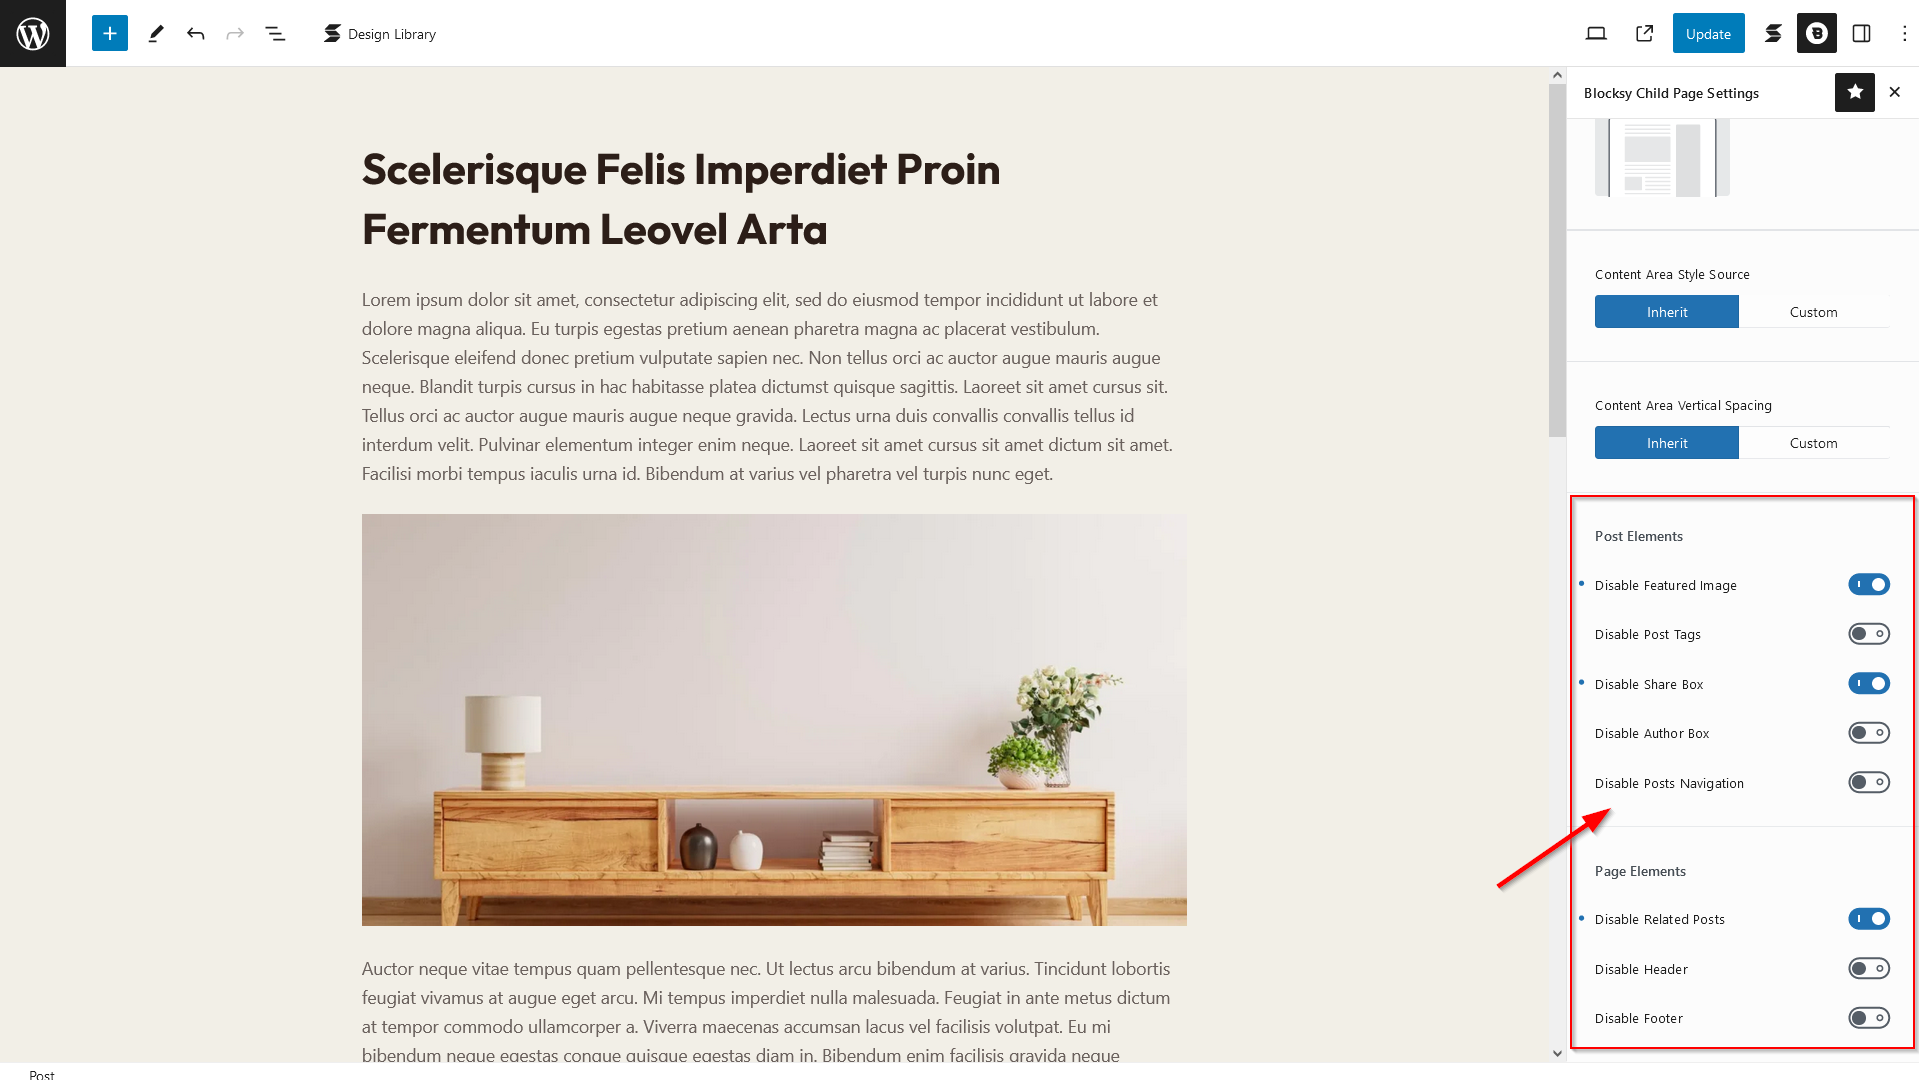
For example, Blocksy allows you to toggle multiple content elements (many of which consist of several DOM nodes) on and off, including the featured image, post tags, share box, related posts, etc., from the custom panel it adds to the post editor:
3.3. Avoid Using a Page Builder
While page builders enhance WordPress sites with tons of design and other features, on the other hand, they also add HTML bloat (i.e. extra DOM nodes) to your pages.
If you build your pages using the default block editor (a.k.a. Gutenberg) instead of a page builder, you can reduce the DOM size of your pages, which subsequently reduces the presentation delay and therefore Interaction to Next Paint. You can also use both on the same WordPress site, meaning that you can build some pages in Gutenberg and some pages in a page builder.
There’s also a difference between page builders performance-wise — see our recommendations in the Page Builders section.
3.4. Simplify Your Menu(s), especially on Mobile
While advanced mega menus can be beautiful if done well, they also increase the DOM size. Simplifying large menus reduces presentation delay, as the browser can re-render the page faster.
Since a large DOM size causes even more presentation delays on small-screen devices, it can also help to create more simplified menus for mobile.
Interaction to Next Paint (together with other Web Vitals) has a separate value for mobile, which will be a ranking factor in Google’s mobile search algorithm once INP becomes a stable Core Web Vital. In addition to optimizing your WordPress site for desktop INP, you also need to improve your mobile INP score (the passing and failing thresholds are the same for both segments: 200 and 500 ms).
You can either use a mobile menu plugin or choose a theme that allows you to create separate menus for desktop and mobile screens.
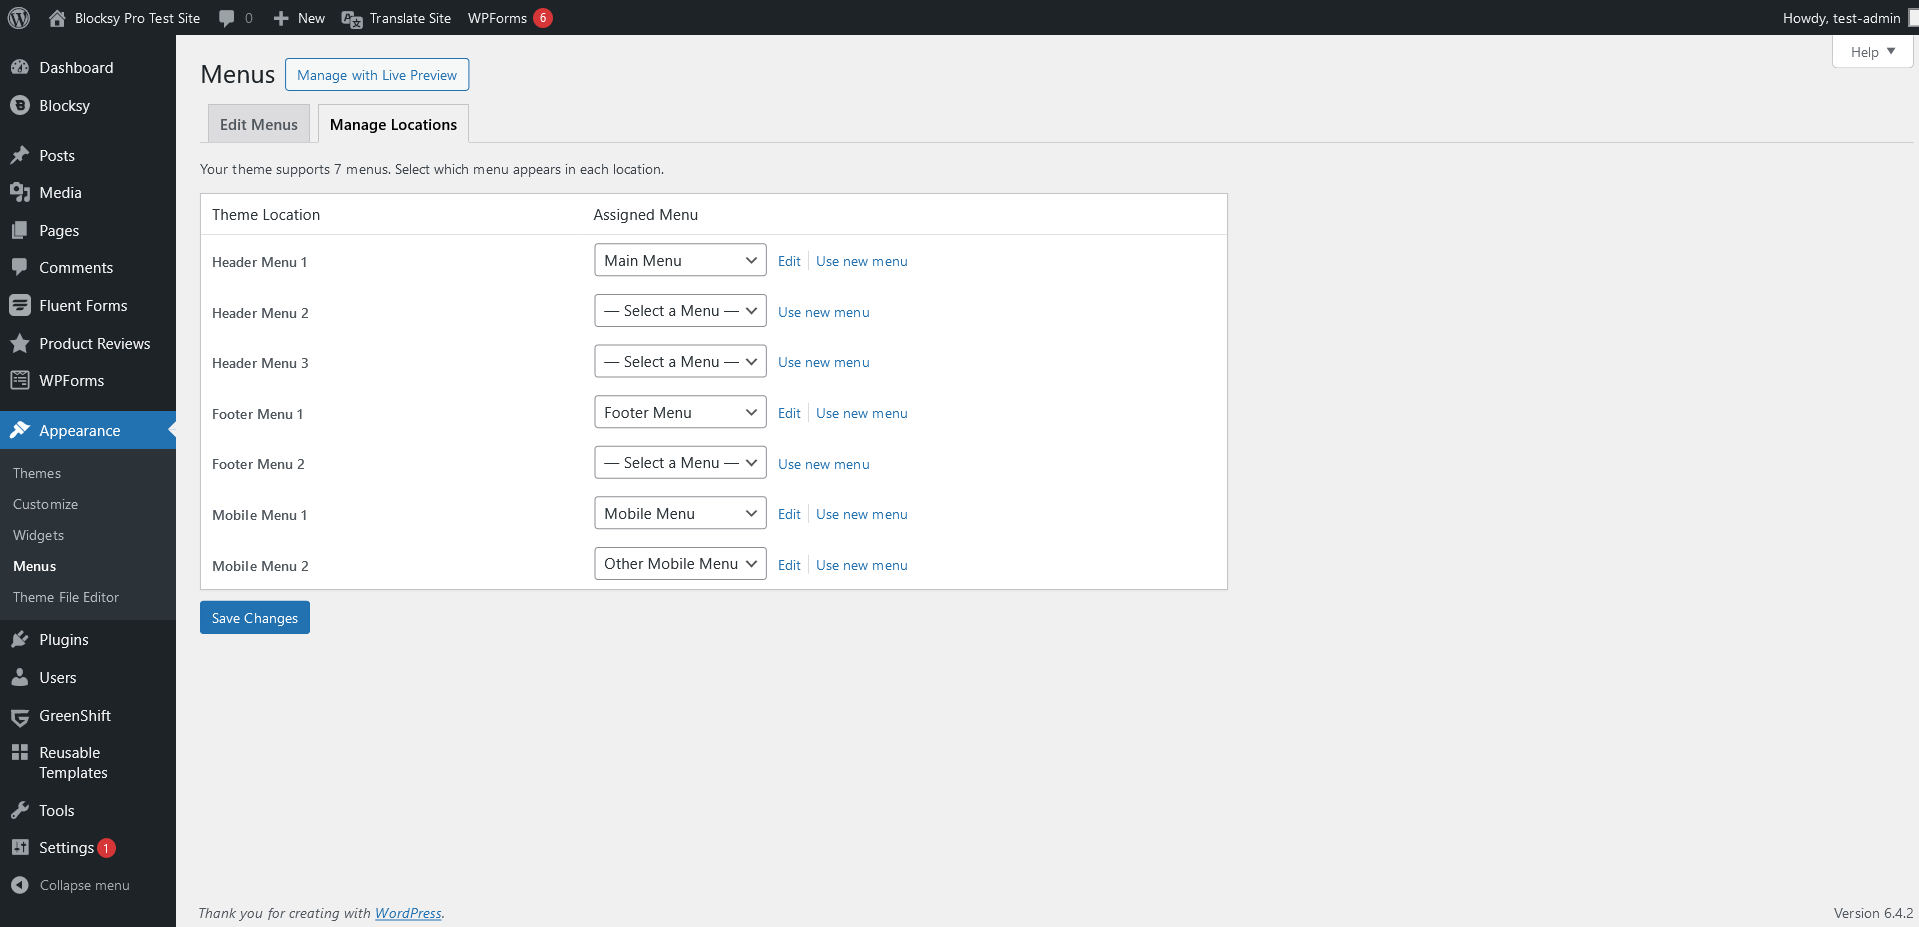
For example, our free Blocksy theme has four menu locations (including one mobile menu) and Blocksy Pro has seven menu locations (including two mobile menus) that you can easily add to your site using the responsive header and footer builders:
Troubleshooting: What to Do When INP Scores Don’t Improve
If your INP optimizations don’t yield the desired results, this troubleshooting guide can help you identify and resolve underlying issues. Below are some steps, tools, and a checklist to diagnose and fix common problems.
Use performance analysis tools to pinpoint bottlenecks:
- Chrome DevTools: Navigate to the “Performance” tab and record a session to identify delays in input processing and rendering.
- GTmetrix: Check the “Waterfall” tab to see which elements take the longest to load.
- WebPageTest: Provides a detailed breakdown of render-blocking resources and overall performance.
Use this checklist to address frequently overlooked issues:
| Issue | How to Identify | Solution |
|---|---|---|
| Uncompressed Assets | Large file sizes in Chrome DevTools or GTmetrix waterfall charts. | Enable GZIP or Brotli compression via your hosting provider, CDN, or caching plugin. |
| Outdated Themes/Plugins | Warnings or errors in the WordPress dashboard or Tools > Site Health. | Update WordPress core, themes, and plugins to the latest versions. |
| Excessive DOM Size | Large DOM tree warning in Chrome DevTools or performance tools. | Break up long pages, simplify menus, or conditionally load elements (e.g., sidebars). |
| Render-Blocking Resources | CSS and JavaScript flagged as render-blocking in GTmetrix or Lighthouse. | Use plugins like WP Rocket or Autoptimize to defer non-essential scripts and optimize CSS. |
| Large Fonts or Third-Party Fonts | Fonts highlighted in the “Resources” or “Font” section of Chrome DevTools. | Self-host Google Fonts or use a local font file. |
| Inefficient Plugins | High plugin load time in tools like Query Monitor or GTmetrix. | Audit your plugins and remove or replace resource-intensive ones with lighter alternatives. |
| Excessive HTTP Requests | Numerous network requests shown in Chrome DevTools. | Minify and combine CSS/JavaScript using a plugin like Autoptimize. |
| Heavy Images | Large image file sizes flagged in GTmetrix or Lighthouse. | Optimize images using tools like Smush or ShortPixel, and convert them to next-gen formats (WebP). |
| Server-Related Delays | Long Time to First Byte (TTFB) in performance tools or high server response time. | Switch to a faster hosting provider or upgrade to managed WordPress hosting. |
Tools and Plugins for Optimizing INP in WordPress
| Category | Tool | Key Features | Best For |
|---|---|---|---|
| Caching Plugins | WP Rocket | User-friendly interface, lazy loading, database optimization, GZIP compression | Beginners and advanced users |
| W3 Total Cache | Comprehensive caching options (object, browser, database caching) | Complex caching needs | |
| LiteSpeed Cache | Optimized for LiteSpeed servers, advanced caching, and optimization | LiteSpeed hosting users | |
| Content Delivery Networks (CDNs) | Cloudflare | Free CDN with Brotli compression, advanced optimization in paid tiers | General-purpose CDN needs |
| BunnyCDN | Cost-effective, pay-as-you-go pricing, fast global performance | Small to medium-sized websites | |
| KeyCDN | Simple setup, affordable pricing, reliable CDN services | Budget-conscious users | |
| Asset Optimization Plugins | Perfmatters | Disable unnecessary scripts, lightweight optimization tools | Fine-tuning script loading |
| Autoptimize | Combines, minifies, and caches CSS, JavaScript, and HTML | Basic optimization needs | |
| Asset CleanUp | Enables selective script and style loading on a per-page basis | Advanced control over resource loading | |
| Performance Monitoring | Google Lighthouse | Built-in tool in Chrome DevTools, evaluates Core Web Vitals, including INP | Free, detailed performance insights |
| GTmetrix | Provides actionable recommendations, performance tracking | Visual and user-friendly reporting | |
| Pingdom Tools | Monitors uptime and page speed with detailed reports | Real-time monitoring and alerts | |
| Image Optimization | Smush | Compresses and resizes images, bulk optimization | Beginners, free with basic features |
| ShortPixel | Lossy and lossless compression, WebP conversion | Flexible image optimization needs | |
| Imagify | Automated compression and resizing, supports WebP | Hands-off image optimization | |
| Complete Optimization Suites | NitroPack | All-in-one solution with CDN, caching, image optimization, and lazy loading | Comprehensive, hassle-free optimization |
| Swift Performance | Advanced caching, database optimization, and plugin management | High-performance websites |
Summary: Optimizing Interaction to Next Paint in WordPress
Interaction to Next Paint is soon to replace First Input Delay in Google’s Core Web Vitals and become a stable metric, which means it will impact your SEO results.
Optimizing Interaction to Next Paint in WordPress is not an easy task partly because there’s still not much knowledge and experience on the subject and partly because you need to focus on many things.
In this article, we looked into some hands-on tips that can help you better Interaction to Next Paint on your WordPress site.
There are a couple of ways of getting started with optimizing Interaction to Next Paint, for example you can:
- start with the first phase and focus on reducing input delay
- implement one tip from each phase
- start with the tip that’s the easiest to implement
- etc.
In addition to Interaction to Next Paint, the recommendations discussed in this article can also improve other web performance metrics and will improve your overall site health.
To learn more about Core Web Vitals and WordPress, also check out my article about how to improve Largest Contentful Paint on a WordPress site and our guide on how to build sticky headers in WordPress which can improve INP as well.
