

The White Label extension allows you to rebrand the Blocksy theme with your own identity – perfect for agencies and freelancers who build websites for clients. Replace the theme’s name, description, screenshots, and icons with your own branding, giving your clients a seamless, professional experience.
Beyond customisation, this extension also lets you restrict access to sensitive areas of the theme. You can hide licensing information, prevent access to Starter Sites and Extensions, and remove documentation links – ensuring your clients see only what’s relevant to them.
Activating the Extension
To enable the White Label extension, follow these steps:
- Open your WordPress Dashboard.
- Click Blocksy in the sidebar.
- Go to the Extensions tab.
- Locate the White Label extension.
- Toggle it on.
Once activated, the configuration panel will appear automatically, presenting all available options for customising the extension.

Granular Controls
General Options

Agency Details
Enter your agency’s information, including your name and URL. These details will replace Blocksy’s default author information throughout the theme.
Theme Details
Rebrand the main Blocksy theme with your own identity. You can replace the following:
- Theme name
- Description
- Screenshot
- Theme icon
- Gutenberg editor options pane icon
Companion Plugin Details
Apply your branding to the Blocksy Companion Pro plugin by customising its:
- Plugin name
- Description
- Thumbnail
Advanced Options

The Advanced pane provides granular control over which sections are visible in the theme dashboard. Each option can be toggled independently to suit your client’s needs.
- Account Menu Item – Hides the Account menu entry from the dashboard, preventing users from viewing licensing details.
- Starter Sites Tab – Hides the Starter Sites tab, preventing users from importing pre-built templates.
- Useful Plugins Tab – Hides the Useful Plugins tab, preventing users from installing partner plugins. Note: this does not restrict access to plugins from the WordPress repository.
- Changelog Tab – Hides the Changelog tab, preventing users from viewing theme update history.
- Extension Documentation Link – Hides the Documentation link displayed next to each extension.
- Extension Video Link – Hides the Video Tutorial link displayed next to each extension or module.
- Support Section – Hides the Need support? section from the dashboard. Alternatively, you can keep it visible and configure it with your own contact details, allowing clients to reach you directly.
- Knowledge Base Section – Hides the main Documentation section. Alternatively, configure it with your own URL to direct users to your knowledge base.
- Video Tutorials Section – Hides the main Video Tutorials section. Alternatively, configure it with your own URL to showcase your video content.
- Facebook Section – Hides the Facebook Community section. Alternatively, configure it with your own community link.
- White Label Extension – Hides the White Label extension itself, preventing other administrators from modifying your branding settings.
Important Notice
The White Label extension does not alter the theme’s folder structure or hide Blocksy references in the code, as doing so would break automatic updates. If you require this level of concealment, we recommend using a third-party plugin such as WP Hide & Security Enhancer.
Restoring the White Label Extension
If you’ve hidden the White Label extension and need to restore access, simply Shift + click on the Dashboard Title in the Blocksy admin area.
Hide the White Label Extension using Code
In some cases, the Shift + click method may not provide sufficient protection for your white label setup. For these situations, you can add a flag to your wp-config.php file that completely locks the White Label manager UI.
Add the following line to your wp-config.php:
define('BLOCKSY_WHITE_LABEL_LOCKED', true);As long as this flag is present, the White Label configuration panel will remain hidden regardless of any keyboard shortcuts.
Hiding License Information
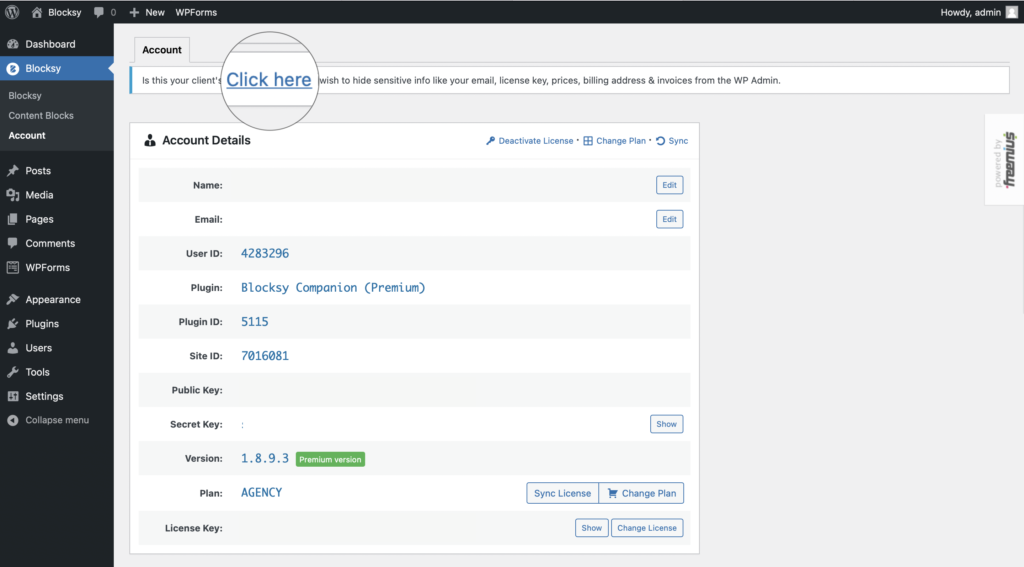
Available on all Blocksy Pro plans, this feature allows you to hide licence information from your WordPress Dashboard without hiding the entire Account section. Simply click the option when prompted inside the Account section of your Blocksy Dashboard.
This is useful when you want clients to access account features whilst keeping your licensing details private.
White Labelling the Child Theme
To apply your branding to a Blocksy child theme, you’ll need to edit the theme’s stylesheet directly:
- Navigate to WordPress Dashboard → Appearance → Theme Editor.
- Select your child theme from the dropdown.
- Open the style.css file.
- Update the theme header with your preferred name, description, and author details.
- Click the Update File button to save your changes.
To change the child theme’s screenshot, replace the file located at wp-content/themes/blocksy-child/screenshot.jpg with your own image. If no custom screenshot is provided, the child theme will inherit Blocksy’s default screenshot.
Customise the White Label Info using Code
For advanced control, you can define all white label settings programmatically using a filter. This approach is useful for maintaining consistent branding across multiple installations or for locking specific values.
add_filter('blocksy:ext:white-label:settings', function ($settings) {
	/*
	[
		'locked' => false,
		'hide_demos' => false,
		'hide_billing_account' => false,

		'hide_plugins_tab' => false,
		'hide_changelogs_tab' => false,
		'hide_support_section' => false,
		'hide_beta_updates' => false,
        'hide_docs_section' => false,
	    'hide_video_section' => false,

		'author' => [
			'name' => '',
			'url' => '',
			'support' => ''
		],

		'theme' => [
			'name' => '',
			'description' => '',
			'screenshot' => '',
			'icon' => '',
			'gutenberg_icon' => ''
		],

		'plugin' => [
			'name' => '',
			'description' => '',
			'thumbnail' => ''
		]
	]
	 */

	$settings['theme']['name'] = 'My Theme';

	return $settings;
});
This filter gives you complete control over agency details, theme branding, plugin branding, and visibility options — all defined in code.